EasyManua.ls Logo

Linksys PLE400

Linksys PLE400
24 pages
To Next Page IconTo Next Page
Loading...
Setting up a wireless network with the
PLWK400
Powerline networking is a way to extend your network using the electrical outlets in your
house. This works by adding a powerline adapter to your network. Setting up a powerline
network requires a set of powerline adapters plugged into each electrical outlet where the
network extension is needed.
The Linksys PLWK400 consists of the PLE400 Powerline 1-port Fast Ethernet and PLW400
Powerline AV Wireless Network Extender that lets you easily set up a powerline network in
your home. This article will guide you on how to create a network using your powerline
adapters.
IMPORTANT: To set up your powerline network, you should:
Make sure you already have Internet access and a working home network.
Make sure that the wireless devices that you want to connect to the PLW400 have a
working wireless feature. An easy way to test this is to first try to connect it to your wireless
router.
Basic powerline network
Creating a basic powerline network is now made possible using your plug and play powerline
adapters. This setup assumes that all the devices are located on the same floor of your house and
that you have an active Internet connection.
QUICK TIP: PLW400 is a wireless powerline adapter that will allow you to connect wireless
computers and devices to your existing powerline network.
Question and Answer IconNeed help?

Do you have a question about the Linksys PLE400 and is the answer not in the manual?

Linksys PLE400 Specifications

General IconGeneral
BrandLinksys
ModelPLE400
CategoryHome Automation
LanguageEnglish

Summary

Setting Up a Wireless Network

Prerequisites for Setup

Ensure Internet access, a working home network, and functional wireless features on devices.

Step-by-Step Powerline Network Setup

Step 1: Connect PLE400 Adapter

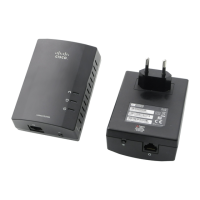
Plug the PLE400 into a power outlet and check its Power and Powerline LEDs.

Step 2: Connect PLE400 to Router

Connect the PLE400 to your router using an Ethernet cable.

Step 3: Connect PLW400 Adapter

Plug the PLW400 into a power outlet and check its Power and Powerline LEDs.

Step 4: Verify Powerline Connection

Confirm that the Powerline LEDs on both adapters are lit.

Completing Setup and FAQs Overview

Step 5: Wireless Connection Setup

Connect the PLW400 wirelessly to your router for extended network coverage.

Step 6: Connect Wireless Devices

Connect your wireless devices to the PLW400 for network access.

PLW400 Hardware and Troubleshooting Details

Troubleshooting Connection Problems

Steps to resolve issues like no LEDs, Ethernet LED off, or no network connection.

PLW400 Troubleshooting and Connection Steps

Connecting the PLW400

Step-by-step guide to connect the PLW400 using Wi-Fi Protected Setup (WPS).

Troubleshooting: No LEDs Turned On

Steps to resolve issues when no LEDs are active after installing the adapter.

PLW400 Troubleshooting: Connectivity and LEDs

Troubleshooting: Ethernet LED Off

Steps to resolve issues when the Ethernet LED does not turn on.

Troubleshooting: Network Connectivity Issues

Steps to resolve problems connecting to the local network or the Internet.

PLW400 LED Status, Firmware, and Features

Installing the PLW400 Adapter

Installation Using Wi-Fi Protected Setup (WPS)

Recommended method if your network has security or WPS feature enabled.

Step 1: Connect PLW400 Near Router (WPS)

Connect the PLW400 to a power outlet close to the wireless router.

PLW400 WPS Installation: Power Check

PLW400 WPS Installation: Activating WPS

Step 2: Activate WPS on PLW400

Press and hold the WPS button on the PLW400 until its WPS LED flashes.

Step 3: Activate WPS on Router

Press the WPS button on your wireless router within two minutes to establish connection.

PLW400 WPS Installation: Finalizing Connection

Step 4: Move PLW400 to Target Location

Move the PLW400 to the desired location for wireless device connectivity.

Step 5: Connect Wireless Devices

Connect wireless devices to the PLW400's network.

PLW400 Advanced Security Setup

Step 1: Set Network Password

Press and hold HomePlug Simple Connect until Powerline LED flashes slowly to create a network key.

Step 2: Share Network Key

On other adapters, press HomePlug Simple Connect until the LED stops flashing to share the key.

Linksys Powerline AV Utility: Configuration

Powerline AV2 Utility and Troubleshooting

Troubleshooting Powerline Network Detection

Tips for troubleshooting if a Powerline adapter is not detected in the network.

Check the LEDs

LEDs are primary indicators of adapter functionality and power supply.

Reset the Powerline Adapter

Procedure to reset the Powerline adapter to factory defaults.

Powerline Adapter Troubleshooting Procedures

Resetting the Powerline Adapter

Press and hold the Standby/Reset button for 10 seconds to reset the adapter.

Powerline Security and Adding Devices

Related product manuals