4
5
Remote control:
Connection: Bluetooth ver. 4.2
Battery time: Up to 100 000 clicks
Charging time: Approx. 2h
Input, charging: 5 V/1 A (USB-C port)
Remote distance: Approx. 10 m
Wireless frequency: 2402–2480 MHz
Effective radiated power: 20 mW (max.)
Included: Sele stick with gimbal, manual
Use
Remote control
The remote control is attached to the sele stick. Pull the remote control outwards to
detach it from the sele stick. Put it back on by pressing it to the sele stick.
Note! Some functions on the remote control, such as the phone holder rotation and the
spinning sequence effect, require the remote to have a wireless connection to the sele
stick. This wireless pairing is made at the factory, but should the connection be lost
during use see the section "Pairing the remote and gimbal stabilizer".
Charging
Detach the remote control from the sele stick. Connect a
USB-C cable (sold separately) between the remote control’s
USB-C charging port and a USB power adapter (sold
separately). The remote control LED indicator lights up red
during charging, and turns off when the remote control is fully
charged.
The LED indicator ashes red during use if the battery power is low.
Bluetooth pairing
Connect the remote control to your smart device using Bluetooth. Make sure the remote
control is turned off. Turn on the remote control by holding the power button for 3 sec-
onds until the remote control LED indicator starts ashing. Open the Bluetooth settings
on your smart device. Look for "Linocell BTC14" and connect. The remote control LED
indicator lights up green and stays lit when the pairing is successful.
ENGLISH
The buttons
Press and hold the on/off button to turn the remote on/off.
Gimbal stabilizer and sele stick
The gimbal stabilizer helps to hold your smart device leveled and steady, as well as
reduce vibrations, during lming.
Note! If the gimbal stabilizer runs out of battery, the phone holder can be locked in place
to let you to use the product as a regular sele stick. See the section "Using the sele
stick without the gimbal stabilizer".
Press the shutter button to take a photo, or start/end a video recording.
Press the rotation button once to change the phone holder
orientation to portrait or landscape mode.
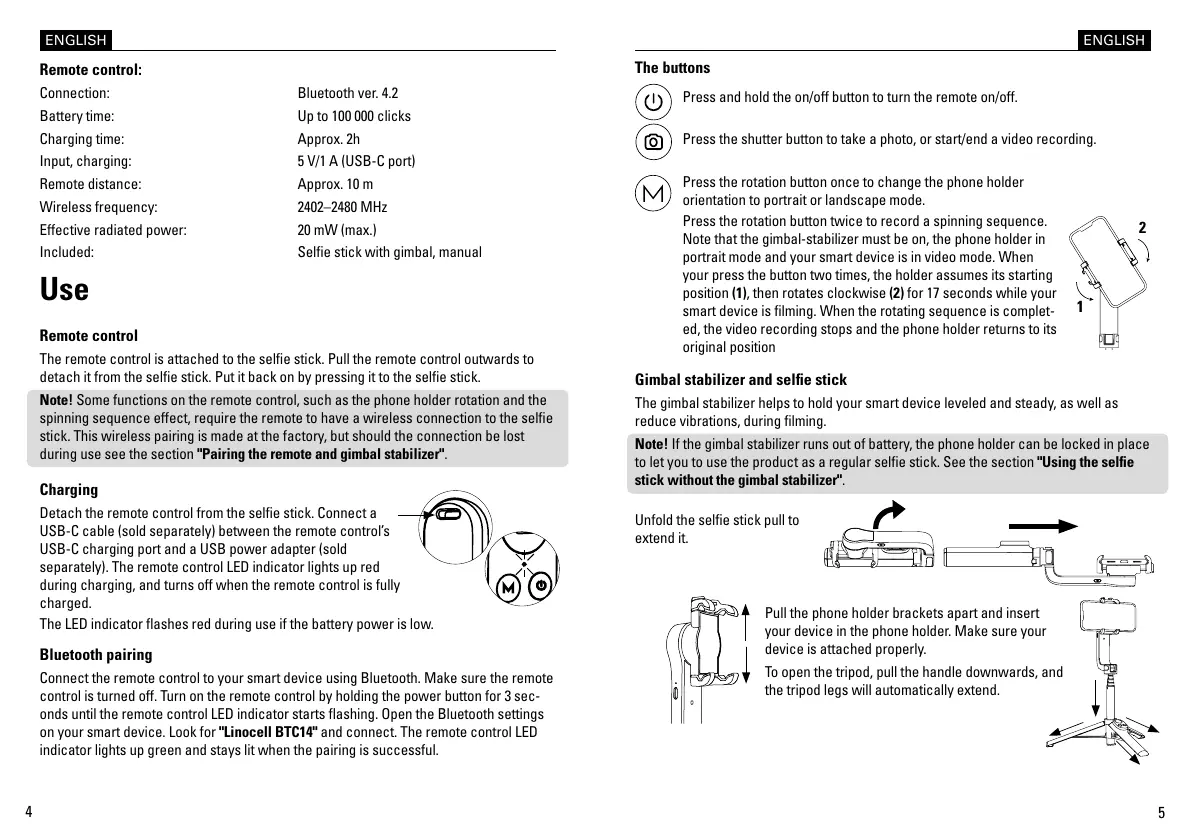
Press the rotation button twice to record a spinning sequence.
Note that the gimbal-stabilizer must be on, the phone holder in
portrait mode and your smart device is in video mode. When
your press the button two times, the holder assumes its starting
position (1), then rotates clockwise (2) for 17 seconds while your
smart device is lming. When the rotating sequence is complet-
ed, the video recording stops and the phone holder returns to its
original position
1
2
Unfold the sele stick pull to
extend it.
Pull the phone holder brackets apart and insert
your device in the phone holder. Make sure your
device is attached properly.
To open the tripod, pull the handle downwards, and
the tripod legs will automatically extend.
ENGLISH
 Loading...