Miller Manufacturing, Glencoe, MN 55336 USA •www.miller-mfg.com
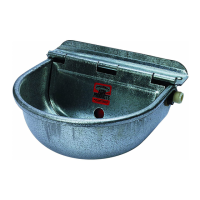
Item # 88SW/88ESW
Automatic Waterer
• Useforhorses,cattle,dogs,andother
animals.Notrainingrequired.
• Easycleaningbowlformedfrom
heavygaugegalvanizedsteel.
• Adjustableoatcontroltomaintaina
constantwaterlevel.
• Watersupplyvia1/2”maleNPT
connectionat20-50psi.
• Availableinuncoatednish(88SW)
andepoxycoated(88ESW).
7.Wrapallsupplylinepipethreadconnections(includingthethreadsonthe
valve)withTeon
®
threadsealingtapeandconnectthewatersupplytothe
oatassembly.DONOTovertightenanyttingorsupplylineconnection.
8.Checktomakesurethewatererllsandshutsoproperly.
9.Thewaterlevelispresetatthefactory;however,minoradjustmentscanbe
madetoincreaseordecreasethewaterlevelinthewatererifdesired.
Toadjustthewaterlevel,removeoatarmassemblybypullingoutthe
connectingpin,loosentheoatmountingscrewandnutwithascrewdriver,
thenrotatetheoatarmupordowntoachievedesiredwaterlevel.Make
sureyouretightenthemountingscrewandnutsecurely.
CAUTION:Rotatingthearmtoofaruporfailingtosecuretheoatmount-
ingscrewandnutmaypreventthewatererfromstoppingthewatersupply
owandruncontinuously.
Note:Thewatererisshippedwiththeoatassemblyinstalledontherightside
ofthewatererbowl.Theoatassemblycanbeinstalledoneithersideofthe
waterertobestsuityourapplication.Carefullyremovethesquareplasticplug
andthemountingnutandbrewasherfromtheoatassembly.Reinstallthe
oatassemblyontheleftsideandthesquareplasticplugontherightsideofthe
watererbeforeproceeding.
1.Mountthewaterertoaatrigidsurfacelikeastall,fence,orpostwiththe
mountingsurface(back)ofthewatererbowlasvertical/plumaspossible.For
additionalprotectionagainstdamagefromanimals,mountthewaterernear
aninsidecornerifpossible.
Note:Thewaterermustbeproperlymountedtoaverticalsurface.Thewaterer
willnotworkproperlylayingontheground.
2.Removetheoatpinandoat/arm
assemblyfromthewaterertogainaccess
tothemountingholes(seeFigure1).
3.Usethewaterbowltomeasureandmark
themountingholesatthedesiredmount-
inglocation.
4.Drillaholeineachofthetwo(2)marked
locations.
a.Ifmountingthewatererwith3/8”lag
screws,usea1/4”dia.drill.
b.Ifmountingthewatererwith
3/8-16throughbolts,usea13/32”dia.
drill.
5.Installthewatererasshown(seeFigure2or3).
Note:Alwaysusethemountingplateprovided.
6.Tightenthelagscrewsorthroughboltssecurelyandreinstalltheoat/arm
assemblyandpin.
•1WatererBowlAssembly
•1FloatAssembly
•1MountingPlate
•2NeopreneWashers
•1SquarePlasticPlug
(alreadyassembled)
•Drill
•1/4”or13/32”dia.DrillBit
•RatchetWrench
•3”Extension
•9/16”HexSocket
•9/16”HexWrench(whenusing
throughbolts)
Contains:
Tools Required:
Features:
Replacement Parts*
Mounting Instructions:
FLOAT
SW23*
SEAL
SW8* (2)
VALVE KIT
SW24KIT*
NEOPRENE
WASHER
SW11* (2)
PLUG
SW19*
MOUNTING
PLATE
SW9*
WATERER
ASSEMBLY
VALVE
SW20*
WASHER
FIBRE
SW10*
LOCK NUT
SW14*
SW25CKIT*
FLOAT KIT
*Only items with part numbers
are available for replacement.
NEOPRENE
WASHER (2)
MOUNTING
PLATE
WATERER
ASSEMBLY
3/8" FLAT
WASHER (2)
3/8" LAG
SCREW (2)
VALVE
3/8" FLAT
WASHER (2)
NEOPRENE
WASHER (2)
MOUNTING
PLATE
WATERER
ASSEMBLY
3/8-16
THROUGH
BOLTS (2)
THROUGH
MOUNTING
SURFACE
3/8"
FLAT
WASHER
(2)
3/8-16
HEX
NUT (2)
VALVE
Figure 2 Figure 3
Installing with Lag Screws
(1-5/8” min. surface thickness):
•2LagScrews(3/8”)
•2FlatWashers(3/8”)
Installing with Through Bolts:
•2Bolts(3/8-16)
•4FlatWashers(3/8”)
•2HexNuts(3/8-16)
1/2” Flex Hose Water Supply:
•Noadditionalitemsrequired
1/2” Pipe Water Supply:
•1GalvanizedUnion(1/2”NPT)
3/4” Pipe Water Supply:
•1GalvanizedReducingCoupling
(3/4”NPTto1/2”NPT)
Garden Hose Water Supply:
•1GardenHoseThreadAdapter(1/2”
•FemaleNPT)(FW1608).
•1HoseWasher(T828)
•LightGaugeWireMesh
(toprotecthosefromlivestock).
Note:DONOTwrapgardenhosewith
heattapeassofteningandleaksmay
develop.
Additional Items Required (not included):
Note:Abackowpreventiondevicemayberequired.Checklocalplumbing
codesorcontactalocallicensedplumberforadditionalinformation.
WATERER
ASSEMBLY
FLOAT ARM
ASSEMBLY
FLOAT
PIN
Figure 1
OPERATING TIPS:
Ifthewaterowdoesnotstop…
1.Makesurewatersupplypressureisbelow50psi.
2.Makesureoatarmmovesupanddownfreelywithoutbinding.
3.Makesureoatisnothittingthemetaloatcoverwhenclosed.
4.Removeoatpinandoatarmassembly:
a.Checkforwaterinsidetheoat.ReplaceSW23oatifnecessary.
b.Removeanydebrisfromvalvetiporvalvesealandtest.
c.ReplaceSW8sealandtest.(Anadditionalsealisprovidedontheside
oftheoatarm)
d.CheckSW20valvetipforchips,surfaceimperfections,orcracks.
Replacevalveifnecessary.