1
P. O. Box 12010
Oklahoma City, OK 73157-2010
405.947.2511 • Fax: 405.947.8720
www.LittleGiantPump.com
CustomerService-WTS@fele.com
This instruction sheet provides you with the information required to safely own and
operate your Little Giant pump. Retain these instructions for future reference.
The Little Giant pump you have purchased is of the highest quality workmanship
and material, and has been engineered to give you long and reliable service.
Little Giant pumps are carefully tested, inspected, and packaged to ensure safe
delivery and operation. Please examine your pump carefully to ensure that no
damage occurred during shipment. If damage has occurred, please contact the
place of purchase. They will assist you in replacement or repair, if required.
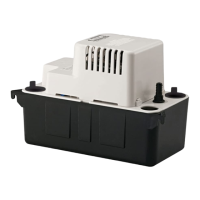
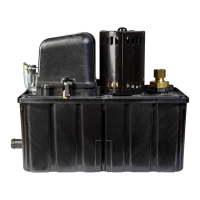
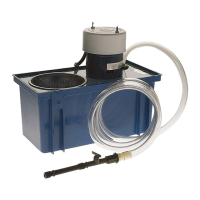
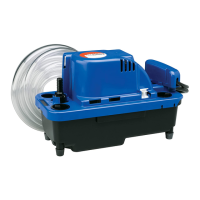
The Little Giant VCMX-20 automatically removes condensation from air con-
ditioners, high-efficiency gas furnaces, and condensing boilers. A float/switch
mechanism turns the pump on when approximately 1.6" of water collects in
its tank, and turns the pump off when the tank drains to approximately 1.2". A
safety overflow switch activates when water in the tank rises to approximately
2.2", turning off the thermostat or turning on an alarm (depending upon wiring
configuration).
• Do not use to pump flammable or explosive fluids such as gasoline, fuel oil,
kerosene, etc. Do not use in explosive atmospheres. Pump should be used
with liquids compatible with pump component materials.
Do not handle pump with wet hands or when standing on a wet or damp •
surface, or in water. This pump is supplied with a grounding conductor
and/or grounding type attachment plug. To reduce the risk of electrical
shock, be certain that it is connected to a properly grounded grounding
type receptacle.
In any installations where property damage and/or personal injury might •
result from an inoperative or leaking pump due to power outages,
discharge line blockage, or any other reason, a backup system(s) and/or
alarm should be used.
Support pump and piping when assembling and when installed. •
Failure to do so may cause piping to break, pump to fail, motor
bearing failures, etc.
Do not install this pump where it can be splashed or sprayed.
Do not use this pump inside air plenums.
1. Carefully unpack the pump. Using the enclosed mounting bracket, mount
the pump either on the side of the air conditioner/furnace/boiler or on a
nearby wall. (See Figures 10 and 11 for pump dimensions.) The tank has a
mounting slot on each side so it can be positioned either way (Fig. 1). Ensure
that the pump is level and the inlet is below the coil drain. Conduit fittings
are not compatible with the plastic pump housing.
Pumps with an anti-sweat sleeve use a different mounting bracket, but the
mounting location holes are the same and the brackets are interchangeable.
If mounting the pump on a flat surface, install the enclosed 4 rubber feet onto
the bottom of the tank.
2. Fully insert the enclosed check valve into the discharge line, ensuring that
the O-ring and discharge line are free of debris (Fig. 2).
3. Insert the check valve into the pump discharge hole and twist it by hand 1/4
turn (Fig. 3).
4. Check to ensure that the valve is securely locked into position (Fig. 4).
All wiring must be performed by a qualified service technician.
Check local electrical and building codes before installation. The installation
must be in accordance with their regulations as well as the most recent National
Electrical Code (NEC).
1. Shut off electrical power at fuse box before making any connections. All
wiring must comply with local codes.
2. Line voltage: Connect power cord to line voltage specified on motor and
nameplate. Power cord must be connected to a constant source of power
(not a fan or other device that runs intermittently). If power cord does not
have a plug, wiring is as follows: green (or green/yellow) is ground, black (or
brown) is line, and white (or blue) is neutral.
Mounting bracket
Mounting bracket
Mounting bracket
Anti-sweat sleeve
Manchon anticondensation
Manguito anticondensación
Mounting bracket
Support de montage
Soporte de montaje
Bracket screws
Vis du support
Tornillos para el soporte
STANDARD PUMP • POMPE STANDARD •
BOMBA ANTICONDENSACIÓN
Wall • Mur • Pared
ANTI-SWEAT PUMP • POMPE ANTICONDENSATION • BOMBA
ANTICONDENSACIÓN
Mounting bracket
Support de montage
Soporte de montaje
Bracket screws
Vis du support
Tornillos para el soporte
Ensure bracket is level
Assurez-vous que le support est de niveau
Asegúrese de que el soporte esté nivelado
Wall • Mur • Pared
Mounting bracket
Support de montage
Soporte de montaje