Attaching the equatorial mount
After the tripod is set up, you are ready to attach the equatorial mount. This is the platform to which the
telescope attaches and allows you to direct it anywhere in the sky. The mount is also adjustable so
you can orient the axis of rotation to make it parallel with the Earth’s axis of rotation (see the section
on Polar Alignment). To attach the equatorial mount to the tripod:
1. Insert the base of the equatorial mount into the top of the central column.
2. Rotate the equatorial mount on the central column until the holes in the mount line
up with those in the central column.
3. Insert the three screws provided through the holes in the central column and into
the equatorial mount.
4. Tighten the screws to hold the equatorial mount in place.
There are three possible orientations of the equatorial mount which allow you to select the most
convenient location of the electronic console.
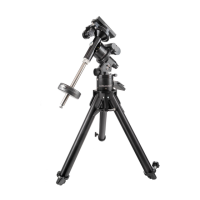
Attaching the counterweight bar
To properly balance the telescope, the mount comes with a counterweight bar and counterweight. To
install the counterweight bar:
1. Locate the opening in the equatorial mount on the DEC axis. It is opposite the
telescope mounting platform.
2. Thread the counterweight bar into the opening until tight.
Once the bar is securely in place you are ready to attach the counterweight(s).
Attaching the counterweight
The Losmandy G-11 comes standard with one 21 pound counterweight.
To install the counterweight:
1. Orient the mount so that the counterweight bar points toward the ground.
2. Remove the counterweight safety thumbscrew and washer on the end of the
counterweight bar (opposite the end that attaches to the mount).
3. Loosen the locking bolt on the side of the counterweight.
4. Slide the counterweight onto the shaft.
5. Tighten the locking bolt on the side of the weight to hold it in place.
6. Repeat this process if using a second optional counterweight.
7. Replace the counterweight safety thumbscrew and washer.