EasyManua.ls Logo

Loveshaw LITTLE DAVID LD7D/3 - User Manual

Loveshaw LITTLE DAVID LD7D/3
27 pages
Print Icon
To Next Page IconTo Next Page
Loading...
LITTLE DAVID
OWNERS MANUAL
LD7D/3
CAC51 / CAC61 CARTRIDGES
THE LOVESHAW CORPORATION LOVESHAW - EUROPE
2206 EASTON TURNPIKE, BOX 83 UNIT 9, BRUNEL GATE
SOUTH CANAAN, PA 18459 W. PORTWAY INDUSTRIAL
ESTATE
ANDOVER, HAMPSHIRE SP103SL
TEL: (570) 937-4921 ENGLAND
FAX: (570) 937-4370 44-264-3575-11
Question and Answer IconNeed help?

Do you have a question about the Loveshaw LITTLE DAVID LD7D/3 and is the answer not in the manual?

Summary

Theory of Operation

Machine Operation Principles

Explains how the LD7 machine applies tape to boxes and its operational sequence.

Important Safety Notices

Precautionary Measures for Operation

Lists essential precautions before operating, servicing, or installing the equipment.

Machine Specifications

Machine Dimensions

Details the height, length, width, and conveyor height of the machine.

Electrical Requirements

Specifies voltage and amperage requirements for machine operation.

Machine Box Capacity

Defines the minimum and maximum box dimensions the machine can handle.

Operating Speed and Closure Material

Outlines belt speed, throughput, tape width, and roll diameter specifications.

Installation

Machine Setup and Placement

Guides on assembling, connecting, and positioning the machine for operation.

Conveyor and Table Integration

Details how to integrate the machine with conveyors or packing tables for smooth operation.

Operation

Box Setup and Adjustments

Explains how to set up the machine for a specific box size, adjusting rails and head height.

Testing Machine Operation

Describes the procedure for testing the machine with a sample box after setup.

Machine Components

Starter Switch Functionality

Details the manual motor starter, its overload protection, and replacement procedures.

Side Rails

Side Rail Adjustment and Use

Explains how side rails center, align boxes, and can hold them on a pack table.

Belts

Belt Replacement Procedure

Guides on how to replace the machine's drive belts, including threading and tensioning.

Belt Finger Guard

Guard Adjustment and Safety Gap

Explains the finger guard's purpose, adjustability, and required gap for safety.

Head Assembly

Head Assembly Adjustment and Maintenance

Details how to adjust head height, level, and perform mast maintenance.

Drive Motor

Drive Motor Specifications and Gearbox

Describes the drive motor's power, voltage, and the maintenance-free gearbox.

Top Flap Squeezer

Squeezer Adjustment and Operation

Explains the function of top flap squeezers and how to adjust them for box closure.

Machine Maintenance

Daily Maintenance Tasks

Lists daily checks and cleaning procedures for the machine.

Weekly Maintenance Tasks

Outlines weekly checks for tensioners, motors, gearboxes, and idlers.

Monthly Maintenance Tasks

Specifies monthly checks for head wear pads and drive roller lagging.

Troubleshooting

Box Jamming and Belt Slipping Issues

Provides causes and corrective actions for box jamming and belt slipping problems.

Head Assembly and Motor Problems

Addresses issues with head assembly movement, motor starting, and related causes.

Overview

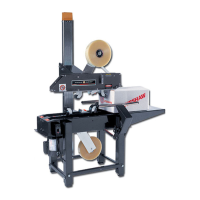
The Little David LD7D/3 is a semi-automatic, uniform pressure-sensitive taping machine designed and manufactured by The Loveshaw Corporation. Its primary function is to apply pressure-sensitive tape to the top and bottom center seams of regular slotted containers, typically in a "C" clip configuration. The machine is manually adjustable in width and height to accommodate a wide range of box sizes, making it versatile for various packaging needs.

Function Description:

The LD7D/3 operates by utilizing dual bottom drive belts to transport boxes through the machine. Once the machine is switched on via the manual motor starter, the bottom belts begin to move. The operator manually presents a box, with all flaps folded and held down, to the machine's entrance. The drive belts then pull the box forward towards the tape cartridges. Optional top flap squeezers, if installed, push the major flaps together just before tape application, ensuring a securely sealed box. After tape is applied to both the top and bottom of the box, it exits the machine. A minimum distance of 14 inches between boxes is required for proper operation.

The machine's design emphasizes simplicity and ease of use, requiring minimal training for general labor. Its compact size and straightforward electrical connection allow for quick relocation to different areas as needed. It can function as a standalone unit or be integrated into an existing conveyor system.

Important Technical Specifications:

  • Machine Dimensions:

    • Height: 57 1/2 inches
    • Length of frame: 33 5/8 inches
    • Width of frame: 17 1/4 inches
    • Maximum width of machine (at side rails): 31 1/4 inches
    • Conveyor height: 22 1/4 inches minimum (leg extensions allow for an additional 8 inches of adjustment)
  • Electrical Requirements:

    • Standard Voltage: 120/1/60 VAC with 10 amps dedicated service.
    • Optional voltages are available upon consultation with the factory.
  • Machine Box Capacity:

    • Length: 4 1/2 inches minimum to infinite maximum
    • Width: 5 1/2 inches minimum to 22 inches maximum
    • Height: 4 1/2 inches minimum to 24 inches maximum standard (34 inches maximum optional). Boxes that are 1 1/2 times taller than they are long are at risk of tipping over and are not considered within the machine's specifications.
  • Operating Speed:

    • Belt speed: 80 feet/minute
    • Throughput: 34 cartons per minute (based on a 12-inch long box)
  • Closure Material: Pressure sensitive tape

    • Tape width: 2.5 inches to 3 inches (38mm to 50mm)
    • Maximum Roll Diameter: 15 inches (380mm)
  • Weight (uncrated): 180 lbs (81 kg)

Usage Features:

  • Manual Motor Starter: A toggle-design starter with an integral overload heater protects the drive motor from overcurrent conditions, such as a box jam. When an overload is detected, the machine automatically shuts down.
  • Side Rails: These manually adjustable rails center and align the box during processing. They are secured in position by a manual lock knob. The side rails can also be used to hold a box in position on a pack table while it is being filled.
  • Head Assembly: The head assembly moves along the mast on ball bearings and high-density polyethylene pads. Its height is adjusted by loosening a lock knob and manually pushing or pulling the assembly. A constant force spring counterbalances the head, making height adjustments easy. High-density polyethylene pads, adjustable via jacking screws, are used to level the head assembly from front to rear.
  • Top Flap Squeezers: These optional components butt the major flaps together before tape application. They are independently set to the box width and can help close boxes that are not severely overstuffed. Adjustment is made by loosening a wing nut and sliding the squeezer wheel in or out. Caution is advised to prevent adjusting the wheel too far into the box's path, which could cause jams or damage.
  • Installation: The Little David is shipped completely assembled for domestic customers. It is ready for operation after being plugged into an appropriately grounded electrical outlet. The conveyor height is manually adjustable from 22 1/4 inches to 30 1/4 inches in one-inch increments using extension legs with a series of holes. Mounting holes are provided to anchor the machine to the floor, ensuring it is on a flat, level surface. Optional casters are available for mobility.
  • Feeding: The machine can be fed by a conveyor or a packing table. The feeding surface should be 1/4 inch lower than the top of the rough top belting for smooth box transition. A power conveyor is recommended at the discharge end for sealed container removal. An optional packing table can be mounted at the infeed, exit, or both ends.

Maintenance Features:

  • Belts: Two laced rough top belts drive the box. They are driven by two drive rollers at the exit end, which are coupled to a dual output shaft reducer connected to the main drive motor. The drive rollers have lagging to increase belt drive. Belt replacement involves jogging the motor to expose the lacing, pulling out the lacing pin, connecting the old belt to the new, pulling the new belt through, disconnecting the old, and then connecting the new belt ends. The belt is spring-tensioned, requiring overcoming the tensioner to connect the ends. It is recommended to replace both belts simultaneously with genuine Little David belts.
  • Belt Finger Guards: These guards prevent entanglement or pinch hazards and are adjustable. The gap between the guard and the belt must be set to 1/32 inch to prevent injury.
  • Mast Maintenance: The mast requires routine cleaning and lubrication to ensure easy movement of the head assembly. This involves wiping the mast with a clean cloth and then spraying it with silicone lubricant.
  • Drive Motor: The standard drive motor is a 1/3 hp open drip proof motor, dual-rated at 120 or 230 VAC single-phase 60Hz. It is coupled to a dual output sealed gearbox that requires no maintenance.

Maintenance Schedule:

  • Daily:
    • Clean machine (as required)
    • Inspect bottom belt drives.
  • Weekly:
    • Check belt tensioner
    • Inspect area around motor & gearbox
    • Inspect belt idlers
    • Adjust finger guards for belts (as required)
    • Lubricate mast with silicone spray.
  • Monthly:
    • Check / Adjust head wear pads
    • Check drive roller belt lagging.

Safety Notices:

  • Always remove all power sources before servicing the machine (Lock out / Tag out procedures).
  • Do not bypass or remove safety guards or tape cartridges.
  • Do not override safety devices.
  • Never adjust tape cartridges or the machine while it is operating.
  • Do not place hands or body inside the machine unless the top head assembly is locked in position and all power sources are locked out.
  • Avoid wearing jewelry, loose clothing, ties, scarves, and ensure long hair is pulled back during operation.
  • Never pull jammed boxes out of an operating machine; always remove power sources first.
  • When feeding boxes into a semi-automatic machine, always hold top flaps down at the rear of the box and never place hands near the top head assembly.
  • When moving a machine with the caster option, ensure the top head assembly is completely lowered. Always push the machine from the front or rear, not width-ways.
  • Never remove safety labels. Replace any worn, damaged, peeling, or illegible labels immediately.
  • Wear proper PPE when servicing the machine electrically and follow Arc Flash Protection procedures.

Loveshaw LITTLE DAVID LD7D/3 Specifications

General IconGeneral
BrandLoveshaw
ModelLITTLE DAVID LD7D/3
CategoryIndustrial Equipment
LanguageEnglish

Related product manuals