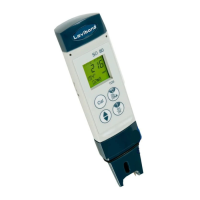
SD 80
TDS
1 2 3
4 5 6
Austausch der Elektrode
neue Elektrode
DE
Batterie tauschen
7. Art der Anzeige von
Datum und Uhrzeit
Einschalten
3 Sek. drücken
4 x drücken
Datumsanzeige erscheint
Bestätigen
Auswahl zwischen 12-Stunden-
Uhr (AM/PM) und 24-Stunden-
Uhr
Speichern und Beenden
8. Datum und Uhrzeit
einstellen
Einschalten
Art der Anzeige muss zuvor
gewählt werden (siehe 7.)
3 Sek. drücken
2 x drücken
Uhrzeit blinkt
Bestätigen
Minuten können eingestellt
werden.
Zum Erhöhen
Zum Senken
Speichern und Wechsel zu
Stunden
Zum Erhöhen
Zum Senken
4. Gespeicherte Daten
abrufen
Einschalten
3 Sek. drücken
Letzter Speicherplatz blinkt
Bestätigen
Letzter Speicherplatz wird
angezeigt
Wechsel zwischen Speicher-
plätze
Zum Beenden
5. Gespeicherte Daten
löschen
Aufrufen der gespeicherten
Werte (siehe 4.)
3 Sek. drücken
CLEAR blinkt
Bestätigung Löschen der Werte
Alle Werte werden gelöscht
Beenden erfolgt automatisch
6. Wählen des TDS-
Faktors
Einschalten
3 Sek. drücken
1 x drücken
eingestellter TDS-Faktor blinkt
Bestätigen
Wahl des TDS-Faktors
(0,7 oder 0,5)
Speichern und Beenden
Schutzkappe abziehen, Gerät
einschalten, Elektrode mit dest.
Wasser spülen, dann in die
Kalibrierlösung
L
eintauchen.
3 Sek. Cal drücken
CAL blinkt im Display
Der Wert kann wie folgt ange-
passt werden:
Zum Erhöhen (+) gedrückt hal-
ten und mit
Erhöhen
Zum Senken (-) drücken
Speichern und Beenden der
Kalibrierung
Gerät springt zurück in den
Anzeigemodus
Schutzkappe abziehen, Gerät
einschalten, Elektrode mit dest.
Wasser spülen, dann in die
Kalibrierlösung
H
eintauchen.
3 Sek. Cal drücken
CAL blinkt im Display
Der Wert kann wie folgt ange-
passt werden:
Zum Erhöhen (+) gedrückt
halten und mit
Erhöhen
Zum Senken (-) drücken
Speichern und Beenden der
Kalibrierung
Gerät springt zurück in den
Anzeigemodus
L
H
zeigt die Art der Kalibrierung
im Display an.
1. Ein/Aus Funktion
Kurz drücken
Wenn ! erscheint, mit
deaktivieren
Automatische Abschaltung 8
Min nach letzter Tastenfunktion
3 Sek. drücken, um das Gerät
auszuschalten
Display Beleuchtung An/Aus
2. Messung
Halten Sie das Gerät ohne Schutz-
kappe in das zu messende Pro-
benwasser, so dass das Gerät
bis maximal zum Dichtring vom
Probenwasser umgeben ist.
Der Messwert wird angezeigt
Kurz ! drücken, um den Mess-
wert einzufrieren/ freizugeben
3 Sek. drücken, um den Mess-
wert zu speichern
Es erscheint der Speicherplatz
(z.B. 01) im Display während des
Tastendrucks
3. Kalibrierung
Die Elektrode ist nach jeder Messung/
Kalibrierung mit dest. Wasser abzuspülen.
Neue Kalibrierung nach Bedarf. Ist die
Temperatur außerhalb des Messbereichs,
erscheint „ERR“. Das Messgerät kehrt
automatisch in den Messmodus zurück.
Wenn das Auslesen des Standards
mehr als 30 % außerhalb des Standard-
Pufferbereichs liegt, erscheint „ERR“.
Autom. Erkennung von
L
begrenzt auf:
100-999 ppm;
H
begrenzt auf 1 - 10 ppt.
+
+
Speichern und Wechsel zu Jahr
Zum Erhöhen
Zum Senken
Speichern und Wechsel zu
Monat/Tag
Zum Erhöhen
Zum Senken
Speichern und Beenden
9. Temperatureinheit
einstellen
Einschalten
3 Sek. drücken
3 x drücken
Temperatureinheit blinkt
Bestätigen
Wahl der Temperatureinheit
(°F/°C)
Speichern und Beenden
Zubehör
1950026 AAA Batterien 4er Pack
(2 Batterien notwendig)
19 48 22 Ersatzelektrode
38 48 01 Messbecher, 100 ml
19 48 10-16 Plastikbox
46 76 42 Leitfähigkeits- (1413 µS)
und TDS- (998 ppm)
Justierlösung 100 ml
46 76 43 Leitfähigkeits- (12,89 mS)
und TDS- (9,02 ppth)
Justierlösung 100 ml
Gewährleistung
Ab Verkaufsdatum beläuft sich die Ge-
währleistung für das SD 80 auf einen
Zeitraum von 2 Jahren; für die Elektrode
auf 12 Monate. Ausgenommen hiervon
sind Schäden, die aus unsachgemäßer
Handhabung resultieren oder auf mecha-
nische Beschädigung zurückzuführen sind.
Fehlermeldungen und Vorgehensweise
Beschreibung Messbereich Vorgehensweise
Err 1 Elektrode nicht installiert Thermistor: Elektrode installie-
oder fehlerhaft 0.5~100 kΩ ren oder ersetzen
Err 2 Nicht verwendet
Err 3 Temperatur außerhalb des 0~60 °C Bringen Sie die Lösung
Messbereichs auf eine Tempera-
tur im Messbereich
Err 4 Nicht verwendet
Err 5 Kalibrierter Versatz außerhalb 70 - 130 % (ver- Kalibrieren sie die Elek-
des Messbereichs gleichen Sie mit trode neu oder ersetzen
dem Standardwert) Sie sie oder verwenden
Sie den Standardwert
(Batterien entfernen)
Err 6 TDS außerhalb des < 10,00 ppt Verwenden Sie eine
Messbereichs andere Lösung
SD 80 Spezikation
1 Betriebsbereich: 0-60 °C, <10.00 ppt
2 Automatisches Umpolen ppm und
ppt. ppm: 0~999 ppm;
ppt:1,00~10,00 ppt
3 Bis zu 2-Punkt-Kalibrierung für
manuellen Modus. +/-50 %
einstellbarer Wert
4 TDS-Auflösung: 1 ppm (<=999 ppm)
und 0,01 ppt (1,00~10,00 ppt);
Genauigkeit: ±3 % FS
5 Temperaturauflösung: 0,1 °C;
Genauigkeit: ±1 °C, wählbares °C/°F
System
6 Wählbarer TDS-Faktor, 442:0,7,
NaCl: 0,5
7 Anzeige Uhrzeit und Datum mit 25
Speicherplätzen (nicht flüchtig)
8 22x22 mm LCD Bildschirm mit
gelbgrüner Hintergrundbeleuchtung
9 2 x AAA Batterien 1.5 V
10 Automatisches Ausschalten zum
Sparen von Batterieleistung (bei
8 Min. Inaktivität)
11 Batteriekapazität > 100 h bei
kontinuierlichem Gebrauch (ohne
Displaybeleuchtung)
Low Batterieanzeige im Display
1 2 3
4 5 6
Replacing electrodes
New electrode
GB
Replace battery
7. Type of display of
date and time
Switch on
Press for 3 sec.
Press 4 x
Date appears
Confirm
Choose between 12-hour clock
(AM/PM) and 24-hour clock
Save and close
8. Adjusting date
and time
Switch on
Type of display must be selected
beforehand (see 7.)
Press for 3 sec.
Press 2 x
Time blinks
Confirm
Minutes can be adjusted.
To increase
To decrease
Save and switch to hours
To increase
To decrease
Save and switch to year
4. Viewing saved
data
Switch on
Press for 3 sec.
The last storage location blinks
Confirm
The last storage location
is shown
Switch between storage locations
To close
5. Deleting saved
data
View the saved values (see 4.)
Press for 3 sec.
CLEAR blinks
Confirm deletion of values
All values are deleted
Process closes automatically
6. Selection of TDS-
factor
Switch on
Press for 3 sec.
Press 1 x
Adjusted TDS factor blinks
Confirm
Selection of TDS factor
(0.7 or 0.5)
Save and close
Pull off the protective cap,
switch on the device, rinse the
electrode with distilled water,
then immerse in the calibration
L
solution.
Press Cal for 3 sec.
CAL blinks in the display
The value can be adjusted as
follows:
Press and hold (+) to increase,
or with
increase
Press (-) to decrease
Saving and closing the calibra-
tion
The device jumps back to display
mode
Remove the protective cap,
switch on the device, rinse the
electrode with distilled water,
then immerse in the calibration
H
solution.
Press Cal for 3 sec.
CAL blinks in the display
The value can be adjusted as
follows:
Press and hold (+) to increase,
or with
increase
Press (-) to decrease
Saving and closing the calibra-
tion
The device jumps back to display
mode
L
H
shows the type of cali-
bration in the display.
1. On/Off function
Press briefly
If ! appears,
deactivate with
Automatic shut-off after 8 min.
of inactivity
Press and hold for 3 sec. to
switch off the device
Display lighting on/off
2. Measurement
Hold the device without pro-
tective cap in the sample water
to be measured so that the
device is immersed in the sam-
ple water no higher than the
seal ring.
The measurement is displayed.
Briefly press ! to freeze/release
the measurement
Press and hold for 3 sec. to save
the measurement
The storage location (e.g. 01)
appears in the display while the
button is pressed
3. Calibration
The electrode must be rinsed off after
each measurement/calibration with
distilled water. Recalibrate as necessary.
If the temperature is outside of the
measuring range, 'ERR' appears. The
measuring device automatically returns
to measuring mode. When the readout of
the standard is more than 30 % outside of
the standard buffer range, 'ERR' appears.
Autom. recognition of
L
limited to: 100-
999 ppm;
H
limited to 1 - 10 ppt.
+
+
To increase
To decrease
Save and switch to month/day
To increase
To decrease
Save and close
9. Adjusting the
temperature unit
Switch on
Press for 3 sec.
Press 3 x
Temperature unit blinks
Confirm
Selection of temperature unit
(°F/°C)
Save and close
Accessories
1950026 AAA batteries in 4-pack
(2 batteries required)
19 48 22 Spare electrode
38 48 01 Measuring beaker, 100 ml
19 48 10-16 Plastic box
46 76 42 Conductivity (1413 µS)
and TDS (998 ppm)
adjusting solution 100 ml
46 76 43 Conductivity (12.89 mS)
and TDS (9.02 ppth)
adjusting solution 100 ml
Warranty
The warranty for the SD 80 is valid for a
period of 2 years from the date of pur-
chase; the warranty for the electrode is
12 months. This does not cover damages
resulting from improper handling or based
on mechanical damage.
Error messages and procedure
Description Measuring range Procedure
Err 1 Electrode not installed or Thermistor: 0.5~100 kΩ Install electrode or
defective replace
Err 2 not used
Err 3 Temperature outside of the 0~60 °C Bring the solution
measuring range to a temperature
within the mea-
suring range
Err 4 not used
Err 5 Calibrated offset outside of 70 -130 % (compare to Calibrate the
the measuring range the standard value) electrode - again,
replace it, or use
the standard value
(remove batteries)
Err 6 Conductivity outside of the < 10.00 ppt Use a different
measuring range solution
SD 80 Specications
1 Operating range: 0-60 °C,
<10.00 ppt
2 Automatic pole change between
ppm and ppt. ppm: 0~999 ppm;
ppt:1,00~10,00 ppt
3 Up to 2-point calibration for manual
mode. +/-50 % adjustable value
4
TDS resolution: 1ppm (<= 999 ppm)
and 0.01 ppt (1.00 - 10.00 ppt);
Accuracy: ±3 % FS
5 Temperature resolution: 0.1 °C;
Accuracy: ±1 °C, optional °C/°F
System
6 Optional TDS factor, 442:0.7, NaCl:0.5
7 Display of time and date with 25
storage locations (not permanent)
8 22x22 mm LCD screen with
yellow-brown background lighting
9 2 x AAA batteries 1.5 V
10 Automatic shut-off to save
battery life (with 8 min.
of inactivity)
11 Battery capacity > 100 h with
continuous use (without display
lighting)
Low battery indicator in the display
1 2 3
4 5 6
Remplacement de l’électrode
Nouvelle électrode
Remplacement des piles
FR
7. Mode d’affichage de
la date et de l’heure
Allumer l’appareil.
Appuyer sur le bouton pdt 3 s.
Effectuer 4 pressions sur le
bouton.
Le mode d’affichage de la date
apparaît à l’écran.
Confirmer
Permet de choisir le mode 12
heures (AM/PM) ou 24 heures.
Enregistrer et quitter
8. Réglage de la date et
de l’heure
Allumer l’appareil.
Il faut d’abord configurer le
mode d’affichage (cf. point 7).
Appuyer sur le bouton pdt 3 s.
Effectuer 2 pressions sur le
bouton.
L’heure clignote.
Confirmer
L’étape suivant consiste à régler
les minutes.
Plus
Moins
Enregistrer et revenir à l’affi-
chage des heures
Plus
Moins
Enregistrer et revenir à l’affi-
chage de l’année
4. Consultation des
données enregistrées
Allumer l’appareil.
Appuyer sur le bouton pdt 3 s.
Le dernier emplacement mé-
moire clignote.
Confirmer
Le e dernier emplacement
mémoire s’affiche.
Permet de passer d'un emplace-
ment mémoire à l’autre.
Quitter
5. Suppression des
données enregistrées
Afficher les valeurs enregistrées
(cf. point 4.).
Appuyer sur le bouton pdt 3 s.
CLEAR clignote.
Confirmer la suppression des
valeurs.
Toutes les valeurs sont suppri-
mées.
Terminé
6. Sélection du facteur
TDS
Allumer l’appareil.
Appuyer sur le bouton pdt 3 s.
Exercer 1 pression surle bouton.
Le facteur TDS réglé clignote.
Confirmer
Permet de sélectionner le facteur
TDS (0,7 ou 0,5).
Enregistrer et quitter
Retirer le cache de protection,
mettre en marche l’appareil,
rincer l’électrode avec de l’eau
distillée, puis la plonger dans la
L
solution de calibrage.
Appuyez sur le bouton Cal
pdt 3 s.
CAL clignote sur l’écran.
Cette valeur peut être adaptée
comme suit :
Pour augmenter la valeur (+),
maintenir le bouton enfoncé
tout en appuyant sur ce bouton.
Appuyer sur ce bouton pour
réduire (-) la valeur.
Enregistrer et terminer le cali-
brage
L’appareil se remet en mode
« affichage »
Retirer le cache de protection,
mettre en marche l’appareil,
rincer l’électrode avec de l’eau
distillée, puis la plonger dans la
H
solution de calibrage.
Appuyez sur le bouton Cal
pdt 3 s.
CAL clignote sur l’écran.
Cette valeur peut être adaptée
comme suit :
Pour augmenter la valeur (+),
maintenir le bouton
enfoncé
tout en appuyant sur ce bouton.
Appuyer sur ce bouton pour
réduire (-) la valeur.
Enregistrer et terminer le cali-
brage
L’appareil se remet en mode
« affichage »
L
H
Indique le type de calibrage
à l’écran.
1. Bouton de
marche/arrêt
Appuyer brièvement sur le
bouton.
Lorsque ! apparaît, appuyer
pour effacer l’écran.
L’appareil s’éteint automa-
tiquement 8 min après la
dernière activation d'une touche
de fonction.
Appuyer sur le bouton pendant
3 s pour éteindre l’appareil.
Bouton de marche/arrêt de
l’écran
2. Mesure
Plonger l’appareil sans cache
de protection dans l’échantillon
d’eau à tester au maximum
jusqu’à la bague d’étanchéité.
La valeur mesurée s’affiche.
Appuyer brièvement sur le bou-
ton ! pour geler/valider la valeur
mesurée.
Appuyez sur le bouton pendant
3 s pour enregistrer la valeur
mesurée.
L’emplacement mémoire appa-
raît à l’écran (p. ex. 01) lorsque
le bouton est enfoncé.
3. Calibrage
Rincer l’électrode après chaque mesure /
calibrage avec de l’eau distillée. Procéder
à un nouveau calibrage selon les besoins.
Si la température n’est pas comprise
dans la plage de mesure, la mention
« ERR » apparaît à l’écran. L’appareil
se remet automatiquement en mode
« mesure ». Si la valeur standard dépasse
de plus de 30 % la plage tampon
standard, la mention « ERR » apparaît.
Identification auto. de
L
limitée à : 100-
999 ppm ;
H
limité à 1 - 10 ppt.
+
+
Plus
Moins
Enregistrer et revenir à l’affichage
du jour/mois
Plus
Moins
Enregistrer et quitter
9. Réglage de l'unité
de température
Allumer l’appareil.
Appuyer sur le bouton pdt 3 s.
Effectuer 3 pressions sur le
bouton.
L'unité de température clignote.
Confirmer
Permet de sélectionner l’unité de
température (°F/°C).
Accessoires
1950026 Piles (AAA), lot de 4
(2 piles sont nécessaires)
19 48 22 Electrode de rechange
38 48 01 Gobelet gradué de 100 ml
19 48 10-16 Boîte en plastique
46 76 42 Solution de conductibilité
(1413 µS) et (998 ppm)
solution d’étalonnage TDS
100 ml
46 76 43 Solution de conductibilité
(12,89 mS) et (9,02 ppth)
solution d’étalonnage TDS
100 ml
Garantie
La garantie de 2 ans accordée pour l’ap-
pareil SD 80 court à compter de la date
d’achat. L’électrode est garantie pendant
12 mois. La garantie ne couvre pas les
dommages liés à une utilisation contre-in-
diquée ou à un problème mécanique.
Messages d’erreur et marche à suivre
Description Plage de mesure Marche à suivre
Err 1 Electrode non montée ou Thermistor : Monter ou remplacer
défectueuse 0,5~100 kΩ l’électrode
Err 2 Non utilisé
Err 3 Température non comprise 0~60 °C Amener la solution
dans la plage autorisée à une température
conforme à la plage
autorisée
Err 4 Non utilisé
Err 5 Décalage calibré non conforme 70 - 130 % Calibrer ou remplacer
à la plage de mesure (comparer avec l’électrode ou utiliser
la valeur standard) la valeur standard
(retirer les piles)
Err 6 Conductibilité non comprise < 10,00 ppt Utiliser une autre
dans la plage de mesure solution
Spécications tech-
niques du modèle SD 80
1 Plage de fonctionnement : 0-60 °C,
<10,00 ppt
2 Inversion automatique de ppm et
ppt. ppm : 0~999 ppm ;
ppt :1,00~10,00 ppt
3 Calibrage en 2 étapes max.
pour mode manuel +/-50 %, valeur
réglable
4 Résolution TDS : 1 ppm (<=999 ppm)
et 0,01 ppt (1,00~10,00 ppt) ;
précision : ±3 % FS
5 Résolution de la température :
0,1 °C ; Précision : ±1 °C, choix
entre °C/°F
6 Facteur TDS au choix, 442 : 0,7,
NaCl :0,5
7 Affichage de la date et de l’heure
sous 25 emplacements mémoire (non
volatiles)
8 Ecran LCD 22x22 mm
avec rétroéclairage jaune-vert
9 2 piles de type AAA 1,5 V
10 Coupure automatique pour
économie de la puissance de la
batterie (après 8 min d’inactivité)
11 Autonomie > 100 h en
usage continu (sans rétroéclairage de
l’écran) Faible niveau de charge de la
batterie indiqué à l’écran
 Loading...