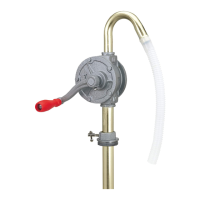
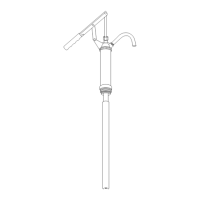
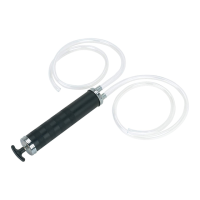
HAND ROTARY BARREL PUMP
For use with 15 (56 l) to 55 Gallon (207 l) Drums
ASSEMBLY & OPERATING INSTRUCTIONS : Thank you for purchasing Lumax
®
Pump.
Please read this Operational Manual carefully. It is important that you read the entire manual to become familiar with the unit before you begin assembly
and/or operate the unit. Please store this Operational Manual in a safe place for later reference.
Caution : This pump is designed for use with Non-corrosive Petroleum based products of Light to Medium Viscosity. It is not meant to be used with
Solvents, Acids, Alkalis, Water or other Corrosive Fluids. Always Pump in a well ventilated area. Never Smoke near any fluids that are to be
pumped. Follow the Safety Tips in this Manual. Refer to the materials below, to check which Fluids can be pumped, using this Pump.
Materials (Can be Pumped) : Diesel Fuel, Ethyl, Heating Oil, Kerosene, Machine Oils, Motor Oil, Oil based Fluids, Oils (Light and Heavy), Soaps,
Solvents, Thinners and Transmission Oil
Materials (Should Not be Pumped) : Acids (Weak and Strong), Alcohols, Alkalis, Anti-freeze, Automotive Additives, Benzene, Chemicals (Mild and
Aggressive), Cleaning Solutions, Corrosive Fluids (Mild and Strong), Detergents, Disinfectants, Edible Oils, Edible Fluids (Juice, Wine etc.), Esters,
Farm Chemicals, Fertilizers, Gasoline, Grease, Herbicides, Hydrocarbons, Industrial Chemicals, Insecticides, Water, Water based Fluids and Waxes.
Caution : The above Materials List is for guidance only and is by no means a complete List. If there is any question about any Material that
can or cannot be pumped, do not operate the pump. Check with Lumax
®
as to whether it is safe or unsafe, to operate the pump.
WARNING FOR YOUR OWN PROTECTION READ, UNDERSTAND AND OBSERVE THESE
SAFETY FIRST! SAFETY TIPS AND ALL INSTRUCTIONS BEFORE USING THIS PRODUCT!
Pumps should only be used as recommended. Any tool can fail if it is misused. To avoid Serious Personal Injury when using your Pump, follow these
Safety Tips and Rules :
• Do Not use Pump for the purpose it is not intended for. Do Not Force use Pump. It will do the job Better and Safer at the Rate for which it was Intended.
Never Use Handle Extensions to Increase Leverage.
• Always Wear Appropriate Protective Clothing and Equipment. Do Not wear Loose Clothing or Jewelry. They can be caught in Moving Parts.
Protective Gloves and Non-skid Footwear are recommended when working with Pumps. Approved Guards and Protective Equipment, such as,
Impact Resistant Safety Glasses, Safety or Chemical Splash Goggles, Full Face Shield, Safety Shoes, Arm Guards, Protective Gloves and Apron Must
be used
for Operator Protection. Wear Protective Hair Covering to contain Long Hair.
• Use Respirator. Always wear proper Face Mask to avoid Inhalation of Fumes and Hazardous Gases.
• Stay Alert. Watch what you are doing. Use Common Sense. Do Not operate Pump when you are Tired or under the influence of any medications.
Be Alert at All Times especially during Repetitive, Monotonous Operations. You may have demonstrated a certain product hundreds of times, but
do not be lulled into Complacency due to a False Sense of Security. Tools can be extremely unforgiving if not used carefully and as per instructions.
• Do not Over-reach. Keep Proper Footing and Balance at all times.
• Keep Visitors Away. All Visitors should be kept away from Work Area. Do Not let Visitors operate Pump.
• Check Damaged Parts. Before use of the Pump, carefully check for any Damaged Parts to determine that the Pump will operate Properly and Perform
its intended function. Check for Alignment of Moving Parts, Binding of Moving Parts, Breakage of Parts, Mounting, and any other Conditions that may
affect its Operation. Any Part that is damaged should be properly Repaired or Replaced by an Authorized Service Center.
• Maintain Pumps with Care. Keep Pumps Clean and regularly serviced or maintained for Better and Safe Performance. Follow Instructions for
Lubricating and changing Accessories. Inspect Pumps Periodically and if Pump or any of its parts are Damaged - have it Repaired by an Authorized
Service Facility. Always keep your Pumps Inspected and Replace Immediately, if damaged or Worn.
• Store Idle Tool. When not in use, Pumps should be Stored in Dry, High and/or in Locked-up place. Childproof the Pump and work area.
• Pumps Must only be repaired by Qualified Technicians.
• Always check local area Laws and Ordinances regarding Handling, Pumping and Disposing of Liquids. Dispose of pumped fluid properly. Do Not
drain into street drains, house drains, or backyards. Contact your local Municipal Waste Management officials for proper disposal methods. If there
is any question about a condition being safe or unsafe, do not operate the pump.
Your Pump will require basic assembly prior to operation. It is important that you read the entire manual to become familiar with the unit BEFORE you
use the Pump. Before assembling your Pump, be sure that you have all parts described in the Parts List. If any part is missing or broken, please contact
your local distributor. When assembling your Pump, it will be helpful to refer to the Diagram and the Parts List. Assemble attachments based on the
intended use of the Barrel Pump.
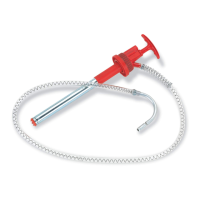
Step 1 : Screw the Discharge Spout (Item No. 5) into the 1" top side outlet on the Pump Body (Item No. 4)
Step 2 : Insert Handle Bolt (Item No. 2) into the Plastic Handle (Item No. 1). Screw Nut (comes with this Bolt) onto the Bolt, till it is a thread or two off the
Plastic Handle, so you have free movement of the Plastic Handle for ease of rotation. Do Not over-tighten this nut or it will damage the Plastic Handle.
Next, insert the Handle Bolt with the Plastic Handle into the Crank Arm (Item No. 3). Tighten the Bolt securely. Thereafter, screw the other Nut (that comes
with Handle Bolt) on to the other side of the Crank Arm. Tighten this Nut securely. Tighten the Crank Arm assembly on the shaft of the Pump with the Bolt
on the Crank Arm. Ensure to line-up bolt depression on the shaft with bolt on Crank Arm, for non-slip rotation.
Step 3 : Screw the first Inlet Tube (with Male threads on both ends) of the three part Steel Inlet Tubes (Item No. 7) into Pump Body (Item No. 4) at the bottom
of the housing 1-1/4" (30 mm) inlet. Slide the 2" (50 mm) Bung Nut with Tommy Bar (Item No. 6) over the first Inlet Tube. Connect the second piece of the
Inlet Tube (with Female threads on both ends) to the piece now inserted into the Pump Body. Finally, screw the third Inlet Tube (with Male threads on both
ends) to the second piece of the Inlet Tube.
Note : The Steel Inlet Tubes come in 3 pieces. They all need to be connected together to form complete Inlet
Tube (for use on 55 Gal /200 lts. Barrel).
Step 4 : Screw the Draw Head with Filter Gauze (Item No. 8) to the bottom of the Inlet Tube (Item No. 7).
Step 5 : Insert Locking Clip (Item No. 10) onto the Discharge Spout (Item No. 5). Then insert Discharge Hose (Item No. 9) about 1-1/2" (40 mm) over the
Discharge Spout. Widen the Locking Clip and Slip it over the Discharge Hose, so that it stays above the barb on the Discharge Spout, for secure lock of
the hose-to-the-spout.
!
LX-1318