Helpful Tips
• Food not hot enough?
• LunchEAZE heats from the bottom up. We
recommend putting proteins on the bottom,
and lighter items like vegetables or rice on top.
• Use the insulated bag! The insulation traps the
heat, and increases the temperature of the
food.
• Frozen Food?
• LunchEAZE can handle frozen foods, but for best
results let them defrost in the fridge overnight,
or pack them with a few hours before heating
begins.
• Food too hot?
• With upgraded models, use the heat setting
option to turn down the maximum heat. Set it
once and your setting will be saved until you
change it again.
• Want two meals?
• The LunchEAZE battery is designed to handle
one meal, but the battery pack can be swapped
with a charged pack. Or, you can leave
LunchEAZE plugged in, or use our car inverter to
charge on the go.
• Convenience features:
• LunchEAZE remembers your set mealtime. Just
turn it on and it’ll be ready to go with
yesterday’s settings.
• Leave your food container inside LunchEAZE
while you eat– LunchEAZE will actively keep
your food hot while you eat.
Spare Parts
• Every user-replaceable spare part is available on
the website (LunchEAZE.com)
• Available Parts:
• DC Charger
• Lithium Ion Battery
• LunchEAZE Lids (in all colors)
• Insulated Bags
• Stainless Steel Food Container
• Side Dish Containers
• Car Power Inverters
• Battery Replacement:
• LunchEAZE’s battery is user replacable.
• To do so, remove the 2 screws on the
bottom of the unit, and remove the battery
cover.
• Unplug both connections to the battery,
and remove the battery.
• Place a new battery in the chamber, and
connect both connections
• BOTH must be connected, and
each can be connected to either of
the 2 connectors on the battery
interchangeably.
FAQ
• Factory Reset: Hold POWER and ENTER together for
5 seconds together to factory reset your LunchEAZE
Lite. The screen will show all LED’s illuminated to
confirm.
• Battery: The battery lasts for 2.5 hours of heating (1
meal), charges in 3 hours, and can be charged while
the device is heating (charging will take longer in
this case).
• Cleaning: LunchEAZE Lite’s main body is not
waterproof. Clean spills with a damp cloth. The food
container, however, is totally dishwasher safe.
• Food Types: LunchEAZE Lite can handle any type of
food, including soups, whether or not they’re
frozen. FOR BEST RESULTS, let frozen food defrost
slightly in the fridge the night before.
• Food Storage: LunchEAZE Lite does not refrigerate
your food, although using an insulated bag helps
control temperatures. We do not recommend
keeping perishable foods in LunchEAZE Lite for long
periods of time.
• Food Temperature: LunchEAZE Lite heats to a
maximum of 220°F.
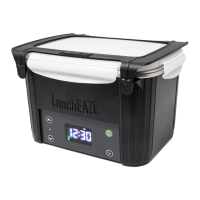
What’s Included
Each LunchEAZE unit comes with:
• 1x LunchEAZE Base
• 1x LunchEAZE Latch
• 1x Lithium Ion Battery (pre-installed)
• 1x Stainless Steel Food Container
• 1x Food Container Lid
• 1x 9V 5A DC Charger
User Guide: Adjust Heat*
• If your model includes temperature adjustment, this
menu option will be indicated by the thermometer
icon. The “Manual Heat” menu option will have no icon.
• When in this menu option, hold ENTER to adjust the max
temperature. Use UP and DOWN to increase or decrease
the max temperature.
• Temperatures can be adjusted between 170°F – 220°F.
• Press ENTER to confirm and save your settings.
LunchEAZE will remember your heat setting, so you do
not need to adjust it every time.
8
* UPGRADED MODELS ONLY
User Guide: Heating
• Your unit may be warm during this time, handle with
care.
• When heating, the Menu Indicator will only have the
flame icon illuminated.
• The display shows the current temperature of the
hotplate. Note that your food may be hotter or colder
than the hotplate itself.
• The display will flash every few seconds, and the
temperature readout will update.
• The temperature is shown in degrees Fahrenheit.
• LunchEAZE will heat up to a max of 220°F.
• Hold ENTER to view the time your meal will be ready.
9
User Guide: Battery and Charging
• This menu shows the current battery percentage.
• The battery reading is only accurate when the charger is
unplugged.
• If the battery level is too low for your meal to be heated
effectively, the battery icon will be flashing, even when
outside of this menu.
• To charge your LunchEAZE Lite, only use the included 9V
5A DC charger.
• Charging the battery takes about 3 hours.
• One battery charge will heat 1 meal, and keep it hot for
30-45 minutes after your mealtime.
• When charging, the Charge LED will be illuminated (see
“Interface” section). If the battery has been full and is
plugged in for an extended period of time, the Charge
LED will turn off.
10
User Guide: Loading Food
Pack food into the stainless
steel container. All 4 clasps
on its lid must be closed
securely, and the whole
container must be latched
down into LunchEAZE.
Lower the container into the
base, and make sure both
latches click down into
place, securing the
container’s lid tightly.
Always keep the lid closed
until you’re ready to eat.
3
User Guide: Manual Heat
7
• To start heating manually, hold ENTER when in this
menu option. Heat will start immediately, and the
display will show the temperature.
Base Model:
Upgraded Model:
• In Base Models, the Heat Now option is indicated by
the red thermometer indicator light. In Upgraded
Models, there is NO indicator light for this option.
 Loading...