EasyManua.ls Logo

LunchEAZE Lite - User Manual

LunchEAZE Lite
2 pages
Print Icon
To Next Page IconTo Next Page
Loading...
LunchEAZE Lite
User Manual
Designed and distributed in California by:
Reliant EMS Corp
47366 Fremont Blvd
Fremont, California, 94538
ReliantEMScorp.com
Visit LunchEAZE.com for more info
1
Follow all charging instructions and do not charge the
battery pack in environments above 60°C, or below 0°C.
Charging improperly or outside the specified range may
damage the battery and increase risk of fire.
Do not modify or attempt to repair any part of
LunchEAZE. Service can only be performed by the original
manufacturer.
Do NOT use without latching top lid closed and without
closing all 4 edges on the stainless steel food container.
Do NOT use if LCD display has been cracked or damaged.
Food container and contents will be HOT. Leave inserted
in LunchEAZE base while eating. Spilled hot food can
result in serious injury or burns.
LunchEAZE does NOT keep food refrigerated. Avoid
packing easily perishable foods for extended periods.
Do NOT dispose of any part of LunchEAZE in the trash.
Recycle your unit responsibly with an electronics
recycler.
LunchEAZE and ReliantEMS Corp are NOT responsible for
any damages that are a result of misuse of the product,
failure to follow instructions, or failure to exercise
caution when necessary.
Warranty: LunchEAZE comes with a 1 year manufacturing
defect warranty. This warranty excludes normal wear &
tear, water damage, and abuse.
IMPORTANT SAFEGUARDS AND SAFETY INFORMATION | SAVE THESE INSTRUCTIONS
Input: Battery:
9V 5A 8000mAh Lithium Ion
8.4V Max | 7.4V Nominal
WARNING: Read all safety warnings and instructions.
Failure to follow the warnings and instructions may
result in electric shock, fire, and/or serious injury.
WARNING: Spilled food can cause serious burns.
ONLY use LunchEAZE to reheat food, and ONLY use as
instructed.
Do not touch hot surfaces. LunchEAZE can heat up during
charging or operation. Only handle plastic enclosure.
To protect against electrical shock, do not immerse any
part of LunchEAZE in water, except the food container.
Clean spills with a damp cloth.
Close supervision is necessary when LunchEAZE is used by
or near children.
Unplug from charger when not in use. Allow all parts to
cool before putting on or taking off parts.
Do not operate LunchEAZE with a damaged cord or plug
after the unit malfunctions or has been damaged in any
manner. Return unit to LunchEAZE for servicing.
The use of accessory attachments not recommended by
LunchEAZE or ReliantEMS may cause injuries.
Do not let charging cord hang over edge of table or
counter, or touch hot surfaces.
Do not place on or near a hot gas or electric burner, or in a
heated oven.
Extreme caution must be used when moving LunchEAZE
when it contains hot oil, water, or other liquids.
Always attach charger to LunchEAZE first, then plug
charger into wall outlet.
Do not use LunchEAZE for other than its intended use.
Prevent unintentional starting. Ensure that LunchEAZE is
powered off before disconnecting the battery pack, and do not
carry LunchEAZE with your finger on the power button.
Disconnect the battery pack from LunchEAZE before making
any adjustments, changing accessories, or storing LunchEAZE.
These measures help reduce the risk of accidental starting.
Charge LunchEAZE ONLY with the supplied charger, featuring
model # TDX-0905000. Using a charger suitable with one
battery pack may create a risk of fire when used with another
battery pack.
Use LunchEAZE ONLY with the supplied battery pack, or a
replacement from LunchEAZE. Use of any other battery pack
may create a risk of injury and fire.
When battery pack is not in use, keep it away from other metal
objects, like paper clips, coins, keys, or any object that can
make a connection from one terminal to the other. Shorting
the battery terminals together may cause burns or a fire.
Under abusive conditions, liquid may be ejected from the
battery. Avoid contact. If contact occurs, flush with water, and
seek medical help. Liquid ejected from the battery may cause
irritation or burns.
Do not use a battery pack or LunchEAZE that has been
damaged or modified. Use of damaged or modified parts may
exhibit unpredictable behavior resulting in fire, explosion, or
risk of injury.
Do not expose battery pack or appliance to fire or excessive
temperature. Exposure to fire or temperature above 130°C
may cause explosion.
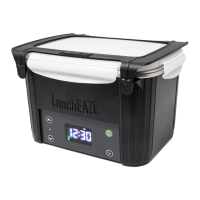
Getting Started
LunchEAZE is an automatic, heated lunch box. Pack
your food, program a mealtime, and LunchEAZE will
heat up automatically right on schedule.
Navigate the Menu
Press the ENTER button to cycle though the menu
options. The colored LEDs indicate which setting is
currently being shown.
Program your Settings
Hold the ENTER button, then use the UP and DOWN
buttons to adjust the setting that is being displayed.
Press ENTER again to confirm the changes. The colored
LED will flash when a setting is being adjusted.
Enjoy your Meal
If your mealtime is set, and the current time is set
correctly, LunchEAZE Lite will start heating
automatically 2 hours before your mealtime. The unit
must be powered ON for it to auto-start.
Please read ALL instructions for the best experience.
Please charge
your unit before
first use!
For hotter food,
keep unit inside an
insulated bag!
3
4
Interface
Power Button
(Hold to turn off)
Enter
Up
Menu
Indicators
Charge LED
RESET
Down
Navigating the Menu:
The Menu Indicators tell you what menu you are
currently in.
Press ENTER to cycle through menu options.
Editing a setting:
Hold ENTER to select or edit a menu item, such as the
mealtime or clock.
When a menu item is being edited, the Menu Indicator
will flash.
Use UP and DOWN to adjust settings.
Press ENTER again to confirm those settings.
Power:
Hold the POWER button to turn off the device.
2
Menus
Meal Time Setting. Indicates when your food
will be ready.
Clock Setting. Indicates the current time of day.
Manual Heat/Temperature Setting. Select to
start heating manually. If your model is
upgraded to include adjustable temperatures,
adjust max temperatures here.
Battery Life. Indicates the current battery
charge.
Heating Mode. Indicates that the device is
heating. The unit will be hot if this light is on,
exercise caution. The display indicates
temperature in °F.
User Guide: Setting Meal Time
LunchEAZE will automatically heat your food according
to your set meal time. Once set, LunchEAZE Lite will
remember your mealtime settings until you change it.
Adjust the mealtime by holding ENTER when in this
menu option. Use UP and DOWN to change the time.
AM and PM are indicated with lights above the display.
Press ENTER when done to confirm the time. LunchEAZE
Lite remembers your setting, so you do not need to set
this everyday.
Heating will start 2 hours before this mealtime. If you
set a mealtime sooner than 2 hours in advance, heat will
not start until tomorrow.
LunchEAZE Lite must be powered on for it to auto-start.
5
User Guide: Setting Clock Time
LunchEAZE Lite needs to know the time of day to start
heating correctly.
Once set, LunchEAZE Lite remembers the clock time, this
only needs to be set once. The very first time you start
your LunchEAZE Lite, you are prompted to input the
current time of day.
Every time LunchEAZE Lite turns on, it will show the
clock time briefly, then show the mealtime. It is
important for you to check and confirm that it is correct
to ensure your food heats properly.
Adjust mealtime by holding ENTER when in this menu
option. Use UP and DOWN to change the time.
AM and PM are indicated with lights above the display.
Press ENTER when done to confirm the time.
6
Question and Answer IconNeed help?

Do you have a question about the LunchEAZE Lite and is the answer not in the manual?

Summary

Getting Started

Navigate the Menu

Cycle through menu options using the ENTER button to navigate settings.

Program Your Settings

Use UP/DOWN buttons to adjust settings, and ENTER to confirm changes.

Enjoy Your Meal

Unit auto-heats 2 hours before mealtime if powered on.

Interface Overview

Menu Navigation

Use Menu Indicators and ENTER to cycle through current menus.

Editing Settings

Hold ENTER to select, use UP/DOWN to adjust, and ENTER to confirm.

Power Button Function

Hold the POWER button to turn the device off.

Setting Meal Time

Program Meal Ready Time

Set your desired meal ready time for automatic heating.

Setting Clock Time

Set Current Time of Day

Set the current time for accurate heating schedules.

Manual Heat Operation

Initiate Manual Heating

Hold ENTER in the 'Heat Now' option to start heating immediately.

Adjusting Heat Settings

Set Maximum Temperature

Adjust the maximum heating temperature for upgraded models.

Heating Status and Temperature

Heating Mode Indicator

Flame icon indicates heating; display shows current hotplate temperature.

Battery and Charging

Battery Percentage

Displays current battery level; accurate when charger is unplugged.

Charging Procedure

Use included 9V 5A DC charger; full charge takes approximately 3 hours.

Loading Food

Food Container Placement

Pack food, close lid securely, and latch container into the base.

Frequently Asked Questions

Factory Reset

Reset device to defaults by holding POWER and ENTER for 5 seconds.

Battery Performance

Battery lasts 2.5 hours heating; charges in 3 hours.

Cleaning and Food Compatibility

Clean spills with damp cloth; container is dishwasher safe.

Food Storage and Max Temperature

Does not refrigerate; heats food to a maximum of 220°F.

Overview

The LunchEAZE Lite is an automatic, heated lunch box designed to warm your food on schedule. It's a convenient solution for enjoying hot meals away from home, whether at work, school, or on the go. The device is user-friendly, allowing you to pack your food, program a mealtime, and then let LunchEAZE Lite handle the heating automatically.

Function Description

The core function of the LunchEAZE Lite is to heat food. Once you set a mealtime, the device will automatically begin heating your food approximately two hours before the programmed time. This ensures your meal is hot and ready when you are. The unit must be powered on for the auto-start feature to work. It features a display that shows the current time, mealtime settings, and, during heating, the internal temperature of the hotplate. The device can heat food up to a maximum of 220°F (104°C). For models with temperature adjustment, you can set a maximum heating temperature between 170°F (77°C) and 220°F (104°C). The LunchEAZE Lite is designed to reheat food and is not intended for refrigeration.

Usage Features

The LunchEAZE Lite features a simple interface with UP, DOWN, ENTER, and POWER buttons.

  • Navigating the Menu: Press the ENTER button to cycle through the menu options. Colored LEDs indicate the currently selected setting.
  • Setting Meal Time: To adjust the mealtime, navigate to the "Meal Time Setting" menu option, hold the ENTER button, and then use the UP and DOWN buttons to change the time. AM and PM indicators are shown with lights above the display. Press ENTER again to confirm. Once set, LunchEAZE Lite remembers your mealtime settings until you change them, so you don't need to set it daily.
  • Setting Clock Time: The device needs to know the correct time of day to start heating accurately. The first time you use LunchEAZE Lite, you will be prompted to input the current time. To adjust the clock time, navigate to the "Clock Setting" menu option, hold the ENTER button, and use the UP and DOWN buttons to change the time. AM and PM are indicated by lights above the display. Press ENTER again to confirm. The clock time is remembered once set.
  • Manual Heat/Temperature Setting: For base models, you can manually start heating by holding ENTER in this menu option. For upgraded models with temperature adjustment, you can also set the maximum heating temperature. Hold ENTER, then use UP and DOWN to adjust the temperature between 170°F and 220°F. Press ENTER to confirm. This setting is also remembered.
  • Battery Life Indicator: The display shows the current battery charge percentage. This reading is most accurate when the charger is unplugged. If the battery level is too low for effective heating, the battery icon will flash.
  • Heating Mode Indicator: When the device is actively heating, a flame icon will illuminate, and the display will show the current hotplate temperature. Exercise caution as the unit will be hot.

Loading Food:

  1. Pack your food into the stainless steel container.
  2. Ensure all four clasps on the container's lid are securely closed.
  3. Lower the container into the LunchEAZE base, making sure both latches click down into place, securing the container's lid tightly.
  4. Keep the lid closed until you are ready to eat.

Power Management:

  • Turning On/Off: Hold the POWER button to turn off the device.
  • Charging: Use only the included 9V 5A DC charger. The Charge LED will illuminate during charging. Charging takes approximately three hours. One full charge is designed to heat one meal and keep it hot for 30-45 minutes afterward. If the battery is fully charged and remains plugged in for an extended period, the Charge LED will turn off.
  • Battery Replacement: The LunchEAZE Lite's battery is user-replaceable. To replace it, remove the two screws on the bottom of the unit, remove the battery cover, unplug both connections to the battery, and then remove the old battery. Insert the new battery, ensuring both connections are securely attached.

Helpful Tips:

  • For Hotter Food: Place proteins at the bottom of the food container and lighter items like vegetables or rice on top, as LunchEAZE heats from the bottom up. Using an insulated bag with the LunchEAZE Lite can help trap heat and increase food temperature.
  • Frozen Food: While LunchEAZE Lite can handle frozen foods, for best results, it's recommended to let them defrost in the fridge overnight or pack them a few hours before heating begins.
  • Two Meals: The battery is designed for one meal. For additional meals, you can swap out the battery with a charged spare, leave the LunchEAZE plugged in, or use a car inverter to charge on the go.
  • Convenience: LunchEAZE Lite remembers your set mealtime. Simply turn it on, and it will be ready with yesterday's settings. Leaving your food container inside LunchEAZE while eating will keep your food hot.
  • Factory Reset: To perform a factory reset, hold the POWER and ENTER buttons together for five seconds. The screen will show all LEDs illuminated to confirm.

Maintenance Features

Cleaning:

  • The main body of LunchEAZE Lite is not waterproof. Clean spills on the device with a damp cloth.
  • The stainless steel food container is completely dishwasher safe.

General Care:

  • Do not immerse any part of LunchEAZE in water, except the food container.
  • Unplug the charger when not in use. Allow all parts to cool before handling.
  • Do not operate LunchEAZE with a damaged cord or plug. If the unit malfunctions or is damaged, return it to LunchEAZE for servicing.
  • Do not modify or attempt to repair any part of LunchEAZE yourself. Service can only be performed by the original manufacturer.
  • Do not expose the battery pack or appliance to fire or excessive temperatures above 130°C (266°F), as this may cause an explosion.
  • Recycle your unit responsibly with an electronics recycler; do not dispose of any part of LunchEAZE in the trash.

LunchEAZE Lite Specifications

General IconGeneral
Power SourceRechargeable Battery
TypePortable Food Warmer
Heating MethodElectric Resistance
MaterialStainless Steel and BPA-Free Plastic
Heating Time30 minutes