EasyManua.ls Logo

Lyfco Hollviken - User Manual

Lyfco Hollviken
20 pages
Print Icon
To Next Page IconTo Next Page
Loading...
ASSEMBLY MANUAL
BRUKSANVISNING
MODEL NAME: Höllviken
Höllviken MODELLNAMN:
SKU: 166-1-55
Konsumentkontakt
Arc E-commerce AB
Box 3124
13603 Haninge
XX-YYWW
Please don’t remove the batch code sticker at back side of this product!
Any feedback please take picture of this batch code for traceablity purpose
NOTE: 50% TIGHTEN BEFORE FIXING ALL BOLTS
VIKTIGT – LÄS MONTERINGSANVISNINGARNA NOGA INNAN DU BÖRJAR
Ta inte bort ettiketten med batchnummer som finns på möbeln. Om du behöver hjälp med service eller reklamation av din möbel –
ange möblensbatchnummer till återförsäljaren, så att du kan få rätt reservdelar till just din möbel.
Question and Answer IconNeed help?

Do you have a question about the Lyfco Hollviken and is the answer not in the manual?

Summary

Assembly Manual

Important Pre-Assembly Notes

Key instructions and warnings to read before starting the assembly process.

Assembly Guidance and Warnings

Optimized Assembly Techniques

Guidance on screw tightening, alignment, and ensuring product stability during assembly.

Assembly Prohibitions and Warnings

Lists actions to avoid, such as using power tools or proceeding with missing parts.

Parts and Hardware Identification

Component Identification A-H

Visual guide to main frame and structural components labeled A through H.

Hardware Identification 1-6

Visual guide to initial set of hardware, bolts, screws, and fabric.

Component Identification I-P

Visual guide to additional frame and structural components labeled I through P.

Hardware Identification 7-12

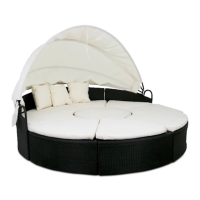
Visual guide to cushions, pillows, and assembly tools.

Component Identification A1-C2

Visual guide to further internal and frame components.

Component Identification D1, Q-R1

Visual guide to lid frames, bottom frames, and rain covers.

Step-by-Step Assembly Instructions

Step 1: Connect Inside Frame & Panel Side Frame

Initial connection of frame parts using specified bolts.

Step 2: Connect to Outside Frame

Attaching the assembled frame section to the outside frame.

Step 29: Attach Canopy Structure

Attaching the completed canopy structure to the main sofa frame.

Step 30: Install Gaslift Mechanism

Installing the gaslift mechanism for the canopy support.

Lyfco Hollviken Specifications

General IconGeneral
BrandLyfco
ModelHollviken
CategoryOutdoor Furnishing
LanguageEnglish