6
Features
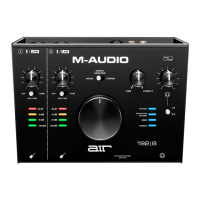
Top Panel
1. Power LED: This LED illuminates when a valid USB connection has been established between
your computer and AIR 192|8. Use this light to verify that AIR 192|8 is receiving power and is
ready to use.
2. Input Gain: Adjusts the input's gain level. Set this knob so the corresponding LED Meter
(located below the knob) displays a "healthy" level (yellow LED is lit) during performance—but
not so high that the meter frequently "clips" or peaks (red LED is lit), causing distortion in the
audio.
3. LED Meters: Indicates the input signal level from the Combo Inputs or Instrument Inputs.
4. MIDI LED: This LED illuminates when MIDI is being sent to or from the device.
5. Mono LED: This LED illuminates when the direct input monitor signal of channels 1 and 2 is set
to Mono.
6. Phantom Power LED: This LED illuminates when the Phantom Power switch is activated, and
+48V is applied to the microphone connections.
7. -10 dB Mic Pad Switches: Adjust these horizontal slide switches to reduce their associated
channel’s mic input gain by -10 dB. When in their right position the -10 dB pad will be active.
8. Phantom Power Switch: This switch activates and deactivates phantom power for Combo
Inputs 1–2. When activated, phantom power supplies +48 volts to the inputs. Please note that
most dynamic microphones and ribbon microphones do not require phantom power, while
most condenser microphones do. Consult your microphone's documentation to find out
whether it needs phantom power.
 Loading...