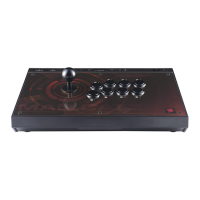
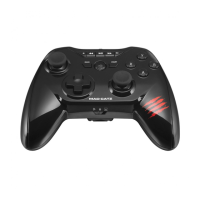
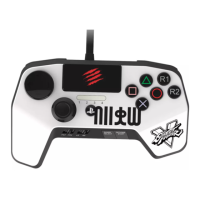
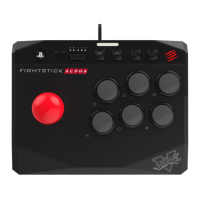
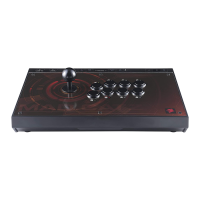
The Mad Catz EGO Arcade Stick is a universal arcade stick designed for an authentic gaming experience across multiple platforms. It comes with a hex screwdriver, a 3m USB cable, a 1m USB cable, and a user manual, providing all necessary accessories for setup and maintenance.
Function Description
The EGO Arcade Stick features a comprehensive set of buttons and controls for precise gameplay. The main controls include a joystick and eight action buttons, allowing for a wide range of inputs required in fighting games and other arcade-style titles.
Key functional buttons include:
- TURBO Button: This button enables a turbo function for the action buttons. When activated, the selected action buttons will rapidly output commands, up to 10 times per second, which can be beneficial in games requiring fast, repeated inputs.
- STICK MODE Button: This button allows users to switch between three joystick modes: D-pad (DP), Left Stick (LS), and Right Stick (RS). This versatility ensures compatibility with various games, as most titles typically work with either D-pad or Left Stick modes.
- LOCK LED: This LED indicates the status of the key lock function.
- LONG PRESS SWITCH BUTTON: This button is used for switching between different input modes (e.g., X-input, D-input, console mode) and for connecting to various gaming consoles.
- SHARE / VIEW Button: This button typically corresponds to sharing or view functions on consoles, allowing users to capture screenshots, record gameplay, or access in-game menus.
- KEY LOCK Button: This feature allows users to disable specific buttons to prevent accidental presses during intense gameplay. The buttons that can be locked are HOME, SHARE / VIEW, OPTIONS / MENU, L3, and R3. When activated, the LOCK LED illuminates.
- HOME Button: This button usually brings up the console's home screen or main menu.
- OPTIONS / MENU Button: This button provides access to in-game options or menus.
- R3 and L3 Buttons: These buttons correspond to the R3 and L3 inputs found on standard console controllers.
Connectivity is handled via USB. The device includes a built-in USB cable stored in a compartment at the back of the arcade stick, along with a separate 1m USB cable for specific console connections. There are also USB IN and CABLE OUT ports for flexible connectivity options.
Usage Features
The EGO Arcade Stick is designed for ease of use and broad compatibility.
PC Instructions:
- To use with a PC, retrieve the built-in USB cable from its storage space.
- Connect the USB cable to a USB port on the PC. The arcade stick will automatically connect in X-input mode, ready for immediate use.
- To switch to D-input mode, hold the Switch button for 2 seconds until the two Lock LEDs flash alternately. The lights will flash 3 times after 30 seconds and then return to show the KEYLOCK status. To revert to X-input mode, hold the Switch button for 2 seconds again.
PS4 / XB1 Instructions:
- For PS4 or XB1 consoles, take out the built-in USB cable from the storage space.
- Connect the USB cable to a USB port on the PS4 or XB1 console.
- Hold the Switch button for 2 seconds until the two Lock LED indicators flash alternately, changing to console mode.
- Use the included 1m USB cable to connect the micro USB head to the micro USB port of the PS4/XB1 controller. Then, connect the standard USB head of this 1m cable to the USB port at the back of the arcade stick. The two Lock LED indicators will turn ON for 3 seconds, confirming a successful connection between the PS4/XB1 controller and the arcade stick. They will then return to normal, indicating the KEYLOCK status. It is crucial to keep the USB cable connected to both the controller and the arcade stick during gameplay.
- If the connection fails (both LOCK LED indicators flash 3 times and then return to KEYLOCK status), remove the USB cable from the back of the arcade stick and repeat steps 2, 3, and 4.
TURBO Function:
- To Turn ON: With the TURBO switch set to OFF, hold down the desired action buttons for which you want to enable turbo, then slide the TURBO switch from "OFF" to "ON." The buttons will now output commands 10 times per second.
- To Turn OFF: Simply slide the TURBO switch from "ON" to "OFF" to disable the turbo function.
STICK MODE Switch:
- Users can switch between D-pad, Left Stick, and Right Stick modes using the STICK MODE button. This allows the joystick to emulate different controller inputs, ensuring compatibility with a wide array of games.
KEY LOCK Function:
- Pressing the KEY LOCK button will lock the HOME, SHARE / VIEW, OPTIONS / MENU, L3, and R3 buttons, preventing accidental activation. The LOCK LED will turn ON to indicate that these buttons are locked.
- Pressing the KEY LOCK button again will unlock these buttons, and the UNLOCK LED will turn ON.
Maintenance Features
The EGO Arcade Stick is designed with user-friendly maintenance and customization options.
- To access internal components for replacement, first retrieve the hex screwdriver from its storage space at the back of the arcade stick.
- Detach the 7 screws located at the bottom of the arcade stick and carefully remove the bottom plate.
- To replace buttons, disconnect the connecting cables from the buttons by pressing the two clips at the side of each button.
- To remove the joystick's top ball, use a normal flat screwdriver to hold the joystick in place from underneath, then rotate the top ball to unscrew it.
- To remove the top panel and access the artwork, detach the 6 screws from the top of the arcade stick.
- Once the top panel is removed, the artwork paper can be replaced.
- After replacing the artwork, reinstall the top panel, action buttons, and top screws.
- When reconnecting the cables to the buttons, follow the provided cable assignment label to ensure correct color-coded connections:
- Yellow cable for LB
- Green cable for RB
- Red cable for Y
- Brown cable for X
- Orange cable for LT
- Blue cable for RT
- Black cable for B
- Purple cable for A
- Finally, replace the bottom plate and carefully secure it with the 7 screws.
Precaution and Maintenance:
- Store the device in a cool, dry, and dust-free environment.
- Avoid storing in areas with extreme temperatures (below 0°C or above 40°C).
- Keep away from direct sunlight and heat sources.
- Prevent the product from getting wet or dirty, as this can cause damage.
- Do not clean with harsh solvents such as benzene, paint thinner, acetone, or alcohol.
- Do not disassemble the product beyond what is described in the manual, as this will void the warranty and may lead to electrical shock or damage to internal components.
- Recycle the cardboard packaging to help conserve the environment.
- Dispose of the product separately from normal household waste; take it to an electrical waste collection point.
- Avoid placing the product under extreme pressures.