EasyManua.ls Logo

Maddox MF15-1 User Manual

Maddox MF15-1
8 pages
To Next Page IconTo Next Page
Page #1 background imageLoading...
Page #1 background image
Visit our website at: http://www.harborfreight.com
Email our technical support at: productsupport@harborfreight.com
56803
Owners Manual & Safety Instructions
Save This Manual Keep this manual for the safety warnings and precautions, assembly,
operating, inspection, maintenance and cleaning procedures. Write the product’s serial number in the back
of the manual near the assembly diagram (or month and year of purchase if product has no number). Keep
this manual and the receipt in a safe and dry place for future reference. 19l
When unpacking, make sure that the product is intact
and undamaged. If any parts are missing or broken,
please call 1-888-866-5797 as soon as possible.
Copyright
©
2019 by Harbor Freight Tools
®
. All rights reserved.
No portion of this manual or any artwork contained herein may be reproduced in
any shape or form without the express written consent of Harbor Freight Tools.
Diagrams within this manual may not be drawn proportionally. Due to continuing
improvements, actual product may differ slightly from the product described herein.
To ols required for assembly and se rv ic e m ay n ot b e i nc lu de d .
Read this material before using this product.
Failure to do so can result in serious injury.
SAVE THIS MANUAL.
Question and Answer IconNeed help?

Do you have a question about the Maddox MF15-1 and is the answer not in the manual?

Maddox MF15-1 Specifications

General IconGeneral
Power0.75 kW
Frequency50Hz
MaterialCast Iron
Maximum Flow Rate15 m³/h
Max Flow Rate15 m³/h
Voltage220V

Summary

Owner's Manual & Safety Instructions

Manual Usage and Product Overview

Keep this manual for safety, assembly, operating, inspection, maintenance, and cleaning procedures. Record serial number.

Important Safety Information

General Safety Precautions (Part 1)

Follow all safety instructions to avoid serious injury. Covers personal safety, environment, tool care, and specific usage warnings.

Important Safety Information (Continued)

General Safety Precautions (Part 2)

Continue following safety instructions for tool operation, environment, and specific warnings regarding vehicle and fluids.

Setup Instructions

Pump Preparation for Use

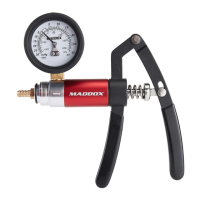
Prepare the vacuum pump by opening the cup, seating the O-ring, removing the spacer, and covering the inlet.

Operating Instructions

Vacuum System Testing Procedure

Test vacuum system by connecting pump, starting engine, reading gauge, and checking for leaks or blockages.

Brake Bleeding Procedure

Brake Bleeding Setup and Initial Steps

Connect hoses, fill master cylinder, create vacuum, open bleed screw, allow fluid flow, retighten screw.

Brake Bleeding Completion

Completing Brake Bleeding and Fluid Management

Release vacuum, disconnect adapter, refill master cylinder, and check for leaks and proper brake operation.

Automatic Brake Fluid Refilling

Refilling Brake Fluid

Maintain master cylinder level with new fluid. Use adapters and plates to refill, then bleed the system.

Maintenance and Servicing

Tool Maintenance and Storage

Inspect pump before use. Clean with dry cloth. Store dry and out of reach. Repairs by qualified technicians only.

Parts List and Diagram

Component Identification

Identify all parts of the vacuum pump kit including hoses, adapters, cups, and lids using the provided list and diagram.

Limited 90 Day Warranty

Warranty Terms and Conditions

Product warranted for 90 days against defects. Excludes misuse, accidents, and lack of maintenance. Claims require proof of purchase.

Repair and Liability Disclaimer

States that all repairs and parts replacements should be undertaken by certified technicians. Buyer assumes all risk for DIY repairs.