Do you have a question about the Magnadyne M1-LCD-2 and is the answer not in the manual?
Important safety guidelines to prevent fire, electric shock, and ensure proper operation of the unit.
Information on handling the LCD panel, temperature effects, and cleaning procedures to prevent damage.
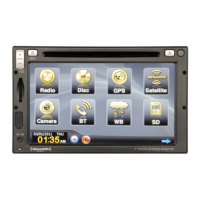
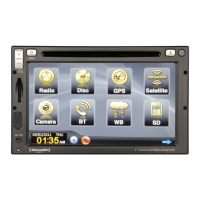
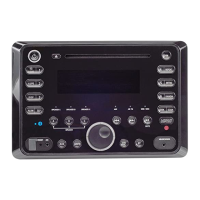
Description of the non-touch display area and the information it presents to the user.
Explanation of how to select different audio/video sources using the touch-activated area.
Details on the touch-activated Home Row buttons like Home, Settings, Display, Dim, and Mute.
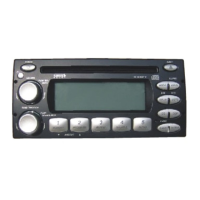
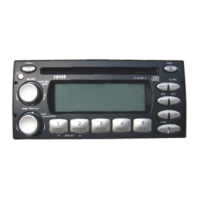
Identifies and explains the functions of buttons located on the main unit's front panel.
Explains the purpose and operation of each button on the provided remote control.
How to enable or disable the audible beep feedback when unit buttons are touched.
Adjusting the tuner's configuration to receive frequencies from different geographical regions.
Option to change the screen's background color from available choices.
Enabling the front camera view, necessary if the system has a front camera installed.
Setting the initial volume level that the unit defaults to when turned on.
Enabling/disabling the Radio Data System for station information display.
Configuring the unit to display a clock on the screen when the ignition is on but the unit is off.
Returning to the main source selection screen from any menu or operation screen.
Navigating to the secondary screen for adjusting Sound, Monitor, and Time settings.
Accessing controls for Bass, Treble, Balance, and Fader to adjust audio output.
Adjusting screen brightness, color, contrast, and tint for optimal picture quality.
Interface for setting the unit's internal clock and time format.
Configuring the clock to 12 or 24-hour format and adjusting the current time.
Using the Display button to show extra information related to the current source.
Adjusting the screen's illumination level, toggling between dim and normal brightness.
Temporarily silencing the unit's audio output by pressing the Mute button.
Navigating to the previous screen or menu option when available.
Increasing or decreasing the audio volume using the unit's buttons or remote.
Adjusting Bass, Treble, Balance, and Fader for optimal sound staging and tone.
Selecting from various pre-defined equalizer settings like Flat, Classics, Pop, Rock, Jazz.
Boosting high and low frequencies at low volume levels to enhance perceived sound clarity.
Adjusting the subwoofer's output level or turning it on/off if equipped.
Enabling or disabling voice guidance prompts from the navigation system.
Turning the unit on and selecting the Radio source from the main menu.
Switching between AM1, AM2, FM1, FM2, and FM3 bands to access different radio frequencies.
Manually tuning to specific radio stations by adjusting frequency or using seek functions.
Automatically scanning for the next available strong radio station and playing it.
Storing favorite radio stations for quick recall using dedicated preset buttons.
Accessing previously stored radio stations by pressing their corresponding preset recall buttons.
Automatically scanning and storing the strongest available radio stations into memory.
Cycling through stored radio presets, pausing briefly at each station.
Searching for FM radio stations based on specific program types like News, Sports, or Talk.
Activating the Traffic Announcement function to receive traffic updates from radio stations.
Cycling through available display options for radio station frequency, call letters, or PTY type.
Turning the unit on and selecting the Weather Band source from the main menu.
Automatically selecting and playing the strongest available weather band station.
Information on compatible disc types (DVD, CD, MP3) and essential handling precautions.
Proper methods for handling, cleaning, and avoiding damage to discs.
Instructions for removing rough edges from new discs to ensure proper playback.
Procedures for inserting a CD and initiating playback on the unit.
Switching to the CD player source and navigating between tracks.
Functions for pausing the CD and resuming playback, or stopping the disc entirely.
How to safely eject a disc from the CD player slot.
Using repeat functions for tracks or discs, and previewing tracks before playback.
Enabling random playback of tracks on a CD for varied listening.
Guidelines for loading and playing MP3 files from various media types.
Connecting and operating USB devices for MP3 playback, including handling notes.
Inserting and operating SD cards for MP3 playback, including handling precautions.
Two methods for navigating and selecting MP3 files organized into folders.
Selecting individual MP3 tracks and navigating through them using screen or remote.
Adjusting playback speed for fast forwarding or rewinding MP3 tracks.
Pausing the current MP3 track and resuming playback from the paused point.
Stopping MP3 playback and cycling through different display modes for track information.
Using the repeat function for individual MP3 tracks, directories, or all tracks.
Enabling random playback of MP3 tracks using the remote control.
Procedure for safely ejecting discs or removing USB/SD card media.
Safely removing USB devices and SD cards from the unit's ports.
Steps for inserting a DVD and initiating playback, including auto-load process.
Information displayed when the vehicle is in motion, restricting video playback.
Using the menu screen and navigation buttons to control DVD playback options.
Controls for pausing, resuming, and stopping DVD playback.
Navigating through different chapters of a DVD using the provided controls.
Using fast forward and rewind functions at various speeds for DVD content.
Accessing and understanding the DVD title screen and its functions.
Choosing desired subtitle languages for DVD playback from available options.
Selecting preferred audio languages or sound configurations for DVD content.
Adjusting TV system, screen saver, TV type, password, and rating settings for DVDs.
Setting OSD, Audio, Subtitle, and Menu languages for DVD interaction.
Configuring audio downmix options and key settings for DVD playback.
Steps to find the Sirius Tuner ID Number (SID) required for activation.
Introduction to manual tuning, direct tuning, and category tuning for Sirius channels.
Procedures for tuning into Sirius channels by manually adjusting the channel number.
Tuning directly to a specific Sirius channel by entering its number.
Entering channel numbers directly for precise Sirius channel selection.
Selecting Sirius channels by browsing and choosing from different content categories.
Accessing and navigating the comprehensive list of available Sirius channels.
Storing favorite Sirius channels into preset memory slots for quick access.
Utilizing different preset bands (SIR1, SIR2, SIR3) to store up to 18 Sirius channels.
Accessing stored Sirius channels by selecting the appropriate preset number.
Temporarily skipping unwanted Sirius channels to avoid hearing them.
Restoring skipped Sirius channels back into the regular rotation.
Switching the unit's input to the CD changer for playback.
Navigating between tracks and discs loaded in the CD changer.
Using functions like pause and disc selection for the CD changer.
Setting repeat modes for individual tracks or entire discs in the CD changer.
Previewing tracks or discs loaded in the CD changer before full playback.
Enabling random playback of tracks across all discs in the CD changer.
Instructions for connecting external audio/video devices via 3.5mm or RCA inputs.
Switching the unit's input to the auxiliary source for external device playback.
Display indicating which auxiliary input (front or rear) is currently selected.
How rear and side view cameras automatically activate based on vehicle conditions.
Procedures for manually selecting front, rear, left, or right camera views.
Adjusting the motorized rearview camera's tilt and saving preset viewing angles.
How to connect an iPod and use the M1-LCD-2 to control its playback functions.
Navigating iPod libraries by playlist, artist, album, genre, or song title.
Selecting and playing individual songs from the iPod library.
Managing iPod playback, including pausing, resuming, and track selection.
Switching the unit's input to the optional navigation system.
Enabling or disabling voice prompts from the navigation system.
Steps for sleeve mounting the radio chassis into the dashboard opening.
Instructions on how to safely remove the radio unit from its mounting sleeve.
Procedure to reset the radio's microprocessor to factory settings using the reset button.
Guidance on identifying and replacing the unit's main fuse with the correct amperage.
| Display Type | LCD |
|---|---|
| Bluetooth | Yes |
| USB Port | Yes |
| Aux Input | Yes |
| Power Output | 50W x 4 |
| Touchscreen | Yes |
| SD Card Slot | Yes |
| Backup Camera Input | Yes |
| Radio Tuner | AM/FM |
| DVD Player | No |
| CD Player | No |
| Remote Control | Yes |
| Resolution | 800 x 480 |