Do you have a question about the Magnadyne M9900 and is the answer not in the manual?
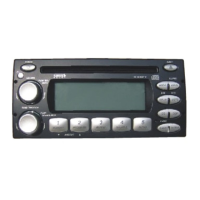
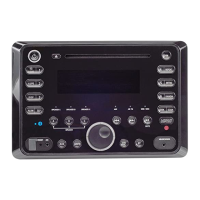
Activates the weather band radio, taking priority over other sources.
Turns the unit on and adjusts the listening volume level.
Used for tuning stations, changing tracks, and setting clock time.
Operates the cassette tape ejection mechanism.
Programs/recalls station #1 and controls CD play/pause.
Programs/recalls station #2 and controls CD repeat function.
Physical slot for inserting and accessing cassette tapes.
Programs stations and plays CD intro for each song.
Programs stations and plays CD tracks in random order.
Used for programming and recalling the fifth radio station preset.
Controls for rewinding, fast-forwarding, and changing tape direction.
Adjusts bass, treble, and speaker balance controls.
Resets unit to default settings, clearing all memory.
Displays the clock and can be used to set the time.
Cycles through available AM and FM radio bands.
Switches playback between Radio, CD, and Cassette sources.
Ejects the CD from the player slot.
Location for inserting Compact Discs.
Shows radio station, clock, and preset recall information.
Indicates CD and cassette tape playback status and features.
Rotate tuning knob to select stations digit by digit.
Press tuning knob to scan for the next strong station.
Hold tuning knob to scan for the next available station.
Use BAND button to choose FM1, FM2, FM3, AM1, AM2.
Use Tuning/Scan knob to find station frequency.
Press and hold preset buttons (5-10) to save stations.
Press W.BAND button to access weather radio.
Press Scan button to cycle through all 7 stations.
Press W.BAND button again to turn off.
Insert CD into slot with label facing up for auto load/play.
Rotate the Track knob to select next or previous song.
Press INTRO button to play 10 seconds of each song.
Press RANDOM button to play songs in a different order.
Press REPEAT button to replay a single song or the entire disc.
Use PLAY/PAUSE button to temporarily stop and resume CD playback.
Press Eject button to remove the CD.
Insert tape into slot, thick end to the right, do not force.
Display shows current tape side (A or B) with indicators.
Tape auto-reverses; press REW/FF simultaneously to change direction.
Press REW or FF buttons until they lock for continuous action.
Press Eject button fully to pop out the tape.
Use quality head/mechanism cleaners regularly for best performance.
Avoid C-120 tapes; C-90 and shorter are acceptable.
Tighten tape slack using a pencil in the hub.
Adjusts the amount of low frequency heard in the music.
Adjusts sound output between left and right speakers.
Adjusts the amount of high frequency heard in the music.
Adjusts sound output balance between front and rear speakers.
Resets unit to default settings, clearing all memory and rebooting.
Selects playback source (Radio, Tape, CD) when multiple are active.
Displays the clock and can be used to set the time.
Procedure to adjust hours and minutes using tuning/volume controls.
Describes sleeve mounting and required opening size for installation.
Suggests using adapter harnesses if available for easier installation.
Bending tabs on sleeve to fix it securely to the dashboard.
Details for power, antenna, lighting, and ground wires.
Connects unit wires to front/rear left/right speakers.
Important safety notes about unconnected wires and potential shorts.
Illustrates how to mount the unit using a sleeve and strap.
Shows how to connect speaker wires to the unit's harness.
Covers defects, excludes labor/damage, provides legal rights.
| Model | M9900 |
|---|---|
| Tuner Bands | AM/FM |
| Display Type | LCD |
| CD Player | No |
| USB Port | Yes |
| Auxiliary Input | Yes |
| Bluetooth | Yes |
| Remote Control | Yes |
| Power Output | 200W Max |