EasyManua.ls Logo

Makita DCU180 - User Manual

Makita DCU180
28 pages
Print Icon
To Next Page IconTo Next Page
Loading...
INSTRUCTION MANUAL
Battery Powered Wheelbarrow
DCU180
ENGLISH: Original instructions
Read before use.
Question and Answer IconNeed help?

Do you have a question about the Makita DCU180 and is the answer not in the manual?

Summary

SPECIFICATIONS

Applicable battery cartridge and charger

Lists compatible battery cartridges and chargers for the machine.

Symbols

Explanation of symbols used in the manual and on the equipment.

Intended use

Noise

Vibration

EC Declaration of Conformity

SAFETY WARNINGS

General power tool safety warnings

Covers essential safety precautions for operating power tools.

Work area safety

Guidelines for maintaining a safe and organized work environment.

Electrical safety

Personal safety

Power tool use and care

Battery tool use and care

Service

Battery powered wheelbarrow safety warnings

Operation

Operation on slopes

Specific safety guidelines and procedures for operating on slopes.

Loading objects

Precautions and best practices for loading objects onto the wheelbarrow.

Maintenance

Important safety instructions for battery cartridge

Tips for maintaining maximum battery life

PARTS DESCRIPTION

Parts description (when the carrier is installed)

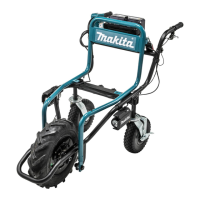
Identifies parts when the carrier is attached to the wheelbarrow.

Parts description (when the bucket is installed)

Identifies parts when the bucket is attached to the wheelbarrow.

ASSEMBLY

Assembling main unit

Step-by-step instructions for assembling the main unit of the wheelbarrow.

Assembling and installing carrier

Installing bucket

FUNCTIONAL DESCRIPTION

Installing or removing battery cartridge

Instructions for safely installing and removing the battery cartridge.

Machine; battery protection system

Switching the battery cartridge

Indicating the remaining battery capacity

Only for battery cartridges with the indicator

How to check the remaining battery capacity using indicator lamps.

Control panel

Switch and brake action

Rear wheel brake

Lighting up the front lamps

Adjusting the handle height

Adjusting the width of the carrier

OPERATION

Operating the machine

Step-by-step guide on how to start and operate the wheelbarrow.

Loading objects

Safety precautions and steps for loading objects onto the wheelbarrow.

Dumping objects

Procedure for safely dumping the contents of the carrier or bucket.

MAINTENANCE

Periodic checks

Regular checks to ensure the machine is in good working order.

Cleaning the machine

Storage

Adjusting the brake

OPTIONAL ACCESSORIES

Refilling the tire with air

Overview

The Makita DCU180 is a battery-powered wheelbarrow designed for loading and carrying objects with electric assistance. It is intended for use on flat ground and slopes, but not on public roads or for transporting people.

Technical Specifications

Dimensions (L x W x H):

  • When carrier is installed:
    • During operation: 1,315 mm x 1,060 mm x 900 mm
    • When stored: 1,110 mm x 820 mm x 820 mm
  • When bucket is installed:
    • During operation: 1,310 mm x 820 mm x 900 mm
    • When stored: 1,110 mm x 820 mm x 820 mm

Traveling speed:

  • Forward: 1.5 or 3.5 km/h
  • Reverse: 1.0 km/h

Minimum turning radius: 1,075 mm (Outer diameter when turning with front wheel as axis) Maximum climbing capacity: 12° Maximum load capacity: 130 kg

Brake:

  • Front wheel: Disc brake with wire
  • Rear wheel: Fixed with pedal

Tire:

  • Front wheel: Tubeless tire
  • Rear wheel: Self-sealing tire

Rated voltage: D.C. 18 V

Net weight:

  • When carrier is installed: 43.7 - 44.0 kg
  • When bucket is installed: 40.7 - 41.0 kg

Applicable battery cartridges: BL1815N, BL1820B, BL1830B, BL1840B, BL1850B, BL1860B Applicable chargers: DC18RC, DC18RD, DC18RE, DC18SD, DC18SE, DC18SF, DC18SH

Noise level (A-weighted):

  • Sound pressure level (LpA): 70 dB(A) or less
  • Uncertainty (K): 3 dB(A)
  • Noise level under working may exceed 80 dB(A).

Vibration total value (tri-axial vector sum):

  • Work mode: operation without load
  • Vibration emission (ah): 2.5 m/s² or less
  • Uncertainty (K): 1.5 m/s²

Usage Features

Assembly: The main unit assembly involves taking out the base unit and handles from the box, placing packing material under the rear side of the base unit, inserting the rear wheels into the frame (or support legs instead), attaching spring washers and washers to short hexagonal bolts, tightening them with a wrench, raising and inserting the handles, and fixing cords with clamps. The carrier frame can be opened and folded. The brake can be locked by pressing a button while pulling the brake lever.

Carrier/Bucket Installation: The carrier or bucket is attached to the base unit by inserting hexagonal bolts and washers into the frames from the top, then tightening them with washers, spring washers, and butterfly nuts from the bottom. Long bolts are used for the front and short bolts for the rear.

Battery Cartridge:

  • Installation: Rotate the lock lever, open the battery box cover, align the battery cartridge tongue with the slot, slide it until it locks, and insert the lock key fully. Close the cover and rotate the lock lever.
  • Removal: Rotate the lock lever, open the battery box cover, pull out the cartridge while sliding the button, pull out the lock key, close the cover, and rotate the lock lever.
  • Protection System: The machine has overload, overheat, and overdischarge protection. It automatically cuts off power to protect the motor and battery. A short beep sounds before automatic shutdown.
  • Capacity Indication: Press the check button on the battery box to see the remaining capacity indicated by LED lamps.
  • Switching: Up to two battery cartridges can be installed. Select the operating cartridge by pressing the corresponding number on the battery selection switch.

Control Panel:

  • Power: Press the power button for a few seconds to turn on/off.
  • Forward/Reverse: Press the forward/reverse button to switch modes. Forward mode and low speed are set by default when powered on.
  • Speed: Press the speed button to switch between low and high speed.
  • Note: Forward/reverse and speed buttons are not available while pulling the switch trigger. A short beep sounds when operating in reverse.

Brake System:

  • Switch and Brake Action: Pull the switch trigger to start, release to stop. Pull the brake lever to stop, press the lock button while pulling the lever to lock it. Release the lock by pulling the brake lever.
  • Rear Wheel Brake: Press the brake pedals forward to lock, press backward to release.
  • Adjustment: Remove the carrier/bucket, open the carrier frame, pull the brake lever to release the lock button, loosen the adjusting sleeve and fixing nut, adjust, then tighten the fixing nut and adjusting sleeve.

Front Lamps: Press the lamp button on the battery box to turn the lamps on/off. Lamps go off after 10 minutes of inactivity or when power is turned off. They can be lit even without the lock key.

Handle Height Adjustment: Remove short hexagonal bolts and shoulder bolts, adjust the handle height (three levels), then tighten the bolts to fix. Ensure left and right handles are at the same height.

Carrier Width Adjustment: Loosen the four thumb nuts, slide the side rails to adjust width, then tighten the thumb nuts to fix. Do not slide rails beyond the limit mark.

Operation:

  • Always hold handles firmly.
  • Ensure the lock key is inserted and the brake lever works properly before operation.
  • Select the battery cartridge.
  • Release the brake lever lock.
  • Pull the switch trigger to operate.

Loading Objects:

  • Ensure power is off and brake lever is locked.
  • If rear wheels are installed, ensure rear wheel brake is locked.
  • Ensure carrier or bucket is locked.
  • Load objects within the carrier/bucket, below eye level, and evenly.
  • Secure objects with ropes.

Dumping Objects:

  • Stop the machine and lock the brakes.
  • Release the lock lever.
  • Lift and tilt the carrier/bucket by pushing up the frame while holding the handle.
  • Ensure the carrier/bucket is locked after dumping.

Operation on Slopes:

  • Do not cross slopes.
  • Decrease speed and exercise caution.
  • Exercise caution when starting or stopping.
  • Secure loads firmly with ropes.
  • Keep load to a minimum and below eye level.
  • Never park on steep slopes; park on flat ground, lock brake, and turn off power.
  • Do not change direction or speed mode on steep slopes.
  • Do not release the switch trigger on upward slopes.
  • Ensure sufficient battery capacity before operating on slopes.

Maintenance Features

Periodic Checks:

  • Check that all bolts and nuts are tightened firmly.
  • Check that the carrier is locked when the lock lever is fully pulled down.
  • Check that the brake lever works properly.
  • Check the front wheel for damage or flatness, and ensure sufficient air pressure (230 KPa).

Cleaning:

  • Remove mud, dirt, etc., with running water. Do not use high-pressure washer, gasoline, benzine, thinner, or alcohol. Wipe with a dry cloth.

Storage:

  • Remove the lock key.
  • Store in a safe place out of reach of children.
  • Handles can be turned toward the front for storage by removing and then re-tightening short hexagonal bolts and shoulder bolts.

Battery Life Tips:

  • Charge before complete discharge.
  • Never recharge a fully charged battery.
  • Charge at room temperature (10 °C - 40 °C).
  • Remove from tool/charger when not in use.
  • Charge if not used for more than six months.

Makita DCU180 Specifications

General IconGeneral
BrandMakita
ModelDCU180
CategoryOutdoor Cart
LanguageEnglish