9 ENGLISH
PARTS DESCRIPTION
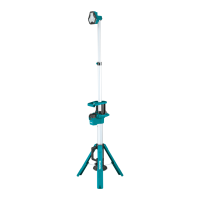
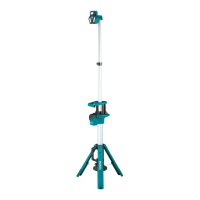
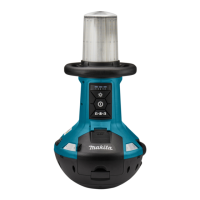
► Fig.1
1 Light head 2 Lens 3 Upper extension pole
4 Upper extension latch 5 Lower extension pole 6 Horizontal handle
7 Lower extension latch 8 Power switch button 9 Brightness change button
10 Battery bay 11 Shoulder belt hole 12 Tripod release button
13 Carrying handle 14 Tripod legs 15 Hole for xing
FUNCTIONAL
DESCRIPTION
CAUTION: Always be sure that the appli-
the appliance.
Installing or removing battery
cartridge
CAUTION: Hold the appliance and the bat-
battery cartridge. Failure to hold the appliance and
the battery cartridge rmly may cause them to slip o
your hands and result in damage to the appliance and
battery cartridge and a personal injury.
CAUTION:
between the appliance and battery cartridge when
loading battery cartridge as well as between the
appliance and the battery cover when closing the
battery cover.
To install the battery cartridge, release the cover lock,
and open the battery cover.
► Fig.2: 1. Cover lock 2. Battery cover
To install the battery cartridge, align the tongue on the
battery cartridge with the groove in the housing and slip
it into place. Insert it all the way until it locks in place
with a little click.
Then close the battery cover.
► Fig.3: 1. Button 2. Battery cartridge
To remove the battery cartridge, slide it from the
appliance while sliding the button on the front of the
cartridge.
CAUTION: Always install the battery cartridge
If not, it may accidentally fall out of the appli-
ance, causing injury to you or someone around you.
CAUTION: Do not install the battery cartridge
If the cartridge does not slide in easily, it is
not being inserted correctly.
Indicating the remaining battery
capacity
Only for battery cartridges with the indicator
► Fig.4: 1. Indicator lamps 2. Check button
Press the check button on the battery cartridge to indi-
cate the remaining battery capacity. The indicator lamps
light up for a few seconds.
Indicator lamps Remaining
capacity
Lighted Blinking
75% to 100%
50% to 75%
25% to 50%
0% to 25%
Charge the
battery.
The battery
may have
malfunctioned.
NOTE: Depending on the conditions of use and the
ambient temperature, the indication may dier slightly
from the actual capacity.
NOTE: The rst (far left) indicator lamp will blink when
the battery protection system works.
Appliance / battery protection
system
The appliance is equipped with the protection system.
This system automatically cuts o power to extend
appliance and battery life. The appliance will automati-
cally stop during operation if the appliance or battery is
placed under one of the following conditions.
Overdischarge protection
When the battery capacity becomes low, the LED lights
go out except a part of LEDs. Later, the system auto-
matically cuts o power. In this situation, remove the
battery cartridge from the appliance and charge it.