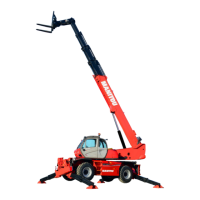
Estrarre il perno di bloccaggio (rif. A Fig. 41)
dal supporto ed utilizzarlo per bloccare il
cestello assicurandolo con l’apposita copiglia
(rif. B Fig. 41).
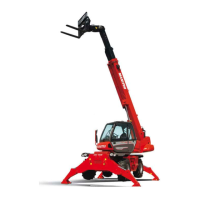
NON DIMENTICARE
DI BLOCCARE IL SUPPORTO
TRAMITE L’APPOSITO PERNO DI
BLOCCAGGIO (rif. A Fig. 42) E LA
SUA COPIGLIA (rif. B Fig. 42).
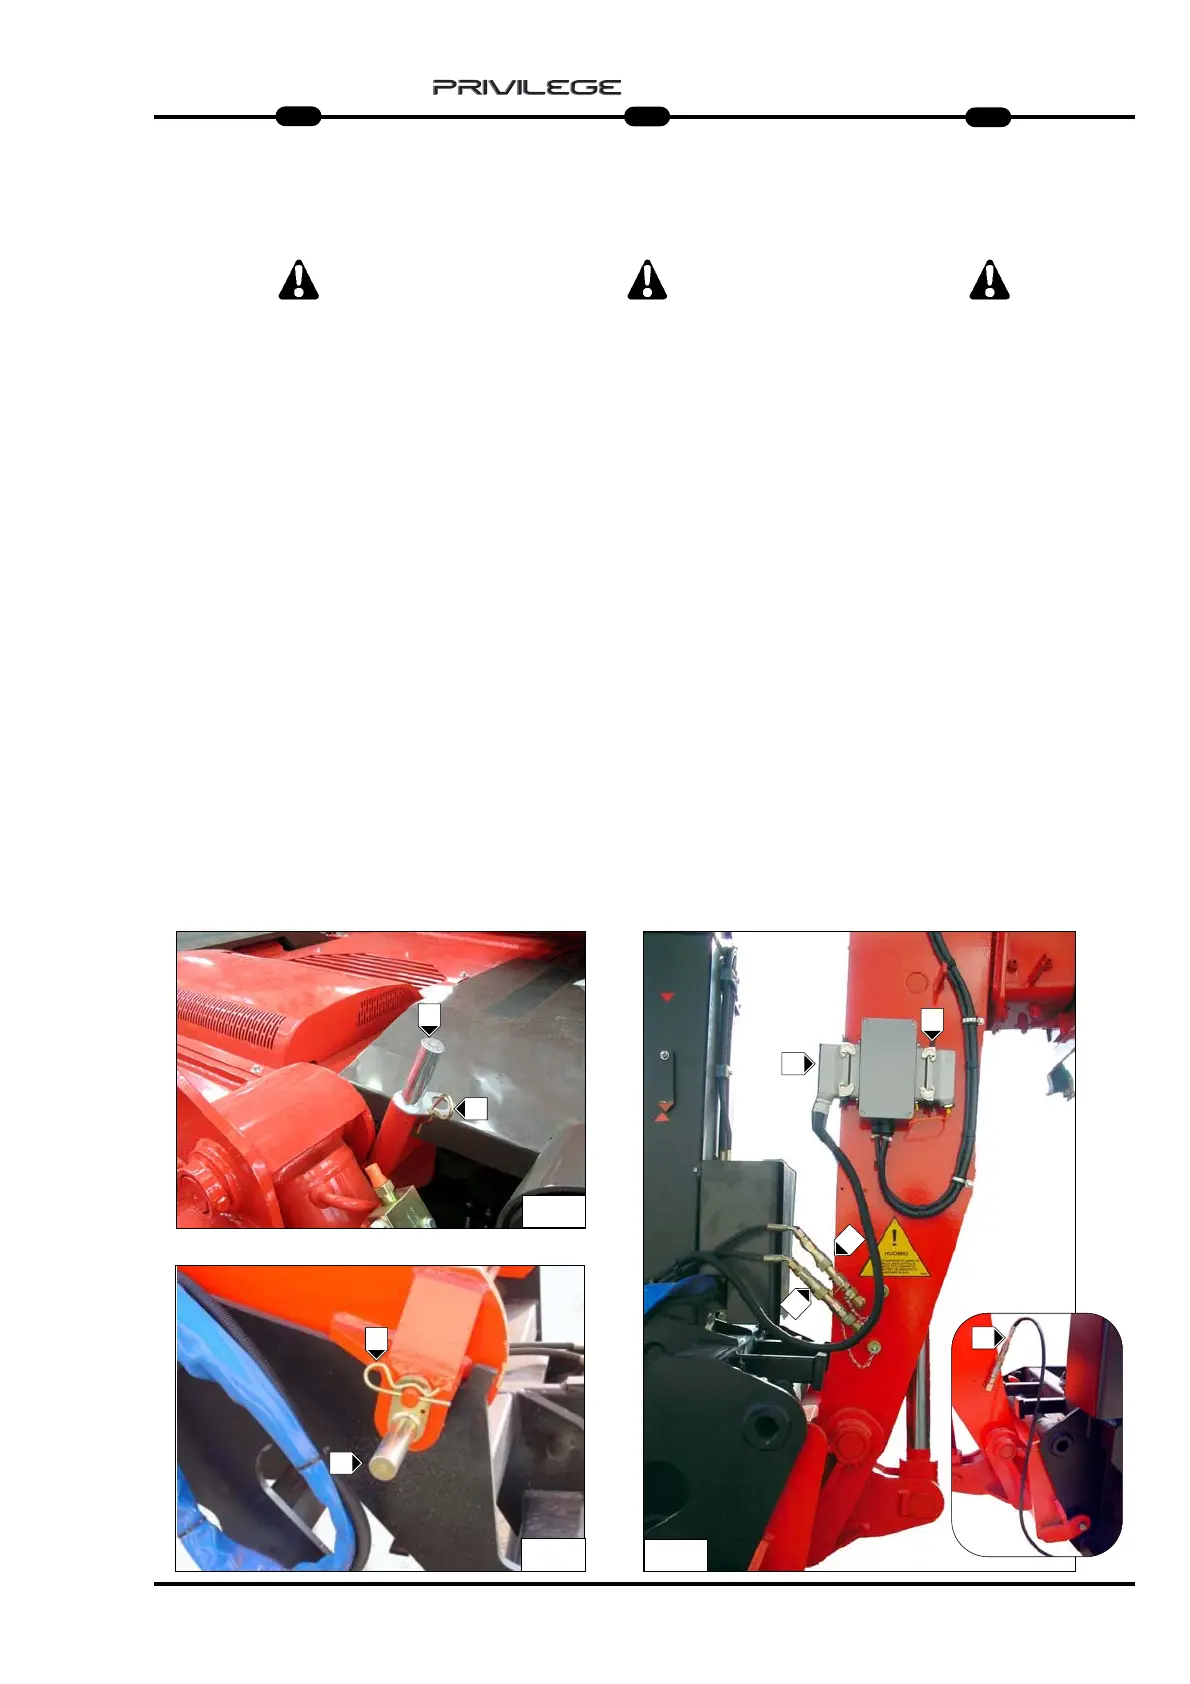
- Agganciare i tubi flessibili di comando
movimenti cestello in testa al braccio
(rif. C Fig. 43 - rif. D Fig. 43).
- Fare attenzione al senso dei raccordi.
- Collegare il cavo della pulsantiera
cestello sulla presa prevista a questo
scopo a lato della testa del braccio
(rif. E Fig. 43).
Nota: Prima di innestare il cavo (rif. E Fig. 43),
occorre togliere il coperchio di
sicurezza (rif. F Fig. 43), e fissarlo sulla
presa (vedi Fig. 43). Il coperchio di
sicurezza dovrà essere rimesso nella
posizione iniziale dopo l’utilizzo del
cestello.
44
44
11
11
44
44
22
22
A
A
E
C
C
B
D
44
44
33
33
F
IT
1
25
MRT 1850 - 2150 - 2540
B
Extract the check pin from the support
(ref. A Fig. 41) and use it to block the Aerial
Jib basket, securing it by means of the split
pin (ref. B Fig. 41).
DO NOT FORGET TO BLOCK THE SUP-
PORT BY MEANS OF THE LOCKING PIN
(ref. A Fig. 42) AND ITS SPLIT PIN
(ref. B Fig. 42).
- Fit the basket movement control hoses at
the top of the boom (ref. C Fig. 43 - ref. D
Fig. 43).
- Take special care to fit the connections in
the right direction.
- Plug the basket pushbutton cable into the
socket provided for the purpose on the
top of the boom (ref. E Fig. 43).
Note: Before connecting the cable (ref. E Fig.
43), remove the safety cover (ref. E Fig. 43),
and fix it in the socket (see Fig. 43). The
safety cover must be refitted in its original
position after using the basket.
Den Sperrbolzen aus dem Träger (Bez. A
Abb. 41) herausziehen und benutzen, um
den Arbeitskorb zu blockieren, wozu man ihn
mit dem Sicherungssplint (Bez. B Abb. 41)
fixiert.
NICHT GEGESSEN, DEN TRÄGER
MIT DEM SPERRBOLZEN (Bez. A Abb. 42)
UND SEINEM SICHERUNGSSPLINT
(Bez. B Abb. 42) ZU BLOCKIEREN.
- Die Schläuche zum Ansteuerung
der Arbeitskorbbewegungen am
Auslegerkopf (Bez. C Abb. 43 - Bez A
Abb. 43 ) befestigen.
- Auf die Richtung der Anschlüsse achten.
- Das Kabel der Schalttafel des Arbeitskorbs
an die Steckbuchse anschließen, die zu die-
sem Zweck auf der Seite des Auslegerkopfs
vorhanden ist (Bez. E Abb. 43).
Hinweis: Vor dem Einstecken des Kabels
(Bez. E Abb. 43) ist der Sicherheitsdeckel
(Bez. F Abb. 43) abzunehmen und auf der
Steckbuchse zu befestigen (siehe Abb. F).
Der Sicherheitsdeckel muss nach der
Benutzung des Arbeitskorbs wieder in der
ursprünglichen Position angeordnet
werden.
EN
DE