Start Here - MAXI-JET
®
Utility Pumps Quick Setup Option Guide
- SETUP OPTIONS -
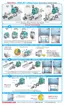
Model 400 Models 900 & 1100 Models 1800 & 3000
8
2
6
7
1
2
3
4
5
8
Models
1800 & 3000
Models
900 & 1100
Model
400
NOTE: Model 400 can
NOT be used for External use.
Models 900 & 1100Model 400
Models 1800 & 3000
Models 900 & 1100
1. ALWAYS Use suction
cups to stabilize the pump.
NOTE: NEVER let
the pump run dry.
1. Remove front cover.
Pull
Apart
Models 1800 & 3000
Remove Screws
2. Pop the Standard Flow Adjustment out with a screwdriver.
(Models 400, 900, 1100, 1800 and 3000 ONLY)
1) Impeller 2) Front Cover 3) Flow Adjustment Plate 4) Strainer Adapter 5) Strainer 6) Hose Barb 7) Suction Cups
8) Inline Intake 9) Locknut 10) Impeller Housing with screws 11) O-Ring 12) Mounting Bracket
Min
Max
Extra
Hose Barb
Locknut
Locknut
Inline
Intake
Inline Intake
06/08 AQ12227
NOTE: Drip Loop.
(for safety)
Optional Sponge
(Not Included)
Optional Sponge
(Not Included)
Sump System
Sump Syst
em
Setu
p
Set
up
Water
Circulation
Setup
Sump System
Sump System
Setup
Setup
(Options B and C) Installing Accessories - Follow These Steps First
1. Each Sump Pump is preassembled for this Setup Option. 2. (Optional) Adjust water flow using
the Flow Adjustment Plate
(Models 400, 900, 1100, 1800 & 3000 only)
. 3. Pick pump placement options Sump
System or Water Circulation. 4. After pump placement continue on to Start Your Pump.
NOTE: There are two setup
options with accessory use:
Submerged Under-Water use,
Continue on to Setup Option B.
And/or External Out-Of-Water
use, Continue on to Setup Option C.
A
Start Your Pump (All Models)
Set
Water Flow
(Models 400, 900, 1100,
1800 & 3000 only)
Sump System
Su
mp System
Setu
p
Set
up
Water
Circulation
Setup
2. Plug pump in.
B
C
Questions or Missing Parts call Customer Service at (800) 322-1266.
www.marineland.com
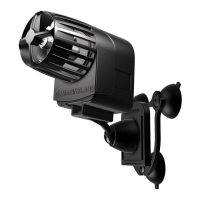
Models 4500 & 5500
3
3
4
2
2
5
6
6
6
6
7
7
7
9
9
10
11
12
Option Submerged Under-Water Use (All Models)
Models
4500 & 5500
Models 4500 & 5500
Extra
Hose Barb
Rotate Impeller
Housing
1. Remove Front Cover. 2.
(Models 900,1100,1800 and 3000)
Install Inline Intake and secure with Locknut.
(Models 1800 and 3000)
Install extra Hose Barb.
(Models 4500 and 5500)
Rotate (optional) Impeller Housing and install with extra Hose Barb. 3. Place pump in Sump System as shown. 4. Continue on to Start Your Pump.
Models 4500 & 5500
1
1
1
6
Option External Out-Of-Water Use (Models 900/1100/1800/3000/4500/5500)
Option Submerged Under-Water Use - With Strainer (Models 400/900/1100/4500/5500)
1.
(Models 400, 900, and 1100)
With the Flow Adjustment Plate removed, reinstall Front Cover. Install
Strainer Adapter
& Strainer
. (Optional) Install Sponge
(NOT Included)
. Rotate
Strainer Adapter
to adjust water flow.
(Models 4500 & 5500)
Install extra Hose Barb. 2. Pick pump placement options Sump System or Water Circulation.
3. Continue on to Start Your Pump.