EN
30
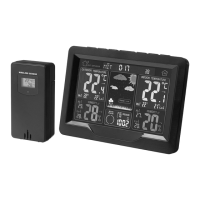
Main unit
Open the battery compartment for the main
unit and insert 2 alkaline AAA batteries with
the correct polarity as shown by the markings.
Follow the instructions below.
1. When the batteries are inserted all
the icons on the display go on for
3 seconds and a beep is heard.
The indoor temperature is registered.
2. The main unit searches for the outdoor
sensor. This process takes up to 3 minutes.
An icon with a radio mast ashes when a
signal is received from the outdoor sensor.
3. The values for precipitation and outdoor
temperature are shown on the display
and the radio mast icon stops ashing.
4. The search for a signal stops when the
main unit receives a signal from the
outdoor sensor.
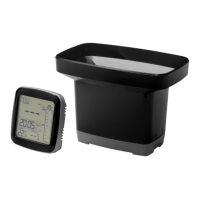
MOUNTING OF WIRELESS SENSOR
Preparations
Before the sensor is mounted, remove the
protective paper round the precipitation funnel
and the tape. They are only intended to protect
the sensor from transport damage.
Positioning
Mount the sensor on a horizontal and stable
surface without any physical obstructions
between the sensor and the weather station
for correct precipitation measuring.
The precipitation measuring is more precise if
the sensor is placed at ground level out of the
wind. Unfortunately it is common for the sensor
to be exposed to insects if it is placed at ground
level and so it may be necessary to place it a
height of 1 to 2 metres to avoid insects.
SENSOR BUTTONS AND PARTS
1. Catch funnel
2. Precipitation gauge
3. Spirit bubble
4. Catch sensor
5. Battery compartment
6. Mounting hole
7. Retaining screw
FIG. 3
HOW TO USE
BATTERIES
NOTE:
See battery type for respective unit under
technical data. Batteries are sold separately in
Jula department stores and at www.jula.com.
The wireless remote sensor works between -30
and 70°C. Use batteries of suitable type for the
temperature interval the wireless sensor is to
be used in. Alkaline zinc manganese batteries
work at -20 to 60°C. Rechargeable polymer
lithium-ion batteries work at -40 to 70°C.
Sensor
Insert 2 alkaline AA batteries in the precipitation
sensor with the correct polarity as shown by the
markings and in accordance with the following
instructions.
1. Press the funnel catch and lift up the funnel
so that the precipitation sensor is accessible.
2. Press the sensor catch and lift o the
precipitation sensor so that the battery
compartment under the precipitation
sensor is accessible.
3. Insert 2 alkaline AA batteries with the
correct polarity as show by the markings.
4. Replace the sensor and press it so that the
catch engages.