From
Jim Marshall
I
would like to take this opportunity to personally congratulate you on
choosing this JMD:1 amplifier from Marshall.
We pride ourselves on our ability to invent, innovate and create new
ways for guitarists to find their own sound, whether that be through
all-valve, solid-state or hybrid technologies.
First released in 1992, the JMP-1 pre-amp offered guitarists unrivalled
flexibility, with true Marshall tone at its heart. It proved to be a great
success! Ever since the JMP-1’s triumph, we have been eager to see
how technology could be pushed even further and, as a result, we are
pleased to introduce its successor, the JMD:1 Series.
The Marshall R&D team have always kept a keen eye (and of course
their ears) on new technologies, and have implemented them when they
were right for the product. Our number one rule - never sacrifice tone for
technology’s sake. Only now have all the components, state-of-the-art
technology and nearly 50 years of experience come together to create
this exciting amplifier range. The JMD:1 is the result of a unique
collaboration with our friends at Softube
T
M
, leading to a true digital
pre-amp, integrated into a product that I am proud to see the Marshall
name on. Partnered with a traditional Marshall valve power amp, it
becomes the most flexible and first, totally programmable valve digital
hybrid amplifier series we have ever made. Never before has such a
variety of great quality tone been available in one product.
I would like to wish you every success with your new Marshall. Welcome
to the family.
Yours Sincerely,
Dr Jim Marshall OBE
1
Presenting the JMD:1 Series.
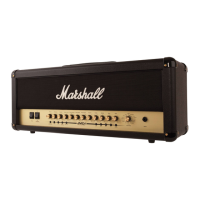
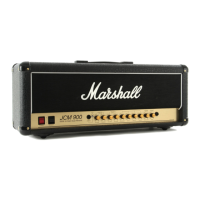
JMD100 100 Watt head
J
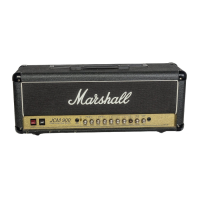
MD50 50 Watt head
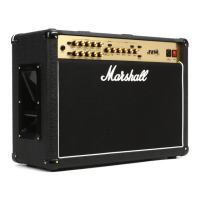
JMD102 100 Watt 2 x 12" combo
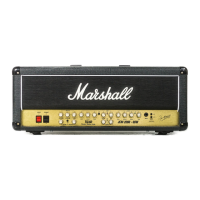
JMD501 50 Watt 1 x 12" combo
I
mmense versatility, extensive tonal control and that
unmistakable Marshall sound is now yours. The JMD:1 is
quite simply one of the most comprehensive and
s
ophisticated amplifiers Marshall has created to date,
combining state-of-the-art digital pre-amp technology with
studio quality effects and sheer EL34 valve power. Working
i
n close partnership with Swedish software house
Softube
TM
, the Marshall team have crafted the latest
evolutionary benchmark in hybrid amplifiers that picks up
where the renowned JMP-1 left off.
At the very heart of the JMD:1 Series is Marshall's
proprietary EL34 power amp section. A fundamental
element in many of Marshall's professional all-valve
amplifiers, this steadfast power stage design has been
driving the Marshall sound for decades. When it came to
creating the all-new digital pre-amp, the Marshall engineers
knew it had to lead rather than follow what had come
before - that is to be the first to offer truly great valve tone.
Enter Softube
TM
and their patented Natural Harmonic
Technology
TM
, used for the very first time in a guitar
amplifier. This groundbreaking technology actually matches
the dynamic reactions of the valve amplifier and the way it
behaves to the various intensities of playing, just like their
analogue counterparts, and ensures that every note feels
right.
Switching between the JMD:1's 16 pre-amp options also
affects the way in which the front panel controls respond to
user input, such as the EQ section which automatically
reconfigures to match the original topology of the chosen
pre-amp. The valve power-amp’s analogue circuitry is also
a
ltered to complement the different pre-amps, with
optimum resonance values automatically selected to
maximise the JMD:1's response. The selectable pre-amps
a
re divided into 4 sections – ‘Clean’, ‘Crunch’, ‘Overdrive’
a
nd ‘Lead’. Each pre-amp has been chosen for its
individual character and its ability to complement, yet at the
same time, differentiate itself from the others.
The digital nature of the pre-amp enables the JMD:1 to
house both modern and classic tones from a variety of
M
arshall amplifiers, such as the 1959, JCM800, JCM2000,
JVM and of course the JMP-1. These and many others
have provided the JMD:1 with a comprehensive collection
of tones, transcending the entire history of Marshall’s
heritage, particularly the EL34 years, due to the on-board
valve power amp. New sounds have also been created by
combining amplifier topologies, resulting in totally unique
Marshall tones, exclusive to this Series!
The JMD:1 also has the ability to store complete pre-amp,
EQ and FX settings. These presets can then be instantly
recalled at any time from either the front panel, the
supplied Stompware
TM
footcontroller or MIDI system for
maximum versatility. Further to the JMD:1's vast array of
features is a serial/parallel FX Loop, balanced XLR
Emulated Line Out, Pre-Amp Out, Line In and Headphones
socket.
The JMD:1 is the total standalone solution to any guitarist's
requirements, from live performance and band rehearsal to
bedroom practice and silent recording. It’s all here in this
extremely powerful package; a real cutting edge Marshall
amp for those not bound by tradition and ready to embrace
a new era of guitar amplification!
ENGLISH
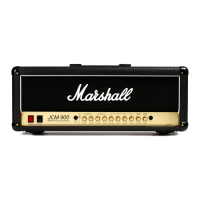
Overview
NEVER use your amp without a (speaker) load attached
when the Standby Switch (9) is in the ‘On’ position.
1. Make sure that the speaker cabinets are connected to
the correct impedance Loudspeaker jacks on the rear
panel (9).
Refer to the Speaker Output guide in this handbook for
specifics regarding impedance matching. When using an
extension cabinet make sure that you’re using an
unshielded speaker cable of good quality. Never use a
screened (shielded) guitar cable for this purpose.
2. Ensure that the Master Volume control (6) on the front
panel is initially set to zero.
3. Connect the supplied mains (power) lead into the Mains
Input (1) on the rear panel first and then into an electrical
outlet.
WARNING: Before going any further, make sure your
amplifier is compatible with your electrical supply. If you
have any doubt, please get help from a qualified
technician, your Marshall dealer can help you in this
respect.
4. Plug your guitar into the Input jack socket (1) on the front
panel.
5. Turn the front panel Power switch (10) on. The front
panel power LED will illuminate (8).
Standby Switch & Silent recording (9)
The Standby switch is used in conjunction with the Power
switch (10) to ‘warm up’ the amplifier before use, and to
prolong the life of the output valves and to mute the
amplifier when required, such as when you are changing
guitars or for short breaks in performance.
When the amplifier is in standby mode the whole pre-
amplifier section is still functional whilst the power amplifier
remains in a standby status. This allows the amplifier to be
used for silent recording or pre-amplification purposes.
Only when the Standby switch (9) is set to ‘OFF’ can the
amplifier be used without a load. Always ensure a load is
connected when switching the Standby switch on.
When powering up the amplifier we suggest engaging the
Power switch (10) first, leaving the Standby switch (9) in
the ‘Off’ position for two minutes to allow the valves to heat
up.
6. After waiting, engage the Standby switch (9).
7. Adjust the Master Volume (6) to your required level -
your amp is ready to play.
When switching the amplifier off, always disengage the
Standby switch (9) a couple of seconds prior to the main
Power switch (10).
Getting started and powering up
Follow all instructions and heed all warnings
KEEP THESE INSTRUCTIONS !
* EUROPE ONLY - Note:
This equipment has been tested and found to comply with the requirements of the EMC Directive
(Environments E1, E2 and E3 EN 55103-1/2) and the Low Voltage Directive in the E.U.
* EUROPE ONLY - Note:
The Peak Inrush current for the 50 Watt is 25 amps.
The Peak Inrush current for the 100 Watt is 25 amps.
Note:
This equipment has been tested and found to comply with the limits for a Class B digital device, pursuant to part 15 of the FCC rules.
These limits are designed to provide reasonable protection against harmful interference in a residential installation. This equipment generates,
uses and can radiate radio frequency energy and, if not installed and used in accordance with the instructions, may cause harmful interference
to radio communications. However, there is no guarantee that interference will not occur in a particular installation. If this equipment does cause
harmful interference to radio or television reception, which can be determined by turning the equipment off and on, the user is encouraged to try
to correct the interference by one or more of the following measures:
*
Reorient or relocate the receiving antenna.
*
Increase the separation between the equipment and the receiver.
*
Connect the equipment into an outlet on a circuit different from that to which the receiver is connected.
*
Consult the dealer or an experienced radio/TV technician for help.
 Loading...