Do you have a question about the Marvel ML15C Series and is the answer not in the manual?
Details methods for warranty registration: mail or online at marvelrefrigeration.com.
Lists essential information needed for warranty registration, such as service number and serial number.
Explains the meaning of warning, caution, and note symbols used in the manual.
Advises using two or more people to move the product due to excessive weight hazard.
Instructions for removing internal packing and keeping shipping carton for inspection.
Warns about suffocation hazard from plastic bags and advises proper disposal.
Instructs to contact the retailer for transit damage claims, not the manufacturer.
Instructions on allowing the appliance to sit upright for 24 hours before plugging in to ensure oil return.
Safety advice on disabling old refrigerators/freezers to prevent child entrapment and suffocation.
Specifies required clearances around the cabinet for proper ventilation and operation.
Emphasizes keeping the front grille unobstructed for optimal airflow, energy efficiency, and ice production.
Recommends location away from direct sunlight and heat sources, with specific temperature ranges.
Details how to adjust leveling legs to ensure the unit is firm and level.
Warns against extension cords, ungrounded supply, removing ground prong, using adapters, and water spray.
Specifies a grounded 115 volt, 15 amp dedicated circuit and proper grounding type receptacle.
Notes that GFCIs may cause nuisance tripping and are generally not used for unattended equipment.
Warns that inadequate drainage can cause water damage and poor ice production.
Emphasizes practicing safe electrical methods and avoiding work in wet areas with energized equipment.
Details routing the pre-installed drain line to an appropriate drain, considering height and path.
Specifies that the gravity drain line must be routed no higher than 6 inches (15.2 cm) off the floor.
Instructs to observe and follow all local building codes when installing drain lines.
Warns of electrical shock and injury risk when accessing moving components with power connected.
Ensures the drain pump vent tube is kept open for proper airflow as water enters the pump reservoir.
Instructs to observe and follow all local building codes when installing the appliance's water supply.
Specifies connection to potable cold water supply with 20-120 psi pressure; copper tubing recommended.
Recommends using 1/4" copper tubing and forming a service loop for easier appliance access.
Advises installing a shutoff valve but warns against self-piercing types due to sediment clogging.
Details connecting tubing with a compression nut fitting and securing the line to the cabinet.
Suggests water filtration or treatment if results are unsatisfactory; advises against RO, softened, or de-ionized water.
Step-by-step guide to test the drain system by pouring water into the bin to ensure proper drainage.
Checks for kinks, incorrect routing, open drains, or blocked vent tubes if water does not drain properly.
Provides table for maximum allowable rise and run for drain lines based on length.
Verifies drain line is plumbed into an open drain and the vent tube is open.
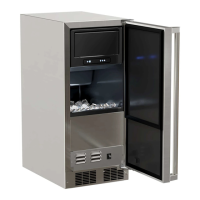
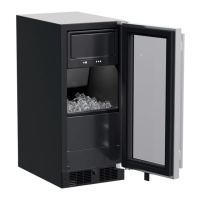
Explains how fractional freezing over an evaporator plate creates clear ice with fewer dissolved solids.
Describes how the ice slab is released, cut by heated wires, and the subsequent draining of minerals.
Details ice production rates in normal and ECO modes based on ambient and water temperatures.
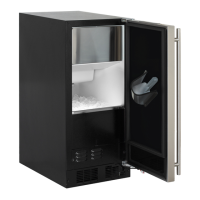
Explains that the bin is not refrigerated, allowing slight melting to preserve quality and ensure a constant supply.
Describes how the bin level sensor starts or stops the ice making process based on ice supply.
Lists and explains common sounds associated with the ice production process.
Provides specific rough-in opening dimensions (A-J) for various models.
Lists cabinet dimensions (A-J) for different models, essential for fitting into cabinetry.
Advises on creating clearance for electrical outlets and recommends specific recessed outlet boxes.
Presents electrical requirements and product weight for different models (MA15C, ML/MO/MP15C).
Reiterates the requirement for a grounded 15 amp dedicated circuit and adherence to local codes.
Diagrams illustrating cabinet and rough-in dimensions, including water inlet and drain locations.
Explains the function of each icon on the user interface display (On/Off, Menu, Light, Clock, Lock).
Defines the meaning of text displayed for ICE, ECO, OFF, DOOR ajar, and CLEAN status.
Instruction to carefully lift and remove the protective plastic film from the control display.
Guides on plugging in the unit and the initial start-up routine, including the 'ICE' mode.
Explains the self-test, harvest cycle, and approximate time before the first ice production cycle.
Instructions for powering the unit on and off using the ON/OFF icon, noting the cycle completion behavior.
Describes the door ajar alarm, its duration, muting, and reset procedure.
Explains drain pump and interior light function during OFF mode and the need for unplugging for servicing.
Details how to lock and unlock the user interface to prevent accidental changes.
Explains how to set a delay start for 1-8 hours or days for temporary shutdown and automatic restart.
Lists displayed codes for Bin Sensor, System Sensor, and Communication errors with actions to take.
Explains how to enter and exit ECO mode for energy and water savings, recommending use after a full ice bin.
Details how to adjust the interior light color using a switch in the toe grille for specific models.
Explains the 6-month clean reminder and how to reset it, noting its impact on ice quality.
Steps to turn off the machine and prepare for cleaning, including removing ice and draining the reservoir.
Instructions for removing ice from the evaporator plate and grid cutter, warning against forcing embedded ice.
Advises purchasing and using Marvel-approved 'nickel safe' cleaner, available via customer service.
Warns against using bleach-based or abrasive cleaners, as they can damage stainless steel and void warranty.
Details pouring the cleaning solution onto the evaporator plate and into the reservoir.
Guides on turning the machine back on, entering CLEAN mode, and the cycle duration (approx. 49 minutes).
Instructs to check if build-up is removed after the cycle and repeat if necessary.
Advises brushing or vacuuming lint and dirt from the front grille area at least once or twice a year.
Recommends washing the painted cabinet with mild soap and water, avoiding abrasive cleaners.
Details cleaning the interior with mild soap and water, avoiding solvents and harsh detergents.
Provides advice on avoiding leaning on the door, exercising caution when cleaning around the grille, and periodic checks.
Instructs to minimize door openings during a power failure to maintain appliance temperature.
Notes that LED lamps are reliable but advises contacting service for replacement if a bulb fails.
Offers tips like avoiding heat sources, minimizing door openings, and using ECO mode.
Guides on how to get service, what information to provide, and where to find authorized service centers.
Instructions on how to exit the cleaning mode, including a 3-minute cancel routine.
States compatibility with custom panel thicknesses of 5/8" (15 mm) and 3/4" (18 mm).
Stresses using the factory grille for proper airflow and warns that custom grilles void the warranty.
Warns that overlay panel models are for built-in installations only, and freestanding use could cause injury.
Details removing the door by disconnecting the wire harness and loosening hinge screws.
Highlights the pinch point hazard of articulated hinges and advises careful handling when removing the door.
Recommends discarding ice produced for 3 hours after cleaning to ensure purity.
Instructions for removing the magnetic door gasket from its retainer.
Specifies that the overlay door panel must not exceed 15 pounds (6.8 kg).
Directs the user to cut the overlay panel according to dimensions shown in Figures 34 to 37.
Provides precise dimensions and drilling locations for a left-hand hinged overlay door panel.
Provides precise dimensions and drilling locations for a right-hand hinged overlay door panel.
Details clamping, drilling pilot holes, and fastening the panel to the door with screws.
Guides on placing hinges, tightening screws, and reconnecting the wire harness.
Instructs on using screws to secure the cabinet top to the cabinet through the 'Z' bracket.
Checks door parallelism to sides and top, adjusting hinge adapter brackets if necessary.
Details loosening hinge screws with an allen wrench to adjust door side-to-side alignment.
Notes the necessary minimum space (3/32" or 7mm) between the door and cabinet flange for proper operation.
Steps for removing the door by lifting the top hinge pin and angling the door off the bottom hinge.
Instructs to peel the door gasket out of its channel to access screw mounting holes.
Provides dimensions for cutting the overlay panel, including slots for hinge pins using a router.
Specifies that the overlay panel weight should not exceed 20 pounds (9.1 kilograms).
Detailed dimensions for a right-hand hinged overlay door panel for MA15C models.
Detailed dimensions for a left-hand hinged overlay door panel for MA15C models.
Guides on locating and drilling handle holes, and mounting the handle to the custom panel.
Details drilling pilot holes for attaching the overlay panel to the door, referencing hole sizes from Table A.
Instructs on fastening the overlay panel to the door using #10 wood screws.
Presses the door gasket into the door channel, ensuring corners are fully inserted.
Reinstalls hinge adapter bushings and the door by reversing the removal procedure.
Advises reading the manual and checking common issues before calling for service.
Guides on checking power cord, control setting, fuses, room temperature, and drain pump issues.
Suggests checking water circulation, 'whoosing' sounds, and ice slab release issues.
Covers checking control settings, water supply, initial run time, drain plug, distributor tube, and fan airflow.
Explains how warm ambient or water temperatures affect performance and recommends relocating the unit.
Addresses scale buildup on the evaporator and recommends cleaning the ice machine.
Covers mineral scale, high mineral content water, stored food, and unpleasant odors affecting ice quality.
Explains ice melting in the bin, slab release, and distributor tube restrictions causing size or formation problems.
Checks drain hose alignment, kinks, obstructions, and drain pump level for proper draining.
Detailed guide for pump not running, not pumping water, or running then turning off repeatedly.
Checks pump level, hose clamps, vent tube height, drain length, and water leaks after installation.
Emphasizes draining all water to prevent damage and voiding warranty in freezing conditions.
Advises against using anti-freeze or other solutions as a substitute for proper draining.
Recommends cleaning to prevent mold/mildew and sanitize the machine before storage or service.
Warns of electrical shock risk when removing compartment covers before unplugging the unit.
Step-by-step instructions for draining water from the system using a gravity drain.
Details disconnecting the water valve outlet line and draining remaining water.
Guides on reconnecting water lines, reinstalling access covers, and cleaning the storage bin.
Advises propping the door open for air circulation to prevent mold and mildew.
Instructs to leave the supply line disconnected or shut off, not allowing water back into the valve.
Specific instructions for draining water for units with factory installed drain pumps.
Uses air pressure to purge remaining water from the drain pump and drain line.
Reinstalls the vent tube and saves the winterization plug for future use.
Steps to reconnect water, plug in, turn on, and check for leaks after storage.
Guides on testing the drain pump by pouring water into the bin and checking for leaks.
Introduces the steps for removing the drain pump, referencing subsequent pages for details.
Instructions for unplugging the unit, removing the rear access cover, front panel, and toe grille.
Details removing the front and rear drain pump brackets and disconnecting the hoses.
Instructs to unscrew the leveling leg to allow clearance for pump removal.
Guides on rotating the pump to remove it from the machine and disconnecting the ground wire.
Instructs to disconnect the ice machine power cord from the drain pump.
Details draining the pump reservoir and reversing the procedure for installation.
Provides a checklist of items to inspect upon service replacement of the drain pump.
Covers parts and labor for defects for one year, including cosmetic defects for 60 days.
Covers parts and labor for professional products for two years, including cosmetic defects for 60 days.
Offers a one-year extension for designated professional products upon registration.
Covers compressor, condenser, evaporator, drier, and tubing for five years (labor not included).
Lists exclusions like negligence, accidents, improper use, and consequential damages; states state-specific rights.
Specifies warranty applies to original purchaser, residential use, and approved outdoor units only.
Excludes coverage for water filters, light bulbs, cosmetic defects on floor displays, and cosmetic defects on certified units.
Provides contact details for parts and service assistance, including website and phone number.
| Ice Production | Up to 39 lbs per day |
|---|---|
| Ice Storage Capacity | 13 lbs |
| Voltage | 115 V |
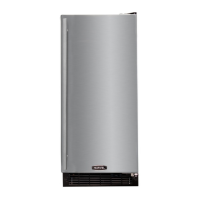
| Model | ML15C |
| Finish | Stainless steel |