Do you have a question about the master mechanic 134453 and is the answer not in the manual?
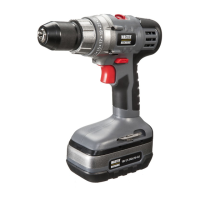
Details specifications for drill chuck speeds, battery type, clutch positions, keyless chuck, and weight.
Provides voltage, charger type, input/output, and charging time for the battery and charger.
Contact information and operating hours for customer support regarding technical questions or replacement parts.
Mandates wearing safety goggles, hearing protection, and dust masks for safe operation.
Advises on using dust masks in dusty environments and lists chemicals found in dust.
Ensures a clean work area, avoids explosive atmospheres, and covers electrical plug and wet condition safety.
Emphasizes staying alert, using PPE, preventing unintentional starting, and keeping others away.
Covers using the correct tool, ensuring switch functionality, and disconnecting power before adjustments.
Details checking for damage, sharpening tools, safe storage, and preventing misuse.
Covers correct charger usage, battery storage, leakage precautions, and temperature limits.
Recommends professional servicing with identical parts to maintain tool safety.
Covers knowing the tool, wearing eye protection, securing workpieces, and keeping hands clear of bits.
Details drill bit size limits, checking for wobble, and ensuring chuck tightness before operation.
Covers exclusive charger use, battery storage, preventing tampering, and charging temperature limits.
Specifies charger placement, water avoidance, handling damaged chargers, and incompatibility warnings.
Emphasizes using recommended accessories, reading instructions, and handling missing or damaged parts.
Warns against using volatile solvents for cleaning to prevent fire, toxic reactions, or plastic damage.
Provides step-by-step instructions for charging the cordless drill battery pack using the provided charger.
Guides on removing and installing the battery pack and describes on-board bit storage.
Explains LED work light activation and how to adjust the torque clutch for different materials.
Provides a chart and instructions for setting the torque adjustment ring based on screw size and material.
Explains the function and operation of the forward/reverse switch for drill rotation direction.
Describes how to set the speed control switch for low-speed or high-speed operation.
Explains how to start and stop the drill using the variable-speed trigger switch.
Provides a warning and instructions on how to properly install drill bits into the keyless chuck.
Details the process of opening the keyless chuck, inserting, and tightening drill bits.
Instructions on how to open the keyless chuck and remove a drill bit.
Explains how to use the built-in horizontal and vertical bubble levels for accurate drilling.
Details drilling pressure, avoiding sideways force, and handling bit binding or breakthrough.
Instructions on selecting the correct bit, securing it, and setting the torque clutch for driving screws.
Explains how to adjust torque settings for screw driving and what to do if the clutch releases too soon or too late.
Step-by-step instructions for removing the chuck using a hex key and mallet.
Details removing the chuck screw, noting its left-handed thread, and loosening the chuck from the spindle.
Provides steps to tighten a loose chuck on the spindle and address binding jaws.
Emphasizes using identical parts, avoiding solvents on plastics, and not abusing the tool.
States that bearings are pre-lubricated for the unit's life, and no further lubrication is needed.
| Brand | master mechanic |
|---|---|
| Model | 134453 |
| Category | Cordless driver drill |
| Language | English |