13
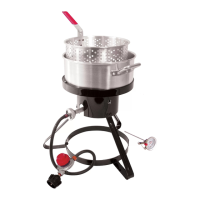
Using the Pot with the Drain Hook Basket:
Do not overfill pot with oil or water. Smaller fry pans may not be marked.
1. Place seasoned food into basket.
2. Slowly lower basket into oil or water using lifting hook. (Wear Protective Gloves)
3. Cover with lid.
4. When food is ready to remove, turn the burner to OFF position. Remove lid and use the lifting hook
to pull basket up slowly. (Wear Protective Gloves)
5. Hook basket to the side of pot with the drain hook, allowing food to drain and cool.
Lifting Hook
Basket
Drain Hook
LISTADO DE PIEZAS
NOTA: No apriete demasiado los herrajes.
Coloque la pata (1) dentro del protector contra
el viento. Con el tornillo (A), fije la pata al
protector contra el viento, según se ilustra.
Repita la operación con las otras patas. Con
los tornillos (A), fije el aro de las patas (2) a
cada pata. En este momento, apriete todos los
herrajes.
LEA DETENIDAMENTE TODAS LAS INSTRUCCIONES Y LAS ADVERTENCIAS ANTES DE
ARMAR O DE HACER FUNCIONAR LA COCINA.
ESTE MANUAL CONTIENE INSTRUCCIONES PARA ARMAR VARIOS MODELOS DE COCINAS.
PASO 2.
Cómo montar las patas
ALGUNOS MODELOS DE COCINAS TIENEN ORIFICIOS ROSCADOS EN LAS PATAS. EN ESE CASO, NO SE
NECESITAN TUERCAS.
SI SE SUMINISTRAN, FIJE LAS PATAS CON LAS TUERCAS.
LISTA DE HERRAJES
Antes de cada uso, revise todas las tuercas y pernos para confirmar que estén bien apretados y fijos.
INSTRUCCIONES PARA EL ARMADO
6
2
4
3
A
1
(A)
M6 X 8
Tornillo Phillips con brida
FÍJELO A LA BASE A
ART. NO. CANTIDAD
DESCRIPCIÓN
3 1 Cabezal de la freidora
4 1 Regulador y manguera
ART. NO.
CANTIDAD
DESCRIPCIÓN
1 3 Patas
2
1
Aro de la pata
(B)
Tuerca del
quemador
Retire la tuerca (B) de la parte inferior del
quemador. Coloque el quemador en la barra de
montura del quemador, introduciendo el perno del
quemador a través del orificio que está en el centro
de la barra de montura del quemador.
Cómo armar el quemador
PASO 1.
Barra para montar
los quemadores
B
Protector
contra el viento