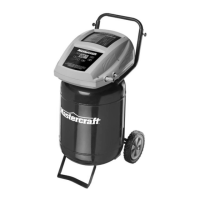
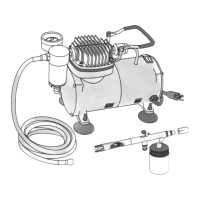
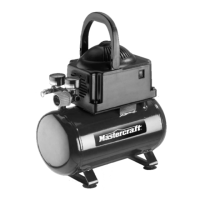
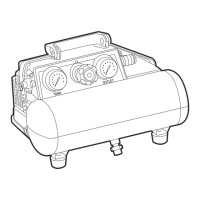
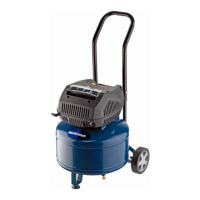
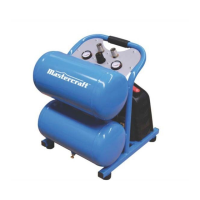
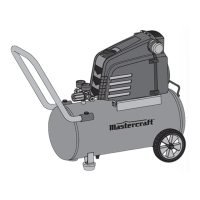
The Mastercraft 5 U.S. Gallons (18.9 L) Air Compressor, model no. 058-1893-2, is a versatile tool designed for a wide range of household applications, from fastening to greasing and engine cleaning. It features a 1.5 HP induction motor for quiet operation and a cast-iron, oil-free pump, ensuring long-lasting and reliable performance.
Technical Specifications:
- Running HP: 1.5
- Tank Size: 5 U.S. Gallons (18.9 L)
- Air Delivery (CFM) @ 40 PSI:* 4.0
- Air Delivery (CFM) @ 90 PSI:* 3.0
- Maximum Pressure (PSI): 175
- Pump Design: Oil-less
- Motor: UMC
- Power: 120 V, 60 Hz, 11.8 A
- Weight: 51 lb 2 oz (23.2 kg)
- Power Cord: SJT 16 AWG / 72" (1.83 m)
- Extension Cord: SJT 12 AWG / MAXIMUM 30' (9.1 m)
*CFM: Cubic feet per minute.
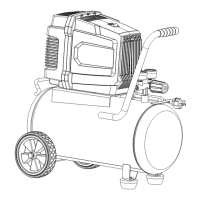
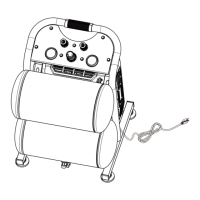
Key Parts and Their Functions:
- Electric Motor (A): Powers the pump and is equipped with a thermal overload protector to prevent damage from overheating.
- ON/OFF Switch (B): Manually controls the compressor's operation. It allows the motor to start when tank pressure is below the cut-in pressure and stops it when the cut-out pressure is reached.
- Safety Valve (C): Prevents system failure by releasing pressure if it exceeds a preset level. It can be activated manually by pulling a ring.
- Air Pressure Regulator (D): Adjusts the air pressure delivered to the tool. Turning the knob clockwise increases pressure, while counter-clockwise decreases it.
- Tank Pressure Gauge (E): Displays the pressure level of air stored in the tank. This gauge is not adjustable by the operator.
- Outlet Pressure Gauge (F): Measures the regulated outlet pressure.
- Air Outlet (G): The connection point for the 1/4" (6.4 mm) NPT air hose.
- Air Tank Drain Valve (H): Used to remove moisture from the air tank after operation.
- Air Tank (I): Stores compressed air.
- Power Cord (J): Connects the compressor to a nominal 120 V grounded electrical circuit.
Usage Features:
The compressor is designed for intermittent use, with a maximum operating time of 30 minutes, followed by a 30-minute rest period. It is intended for use in dry areas only.
Before First Use (Break-in Procedure):
- Set the ON/OFF switch (B) to the OFF position.
- Open the tank drain valve (H) by turning it counter-clockwise to prevent air pressure buildup.
- Turn the air pressure regulator knob (D) counter-clockwise until it stops.
- Plug in the power cord (J).
- Set the ON/OFF switch (B) to the ON position. Run the compressor for 30 minutes. If it fails, turn it off immediately and contact customer support.
- After 30 minutes, turn off the switch.
- Close the tank drain valve (H) by turning it clockwise.
- Set the ON/OFF switch (B) to the ON position. The air receiver will fill to cut-out pressure, and the motor will stop. The compressor is then ready for use.
Before Each Start-up:
- Set the ON/OFF switch (B) to the OFF position.
- Turn the air pressure regulator (D) knob counter-clockwise until it stops.
- Attach the air hose and accessories.
- Close the tank drain valve (H). Plug in the power cord (J).
- Set the ON/OFF switch (B) to the ON position and allow the tank pressure to build.
- Turn the air pressure regulator knob clockwise until the desired pressure is reached.
Shut Down Procedure:
- Set the ON/OFF switch (B) to the OFF position.
- Unplug the power cord (J).
- Reduce the pressure in the tank through the outlet hose. Pulling and holding the safety valve ring (C) will also reduce tank pressure.
Safety Guidelines:
- Fire/Explosion Risk: Do not spray flammable liquids near sparks or in confined areas. Keep the compressor at least 20' (6 m) away from the spray area.
- Electric Shock Risk: Do not expose the compressor to rain. Store it indoors. Disconnect from power source before servicing. Ensure proper grounding.
- Personal Injury Risk: Never spray compressed air or material at yourself or others.
- Bursting Risk: Always check the maximum pressure rating of tools and accessories. Regulate compressor outlet pressure to not exceed these ratings. Relieve pressure in the hose before attaching/removing accessories. Drain water from the tank after each use. Do not weld or repair the tank. Do not adjust the pressure switch or safety valve, as they are factory preset.
- Burns Risk: The pump and manifold generate high temperatures. Avoid touching these parts while the compressor is running. Allow parts to cool before handling.
- Breathing Risk: Use a respirator mask when spraying paints or toxic materials. Never directly inhale air produced by the compressor.
- Eye Injury Risk: Wear ANSI Z87.1 or CSA Z94.3 approved safety goggles. Do not point any nozzle or sprayer toward a person.
- Hearing Risk: Always wear hearing protection.
Extension Cords:
Use a heavier gauge extension cord for longer distances to prevent voltage drop and power loss. Refer to the manual's table for recommended wire gauges based on ampere rating and cord length. Ensure extension cords are properly wired, in good electrical condition, and protected from sharp objects, heat, and moisture.
Maintenance Features:
Regular maintenance is crucial for the compressor's performance and longevity.
- Drain the Tank (Daily): Condensation accumulates in the tank and must be drained after each workday to prevent corrosion. Allow the unit to cool before draining.
- Set ON/OFF switch to OFF.
- Unplug the power cord.
- Turn air pressure regulator knob counter-clockwise to zero.
- Pull and hold the safety valve ring to bleed air from the tank.
- Place a container under the drain valve.
- Slightly tilt the unit and turn the drain valve (H) counter-clockwise to open.
- After draining, close the drain valve (H) clockwise.
- Check the Safety Valve (Daily): Pull the ring on the safety valve (C) before starting the compressor to ensure it operates freely.
- Clean the Air Filter (Weekly): A dirty air filter reduces performance. Clean the foam filter by immersing it in warm, soapy water and allowing it to dry thoroughly. Replace regularly.
- Test for Leaks (Monthly): Check all connections for tightness. Spray soapy water around suspected leak areas; if bubbles appear, repair, replace, or re-seal the faulty component. Do not overtighten connections.
Storage (Prior to Storing):
- Drain all moisture from the tank.
- Use an air blow gun to clean dust and debris from the compressor.
- Disconnect and wind up the power cord.
- Pull the pressure safety valve to release all pressure.
- Cover the unit to protect it from moisture and dust.
- Store the compressor in a clean, dry, and warm location, especially in cold weather, to prevent starting problems and freezing of water condensation.
Troubleshooting:
The manual provides a comprehensive troubleshooting guide for common issues such as the motor not starting, low pressure, moisture in discharge air, and overheating. Solutions range from checking power connections and air filters to replacing defective parts or seeking professional service. Always disconnect the electrical plug and any tools from the air supply before attempting adjustments.
Warranty:
The Mastercraft air compressor is guaranteed for three (3) years from the original retail purchase date against defects in workmanship and materials. Accessories are guaranteed for one (1) year. The warranty covers repair or replacement at the manufacturer's option, including labor costs. It is subject to conditions such as providing proof of purchase, proper installation and maintenance, and excludes normal wear and tear, expendable parts, damage from misuse, unauthorized repairs, or cosmetic deterioration. This warranty applies only to the original purchaser and is not transferable.