Do you have a question about the MasterCraft 58-7922-8 and is the answer not in the manual?
Indicates a hazardous situation resulting in death or serious injury if not avoided.
Indicates a potentially hazardous situation resulting in death or serious injury if not avoided.
Indicates a potentially hazardous situation resulting in minor or moderate injury if not avoided.
Indicates a potentially hazardous situation resulting in property damage if not avoided.
Follow basic safety precautions to reduce risk of fire, shock, and personal injury.
It is strongly recommended that this tool NOT be modified and/or used for any application other than for which it was designed.
Operate in a clean, dry, well-ventilated area free of flammable vapors, at least 20' from spray areas.
Store flammable materials in a secure location away from the compressor.
Keep ventilation openings clear (12" from walls) to prevent overheating and fire.
Always remain near the product when it is operating.
Drain condensed water daily to prevent rust and tank weakening.
Never drill into, weld, or modify the tank or its components.
Do not alter operating pressures; use a regulator and gauge.
Do not exceed attachment pressure ratings; avoid inflating low-pressure items.
Always wear ANSI Z87.1 approved safety glasses with side shields.
Never point any nozzle or sprayer toward body or other people or animals.
Turn off compressor and bleed pressure from hose and tank before maintenance.
Operate outdoors in a clean, well-ventilated area, not enclosed spaces.
Never inhale air from the compressor or breathing device connected to it.
Use a NIOSH/MSHA approved respirator for spraying operations.
Never operate compressor outdoors when it is raining or in wet conditions.
Never operate compressor with cover components removed or damaged.
All electrical wiring or repairs should be performed by authorized service personnel.
Ensure the electrical circuit provides proper grounding, correct voltage, and adequate fuse protection.
Never operate compressor with guards or covers damaged or removed.
Any required repairs should be performed by authorized service center personnel.
Do not touch exposed metal parts during or immediately after operation as they remain hot.
Do not reach around shrouds or attempt maintenance until the unit has cooled.
Operate compressor in a stable, secure position to prevent accidental movement.
Never operate on a roof or other elevated position; use extra air hose.
Place compressor on a protective mat when transporting to prevent vehicle damage from leaks.
Remove compressor from vehicle immediately upon arrival at your destination.
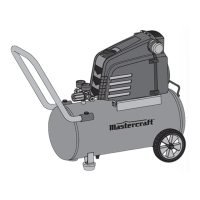
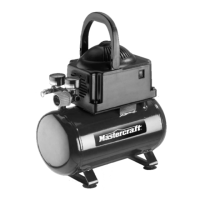
Explains how the piston moves air through the cylinder.
Allows compressed air into the tank and closes when cut-out pressure is reached.
Provides power to the automatic pressure switch and removes power when OFF.
Starts the motor below cut-in pressure and stops it at cut-out pressure.
Controls air pressure from the tank to the accessory.
Indicates the air pressure available at the outlet side of the regulator.
Indicates the reserve air pressure in the tank.
Contains an advanced design cooling system that works when air is expelled.
Located at the base of the air tank to drain condensation.
Shuts off the motor if it overheats; requires cooldown before restarting.
Releases compressed air from the head and tube when cut-out pressure is reached.
Protects against high pressure by popping out if the pressure switch fails.
Restarts the motor after it shuts off due to overloading or low voltage.
Operate in a dry, clean, cool, and well-ventilated area, keeping ventilation openings clear.
Refer to the Specifications Section for voltage and circuit requirements.
Use a grounded plug with a properly installed and grounded outlet.
Use extra air hose instead of extension cords; if used, ensure 3-prong, 14 AWG or larger, no longer than 50'.
Use a regulator to control air pressure for individual air-driven devices.
Bearings are sealed and lubricated for life; no other lubrication is required.
Follow specific break-in instructions to prevent serious damage.
Ensure OFF/AUTO lever is OFF, regulator is closed before attaching hose/accessories.
Ensure regulator outlet pressure does not exceed the maximum pressure rating of the tool being used.
Turn OFF/AUTO lever to AUTO; motor stops at cut-out pressure.
Open regulator clockwise and adjust to the correct pressure setting.
Set OFF/AUTO to OFF, turn regulator counter-clockwise to zero, remove tool.
Pull safety valve ring to bleed tank pressure to approximately 20 PSI.
Open drain valve to drain condensation; failure to drain can cause tank rupture.
Periodically blow out air passages with dry compressed air; clean plastic parts with a damp cloth.
Check cord prongs, outlet contact, fuses, or circuit breakers if tool fails to start.
Only use authorized service stations or centers for repairs.
Turn OFF/AUTO to OFF, set regulator to zero, remove tool, drain tank, store in clean, dry location.
| Brand | MasterCraft |
|---|---|
| Model | 58-7922-8 |
| Category | Air Compressor |
| Language | English |