ENEN
28. DO NOT use metal scouring pads to scrub. Pieces can break off the pad and reach electrical
components, causing an electrical shock risk.
29. Children are not allowed to do the cleaning and repairs.
30. Do not place on or near a hot gas or electric burner, or in a heated oven.
31. Extreme caution must be used when moving the unit containing hot oil or other hot liquids.
32. Never fill the pot with oil, or it may cause a fire hazard.
33. This unit has a polarized plug (one blade is wider than the other). To reduce the risk of electric
shock, this plug is intended to fit into a polarized outlet only one way. If the plug does not fit fully into
the outlet, reverse the plug. If it still does not fit, contact a qualified electrician. Do not attempt to
modify the plug in any way.
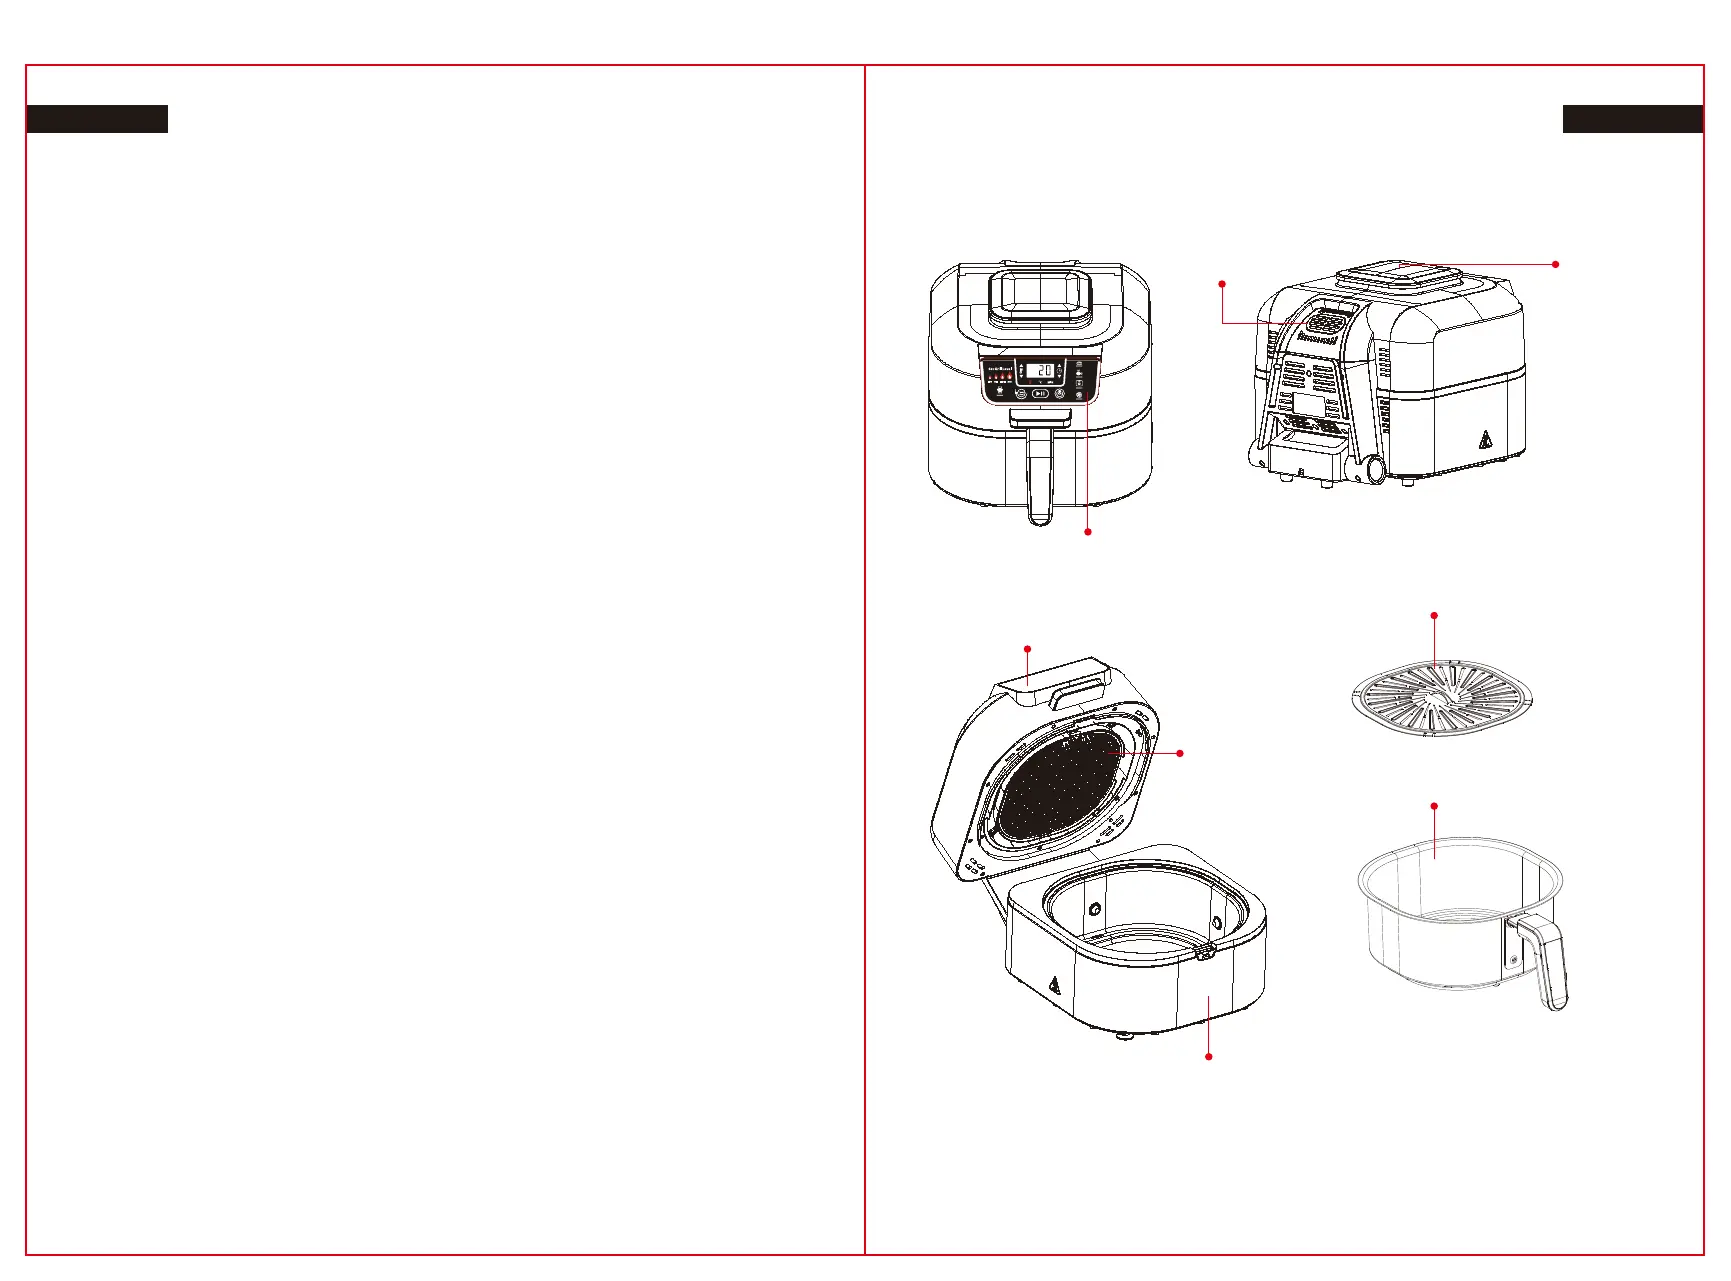
PRODUCT PARTS
WARNING
1. Remove and dispose the protective cover placed on the power socket of this unit.
2. This product can be used by people with limited physical , sensory or mental capacities or lack of
experience and awareness if they have been given guidance or instruction concerning use of the
product in a safe way and understand the risks involved.
3. Keep the machine and its cord out of reach of children. DO NOT allow the machine to be used by
children. Close monitoring is important when used near children.
4. This product is for home use only. DO NOT use this product for anything other than its intended
purpose. DO NOT use in moving vehicles or boats. DO NOT use outside. Misuse can lead to injury.
5. DO NOT place the product near the edge of a countertop all through procedure. Ensure the
surface is level, clean and dry.
6. ALWAYS ensure the product is fully built before using it.
7. While using this appliance, have at least 6 inches (15.25 cm) of space above and on all sides for
ventilation.
8. DO NOT use an extension cord. A short power-supply cord is used to reduce the risk of children
pulling the cord or getting entangled and to lower the risk of people falling over a long cord.
9. To protect from electrical shock. DO NOT immerse cable, connectors, or main unit housing in
water or other liquid.
10. DO NOT use the unit if there's damage to the power cord. Constantly check the unit and power
cable. If the appliance malfunctions or has been damaged in some way, instantly stop use and
contact Customer Support.
11. DO NOT use socket under countertop level.
12. DO NOT put device and let cable hang over edges of desks, counters or hit hot surfaces.
13. Just use approved accessories provided with this appliance or allowed by The use of accessories
or attachments not recommended by may cause a fire danger or damage.
14. Be sure to clean and dry any accessory that you will be placing into the cooker.
15. NEVER use the unit without the splatter guard and removable cooking pot attached.
16. Make sure that the hood is completely closed before using.
17. DON'T move the unit when using.
18. DO NOT cover ventilation or air outlet ventilation when running unit. By doing so, it may prevent
even cooking, and can cause damage or overheating to the machine.
19. No contact with hot surfaces. The surfaces of the appliances are hot during and after using it.
Often use protective hot pads or silicone oven mitts to avoid burns or personal injury, and use
accessible handles and knobs.
20. DO NOT touch devices when cooking, or immediately after. Throughout the cooking process the
grill grate and basket becomes extremely hot. Prevent physical contact while removing the appliance
attachment. ALWAYS take caution when interfacing with product to avoid burns or personal injury. It
is recommended that long handled utensils and secure hot pads or insulated oven mitts be used.
21. DO NOT use as deep fryer.
22. Smokeless Grill Temp Probe is not a substitute for an external thermometer for the food.
23. ALWAYS use a thermometer to ensure whether the food is cooked at the correct temperatures to
avoid potential illness.
24. If a grease fire happens or the machine gives off black smoke, unplug immediately. Wait for the
smoking to end until you remove any cooking devices.
25. For routine maintenance of the appliance see the Cleaning & Maintenance section.
26. Switch off the device and unplug it from the socket when it is not in use and before cleaning.
27. Set aside to cool before washing, disassembling, placing in or removing pieces and storing.
03 04
Control Screen
Grill Plate
Inner Pot
Cover
Splatter Guard
(Detachable)
Air VentAir Outlet
Product Unit
(Power Cord not shown)
3. Place the appropriate accessory in the unit for your selected cooking feature and close the cover.
To start preheating press START / STOP. While the device is preheating, insert the probe in the
middle of the thickest part of the largest piece of protein, close (but not touching) the bone. DO NOT
insert the probe either vertically or at an angle, as it does not provide accurate reading.
4. When the device has preheated and the "Add Food" flashes on the screen, open the cover, put
food inside the device and close the cover over the cord of the probe. The monitor will now show the
reading of the temp probe as it cooks the food.
4. Press START/STOP to begin preheating. PRE will appear on the display screen, and the progress
bar will begin. It can take approximately 4 minutes.
5. Display will show 'Add food' when preheating is completed.
6. Open the cover and put the ingredients on the grill. When the cover is closed, cooking begins and
the timer counts down.
NOTE: If you just want to use the temp probe for testing your food’s temperature press TEMP ACE
button for 2 seconds and the internal temperature of the food will appear on the screen for 5
seconds. When the screen starts flashing, you weren't holding the button long enough. Refer to the
page about Troubleshooting.
7. The device will beep when cook time is through, and END appears on the display screen. Push
TIME up arrow and push START / STOP if you need to add more time to cook the food. When using
the detector the time change varies. Page 9, phase 6b of reference, when using the probe.
8. Keep the cover open after removing the food, so that the machine can cool down faster. After
cooking, the stainless steel cover on the outside of the unit will be hot.
NOTE: When Cooking same food in batch, refer to the instructions at the bottom of page 7.
5. When your food inside hits the temperature you set, the device will beep and the display shows
‘End’. Press TEMP ACE button for 2 sec, the display will go on showing the internal food temperature.
6a. Temp probe cooking complete:
Remove protein from the unit, insert the probe and position it on a plate for a minimum of 5 minutes
to rest. When it is cooking, the protein should carry over to rest. If it hits the temperature of carry-over
cook on the chart from previous page you're complete with the cooking.
6b. Cooking more food without the Temp probe:
If you use the same feature to cook more food but do not need to use the probe, simply press
START/STOP to restart. Then press the TIME arrow to set a new cook time. Change the temperature
of the function, if applicable. To get started click START / STOP. If you use a different function to cook
more food, pick that function before setting the new time and temperature for cook.
NOTE: You can test the food's internal temperature at any time, even if it does not run a cook
feature. Only click the Temp button for 2 seconds.
6c. Cooking same food in batch with the Temp probe:
If you are cooking same food (meat) in batch, remove the probe from the cooked protein and place it
in the center of the largest uncooked protein portion. Click the TEMP button, set the internal tempera-
ture you want and click START / STOP. "Add Food" will show, let the device run for about 3 minutes
until the cover is opened and add the next batch of protein. Then, take step 5.
TYPES OF COOKING
Make sure the machine is plugged in before turning it on then tap the power button.
GRILL
1. Place the cooking pot on the main unit with the indent on the pot corresponding to the rear bump.
Then through the grill with the handles facing up into the bowl. Make sure the splatter guard is in
place and close the cover.
2. Tap GRILL button. The default temperature level on the left side of the control panel will light, and
the corresponding air temperature will appear on the display screen. To change the temperature
setting, press the Grill button, or the up and down TEMP arrows.
3. Click the TIME arrows up and down to set the cook time, in approximately 1 minute, up to 30
minutes, or follow the instructions on page 8 to adjust the temperature of a probe using the TEMP
ACE button.
 Loading...