INSTRUCTION MANUAL MODEL ET-72 REDI CHEK
®
REMOTE
Introduction
Congratulations on your purchase of the Redi Chek
®
Remote, a programmable radio frequency
food thermometer. You will now be able to remotely monitor the time and temperature of food
cooking in the oven or outdoors from anywhere in your home.
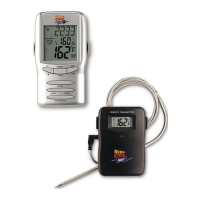
Components
1. 1 - silver receiver unit
2. 1 - black transmitter unit
3. 1 - detachable stainless steel probe sensor
4. 4 - AAA batteries
Receiver Features
LCD
1
MAGNET
3
6
7
1
2
8
4
5
Battery Compartment
Stand
Clip
FRONT
BACK
LCD (Liquid Crystal Display) – Displays all icons, temperature and time. See LCD diagram for
detailed information.
CLIP – Removable clip allows you to be mobile. Clip the receiver unit to belt.
BATTERY COMPARTMENT – Holds 2 AAA batteries.
STAND – Swings out and allows you to stand the receiver on tabletop.
Buttons
1. HR/ – In timer mode, press to set hour. Press & hold for 2 seconds, the hours will
increase 10 hours per second. In thermometer mode, press to increase the temperature value.
Press & hold for 2 seconds, the temperature value will increase 10 degrees per second.
2. CLEAR/°F/°C – When the timer countdown or count up process is stopped, press to clear
the timer reading. In thermometer mode, press to select temperature readings in Celsius or
Fahrenheit.
3. MIN/ – In timer mode, press to set minutes. Press & hold for 2 seconds, the minutes will
increase 10 minutes per second. In thermometer mode, press to decrease the temperature
value. Press & hold for 2 seconds, the temperature value will decrease 10 degrees per second.
4. MODE – Press to select thermometer or timer mode. Press & hold for 2 seconds to register
with the transmitter.
5. MEAT – In thermometer mode, press to select meat type, BEEF, VEAL, LAMB, PORK, CHICK
(chicken) or TURKY (turkey).
6. TASTE – In thermometer mode, select the taste level, W.DONE (well done), MEDIUM,
M. RARE (medium rare) or RARE.
7. START/STOP – Press to start or stop the timer countdown or count up.
8. ON/OFF – Turns receiver functions on and off.
LCD
1
1
Timer mode Hour Minute
Meat type
Taste level
Thermometer mode
Reception signal
Probe temperature reading
Set temperature reading
Sensor registered signal
Timer mode
Thermometer mode
1
1
Timer mode Hour Minute
Meat type
Taste level
Thermometer mode
Reception signal
Probe temperature reading
Set temperature reading
Sensor registered signal
Timer mode
Thermometer mode
Transmitter Features
STAND – Swings out and allows you to stand receiver on tabletop.
BATTERY COMPARTMENT – holds 2 AAA batteries.
LCD (Liquid Crystal Display) – displays temperature of sensor
S – plug in for stainless steel probe sensor
Buttons
1. TX – transmit manually, terminates the auto registration process. Press and hold for 2
seconds to register the radio frequency with the receiver.
2. ON/OFF – on normal operation with full function. Off turns transmitter off.
Registration Procedures
Open the battery compartment of receiver and insert the two “AAA” batteries. Open the battery
compartment of transmitter and insert the two “AAA” batteries.
The Redi Chek
®
Remote needs the receiver to register the radio frequency signal from the
transmitter.
Transmitter & Receiver are off.
1. Plug the stainless steel probe sensor into the plug in of the transmitter.
2. Turn the receiver on by sliding switch on the rear of the receiver from OFF to ON.
3. Turn unit on by sliding switch on the the rear of the transmitter from OFF to ON. This needs
to be done within 60 seconds of turning on the receiver in order for the receiver to register the
signal from the transmitter. If it doesn’t beep within 5-10 seconds slide switch OFF wait a few
seconds and then switch back ON.
4. Registration is complete when the unit beeps and the probe temperature appears where the
“---” was flashing.
Transmitter is already on.
1. Plug the stainless steel probe sensor into the plug in of the transmitter.
2. Turn the receiver on by sliding switch on the rear of the receiver from OFF to ON.
3. Press and hold TX for 2 seconds on the rear of the transmitter. This needs to be done within
60 seconds of turning on the receiver in order for the receiver to register the signal from the
transmitter. Once TX is released it will take several seconds for the receiver to register. If it
doesn’t beep within 5-10 seconds press and hold TX again.
4. Registration is complete when the unit beeps and the probe temperature appears where the
“---” was flashing.
Receiver and Transmitter are already on.
1. Plug the stainless steel probe sensor into the plug in of the transmitter.
2. Press MODE button on the receiver for 1 second. “---” will blink.
3. Press and hold TX for 2 seconds on the rear of the transmitter. This needs to be done within
60 seconds of pressing MODE on the receiver in order for the receiver to register the signal
from the transmitter. Once TX is released it will take several seconds for the receiver to register.
If it doesn’t beep within 5-10 seconds press and hold TX again.
4. Registration is complete when the unit beeps and the probe temperature appears where the
“---” was flashing.
Measure meat temperature to USDA doneness temperature range
1. Press MODE to select thermometer mode. The upper display will show a small MEAT and a
meat type such as BEEF.
2. Press MEAT to select meat type. BEEF, VEAL, LAMB, PORK, CHICK (chicken) or TURKY
(turkey).
3. Press TASTE to select the level of doneness for the meat type selected. W. DONE (well done),
MEDIUM, M. RARE (medium rare) or RARE indicated by a “ ”.
Note: The temperature displayed to the left of the selected taste will show the preset tempera-
ture SET TEMP according to USDA doneness levels. Example: Beef will be Well Done at 170 °F.
4. Once the temperature of meat reaches the preset doneness level the receiver will beep, the
“ ” warning icon and the probe temperature will blink.
BACK
FRONT
SIDE
STAND
(Removable part)
BATTERY
Compartment
1
2
LCD
S1