The provided document is the owner's manual for the Maverick 18 HPX-V boat, Model Year 2024.
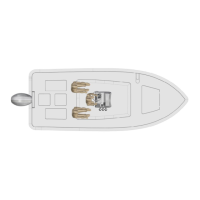
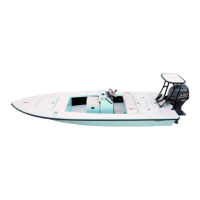
The Maverick 18 HPX-V is a shallow-water fishing boat designed for performance and ease of use in various marine environments, particularly those requiring shallow draft capabilities. It is characterized by its "self-bailing cockpit" design, which allows water to drain directly overboard without the need for a bilge pump, ensuring the cockpit remains free of standing water even when docked.
Important Technical Specifications:
- Length Overall (L.O.A.): 18'04"
- Beam: 6'08"
- Draft: 9"
- Deadrise: 13 degrees
- Weight w/ Engine: 1,460 lbs.
- Fuel Capacity: 29 GAL.
- Maximum H.P.: 150
Usage Features:
Helm and Switch Panel:
The helm features a main switch panel located below the steering wheel, controlling lights, horn, accessories, livewell, and bilge. The bilge switch is an on-demand control for the bilge pump, serving as a backup if the float indicator clogs. Two trim tab switches are standard, and a compass is mounted on top of the console.
Gauges:
The instrument panel includes a Yamaha digital gauge with a tachometer and speedometer. The tachometer displays engine temperature, oil level, and engine trim. The speedometer shows speed, an hour meter, trip meter, and clock. The manual recommends consulting the Yamaha owner's manual for detailed gauge information.
Navigation Lights:
The boat is equipped with port and starboard navigation lights and an anchor light. These lights have expiration years (2043 for both) and should be replaced by a local dealer or manufacturer when due. Modifications or additions to lights that diminish visibility or cause confusion with navigation lights are not recommended.
Fuel System:
The Maverick 18 HPX-V has a standard 19-gallon aluminum fuel tank located forward of the cockpit floor bulkhead. The fuel fill receptacle is on the port gunwale, forward of the console, with a recessed fuel overflow vent just below it. The fuel system is pressure tested at the factory. Any fuel-related problems should be addressed by a local Maverick dealer immediately.
Safety Precautions for Fueling:
- Do not smoke while filling the tank.
- Turn off engines and all electrical equipment to prevent accidental static electricity discharges.
- Use only recommended gasoline (refer to Yamaha Owner's Manual).
- Avoid fuels with alcohol or alcohol-related derivatives, as they can deteriorate marine fuel system hoses.
Self-Bailing Cockpit & Livewell:
The cockpit is designed to be self-bailing, with water draining directly overboard through two aft cockpit drains, not into the bilge. The livewell system is designed to keep bait alive longer, featuring a unique inflow and drain system to prevent dead zones and expel harmful chemicals. The boat is shipped with the livewell shut-off valve in the "off" position (90-degree angle); it must be turned counterclockwise to align with the pipe for water flow. This valve also serves as a safety measure against leaks. Livewells come with a standpipe and screw-style drain plug to control water levels. If the livewell doesn't pump water, shifting the throttle into reverse and backing the boat a few feet can purge air pockets. Detritus should be cleared from the standpipe.
Optional Recirculation System:
Some boats may have an optional recirculation system, a closed system that recycles water within the well. This is controlled by a switch on the panel and is ideal for transporting bait between different water extremes.
- Note: Always turn the shut-off valve to the 90-degree off position before working on the livewell pump or plumbing to prevent outside water from entering the bilge.
Trolling Motor Wiring:
The 18 HPX-V comes standard with a 24V trolling motor wiring system. The trolling motor battery bank and breaker panel are located inside the console. A mounting plate is built into the bow for attaching a trolling motor. Installation requires drilling with a 13/64" drill bit and 1/4" tap, using 1/4" #20 machine screws. The plate accommodates various trolling motor brands.
Battery Switch and Breaker Panel:
The battery switch is located inside the console on the starboard wall, protected by a 30-amp inline fuse. In a single battery system, the battery is wired to the "1" side of the switch. For additional batteries (e.g., for a trolling motor), one should connect to switch "2" to assist in cranking the engine if the main battery lacks power. The "1 & 2" position should only be used if one battery cannot start the engine. After starting, return the switch to the "1" position to ensure the engine alternator charges that battery. The cranking battery is accessed by opening the console doors.
Ladder & Props:
Propeller selection is determined by the local Maverick Dealer, based on recommendations from Maverick Boat Group and Yamaha Marine to optimize overall performance. Different props affect speed out of the hole, overall speed, and cavitation.
- Always inspect the engine and prop for tangled fishing line, debris, cracked blades, or fluid leaks before launching. Consult the Yamaha Owner's Manual for issues.
Unassisted Reboarding:
In an emergency, reboard by swimming to the side, gripping the underside of the gunnel, pulling up to grab the grabrail on the console, and then pulling yourself fully into the boat.
Optional Features:
- Trim Tabs: Standard 12-inch Bennett electric trim tabs enhance performance. They are hydraulic pump-free, eliminating fluid leaks. Trim tabs allow the operator to adjust the boat's attitude for optimal performance and balancing. The port trim tab switch affects the port side, and the starboard switch affects the starboard side.
- Lightly tap tabs to adjust the boat's attitude.
- Pushing "Down" lowers the trim tab, forcing the bow down, useful for heavy seas or a stiff chop.
- Pushing "Up" raises the tabs, lifting the bow out of the water for better running performance.
- In severe weather or high winds, use trim tabs to lift the windward side of the boat, spraying water away from passengers.
- Under Gunwale Rod Storage: Standard with under gunwale rod racks on both port and starboard sides, providing space for two short and two long rods.
- Jackplates: An optional hydraulic jackplate allows the motor to be trimmed straight up, opposing the angled trimming of the stock engine trim motor, thus allowing more prop to remain in the water while running.
- Note: Jackplates increase stress on the transom. Boats with jackplates should have a transom saver or other supporting device. Refer to the jackplate owner's manual and Yamaha engine manual.
- Power Poles: Optional Power Poles allow quick and quiet stopping in shallow water. Refer to the Power Pole owner's manual for operational and mechanical information.
Maintenance Features:
General Maintenance:
Maverick advises that maintenance and repairs be performed at an authorized Maverick Dealer.
- After each use, thoroughly wash the boat with fresh water and dry with a soft cloth to avoid water spots.
- A fiberglass wax can preserve the hull's luster.
- Clean stainless fittings with fresh water and mild soap after each use, then dry completely. Apply wax or polish after cleaning. Remove rust immediately to prevent damage.
- Apply a light coat of lubricant on metal railing, screws, and electrical connections to prevent electrolysis. This also applies to the trailer.
Fuel-Water Separator:
The boat is equipped with one fuel-water separator to protect the outboard engine from contaminated gasoline. It's a metal, cylindrical unit in the starboard wall of the center aft rigging box.
- Check by removing it from the mounting bracket and dumping contents into a waste collection device. If excessive water is present, change the filter component.
- Yamaha Recommendation: Replace the 10-micron fuel filter on new boats after the first 10 hours or 1 month, and every 50 hours or 6 months thereafter. More frequent replacement may be needed in high humidity or areas with fuel supply problems.
Garboard Drain Plug:
A small metal plug at the lowest point on the hull, right above the keel, ensures the bilge is watertight with its rubber seal.
- Always hand-tighten firmly before putting the boat in the water.
- Excess water in the bilge may indicate a problem with the plug or the automatic bilge pump.
Bilge:
- Always check the bilge before and after launch. A small amount of water is normal, but a large amount or signs of fuel/oil require immediate attention. If this occurs, take the boat to a certified marine technician immediately. Never pump fuel or oil overboard.
- Large water quantities may indicate a leak or a malfunctioning bilge pump/float switch due to a jam, clog, or electrical issue.
- The automatic float switch is wired to the 24-hour side of the battery switch via the "BILGE" breaker. If the float switch is submerged but the pump doesn't activate, manually turn it on via the switch panel. If it works, the float switch is faulty.
- If the pump doesn't turn on via the switch panel, check the breaker on the battery switch panel. If tripped, reset it and try again. The automatic float switch also has an independent fuse near the batteries.
- If the pump still fails, unhook it from its cradle (press blue tabs, gently turn top of pump). Check for obstructions under the pump and impeller. Remove debris, reattach the pump, and try again.
- If the bilge pump still doesn't turn on, it likely needs replacement. Do not use the boat if the bilge pump and/or float switch are not functioning.
- Note: The bilge pump has an anti-airlock nozzle that exhausts air. Mist or spray escaping while running is normal.
Wiring:
A wiring diagram is included for troubleshooting electrical problems or adding electronics. It is recommended to use a trained marine electrician for all electrical issues.
Upholstery Care & Cleaning Guide (Spradling International Marine PERMAGUARD®):
The manual includes detailed instructions for cleaning vinyl-coated fabrics, distinguishing between white/primary seating vinyls and colors/accent vinyls.
For White or Primary Seating Vinyls (PERMAGUARD®):
- Step 1 (Light Stains: baby oil, ketchup, chocolate, motor oil, olive oil, tea, coffee): Immediately wipe with a clean, dry cotton fabric. If residue remains, proceed to Step 2.
- Step 2 (Heavy Stains: eye shadow, crayon, grease, permanent felt tip marker, mustard, lipstick, ball point pen): Use concentrated Formula 409® or Fantastik®. Wipe with a clean cloth, rinse with water, and dry. If residue remains, proceed to Step 3.
- Step 3 (Stubborn Soiling): Use a cotton fabric soaked in 91% isopropyl (rubbing) alcohol. Wipe without spreading, then apply a second time with vigorous rubbing. For textured material, use a soft toothbrush. Wipe with a clean cloth, rinse, and dry.
- Important: Certain clothing dyes (e.g., denim) may migrate to lighter colors, especially with humidity and temperature. Always remove stains immediately.
- Avoid: Household cleaners, powdered abrasives, steel wool, industrial cleaners, dry cleaning fluids, lacquer solvents, waxes with dyes/solvents, power washers (over 3500 PSI), kerosene, gasoline, acetone, and silicone-based protectants. These can damage the protective coating, remove printed patterns/gloss, extract plasticizer, and cause vinyl to become hard, brittle, and crack.
- Failure to care for vinyl properly or using improper cleaners may void the warranty.
For Colors and Accent Vinyls (Acrylic or Napa Topcoat):
- Step 1 (Light Soiling): Use a 10% household liquid dish soap solution in warm water with a soft damp cloth. Rub gently and rinse with a water-dampened cloth.
- Step 2 (Heavy Soiling): Use a 1:1 solution of Formula 409® or Fantastik® and water with a soft white cloth. Rub gently and rinse with a water-dampened cloth.
- Step 3 (More Difficult Stains): Use a solution of household bleach (10% bleach and 90% water) with a soft white cloth. Rub gently and rinse with a water-dampened cloth to remove bleach concentration.
- Avoid: Alcohol-based cleaning agents.
- All cleaning methods must be followed by a thorough rinse with clean warm water.
- Avoid: Household cleaners, powdered abrasives, steel wool, industrial cleaners, dry cleaning fluids, lacquer solvents, waxes with dyes/solvents, power washers, kerosene, gasoline, acetone, and silicone-based protectants.
- Always remove stains immediately.
- Contact the cleaning hotline at 1-800-247-9901 or online at www.spradlingvinyl.com/sim for more information.
Warning Labels:
The manual provides locations and part numbers for reordering warning labels, including those for carbon monoxide, sudden turns at high speeds, rotating propeller, and leaking fuel. These labels are crucial for safety and must be replaced if damaged, removed, or lost.
Warranty:
All warranty claims and repair issues should be addressed through a local Maverick dealer. The dealer network is knowledgeable in service and repairs, ensuring timely resolution of issues and a direct link between the boat owner and the factory for parts and service.