EasyManua.ls Logo

Maverick ET-8 - User Manual

Maverick ET-8
2 pages
Print Icon
To Next Page IconTo Next Page
Loading...
INSTRUCTION MANUAL
MODEL # ET-8 DIGITAL ALERT
ROASTING THERMOMETER
Introduction
Congratulations on your purchase of the Digital Alert Roasting Thermometer, a
programmable food thermometer.
Unit Features
LCD (Liquid Crystal Display) – Displays all icons, temperature and timer.
The LCD color coded screen will change colors as per the following:
Blue – Will flash blue when the temperature has risen 10°F from the lowest
temperature.
Green – Will flash green then the temperature is within 15
° F of the set
temperature.
Red- Will flash red when the temperature reaches the set temperature.
The LCD will display temperatures from 16- 482
°F. (-9-250°C)
See LCD diagram for detailed information.
BATTERY COMPARTMENT – Holds 2 AAA batteries (Batteries are included).
Buttons
1. MODE – Press to select thermometer or timer mode.
2. HR – In timer mode, press to set hour. Press & hold for 2 seconds, the hours will
increase 10 hours per second. In thermometer mode, press to increase the temperature
value. Press & hold for 2 seconds, the temperature value will increase 10 degrees per
second.
3. °F/°C – In thermometer mode press to select temperature readings in Celsius or
Fahrenheit.
4. MIN – In timer mode, press to set minutes. Press & hold for 2 seconds, the minutes will
increase 10 minutes per second. In thermometer mode, press to decrease the temperature
value. Press & hold for 2 seconds, the temperature value will decrease 10 degrees per
second.
5. MEAT – In thermometer mode, press to select meat type, PROG (program), GBEEF
(ground beef), GPOUL (ground poultry) , BEEF, VEAL, CHCKE (chicken), PORK, POULT
(poultry) , LAMB & FISH. In Timer mode switches between hour/minute timer to a
minute/second timer and back.
6. START/STOP– In timer mode, press to start or stop the timer.
7. TASTE – In thermometer mode, select the meat taste level, RARE, MED RARE,
MEDIUM, MED WELL and WELL DONE.
LCD Diagram
Measure meat temperature to USDA doneness temperature range
1. Press MODE to select thermometer mode. The upper display will show a small MEAT
and a meat type such as BEEF.
2. Press MEAT to select meat type. PROG (program), GBEEF (ground beef), GPOUL
(ground poultry), BEEF, VEAL, CHCKE (chicken), PORK, POULT (poultry) , LAMB & FISH.
3. Press TASTE to select the level of doneness for the meat type selected. RARE, MED
RARE, MEDIUM, MED WELL and WELL DONE.
Note: The temperature displayed to the right of the actual meat temperature PROBE TEMP
will show the preset temperature TEMP SET according to USDA doneness levels. Example:
Beef will be Well Done at 165 °F.
4. Once the temperature of meat reaches the preset doneness level the Unit will beep and
the LCD backlight will turn red.
Measure meat temperature set to your specific taste
1. Press MODE to select thermometer mode. The upper display will show a small MEAT
and a meat type such as BEEF.
2. Press HR or MIN to raise or lower the set temperature. As you press HR or Min the
display changes to PROG (program). Holding the button will raise or lower the temperature
setting rapidly. Pressing MEAT will return you to the preset USDA ranges.
3. Once the temperature of meat reaches the preset doneness level the UNIT will beep and
the LCD backlight will turn red.
Using the Timer
Count down
1. Press MODE to select timer mode. The upper display will show a small TIMER and 0:00.

Other manuals for Maverick ET-8

Question and Answer IconNeed help?

Do you have a question about the Maverick ET-8 and is the answer not in the manual?

Summary

Unit Features Overview

LCD Diagram and Display Functions

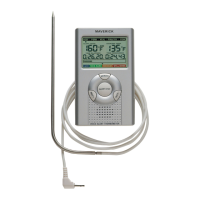
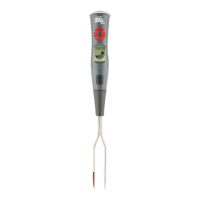
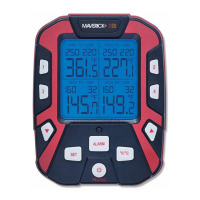
Explains the LCD diagram and the color-coded screen's display behavior for temperature.

Device Buttons and Controls

Details the function of each button: MODE, HR, °F/°C, MIN, MEAT, START/STOP, and TASTE.

Battery Compartment

Specifies the battery type and quantity required for the thermometer unit.

Meat Temperature Measurement Guide

USDA Doneness Temperature Ranges

Instructions for measuring meat temperature against standard USDA doneness levels.

Custom Taste Temperature Setting

Procedure for setting a specific desired meat temperature for personalized cooking.

Timer Operation

Countdown Timer Usage

How to set and use the countdown timer functionality for cooking.

Count Up Timer Usage

Instructions for activating and monitoring the count up timer.

Important Usage Information

Helpful Operation Hints

Provides tips on probe temperature limits, flame contact, and LCD display errors.

Safety Cautions and Precautions

Lists critical warnings regarding age, water exposure, heat, and microwave use.

Cleaning and Maintenance

Guidance on how to properly clean the probe and the main unit.

Limited Ninety Day Warranty

Details the warranty coverage, contact information, and conditions for voiding.

Overview

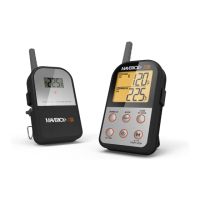
The Maverick ET-8 Digital Alert Roasting Thermometer is a programmable food thermometer designed to help users achieve precise cooking temperatures for various meats. It features an LCD with a color-coded backlight that changes based on temperature progression, providing visual cues during the cooking process.

Function Description:

The device operates in two primary modes: thermometer mode and timer mode. In thermometer mode, it measures the internal temperature of food using a stainless steel probe. Users can select from a variety of pre-programmed meat types (PROG, Ground Beef, Ground Poultry, Beef, Veal, Chicken, Pork, Poultry, Lamb, Fish) and desired doneness levels (Rare, Medium Rare, Medium, Medium Well, Well Done) based on USDA guidelines. The display shows both the actual probe temperature (PROBE TEMP) and the set target temperature (TEMP SET). When the meat reaches the preset doneness level, the unit beeps, and the LCD backlight turns red, alerting the user. Alternatively, users can manually set a target temperature to their specific taste, with the display changing to "PROG" when a custom temperature is set.

In timer mode, the device functions as a countdown or count-up timer. Users can set hours and minutes for countdown, and the display will show a small "TIMER" icon. When counting down, a "▼" icon blinks every second. Once the countdown reaches zero, the timer starts counting up and beeps for 60 seconds, with a "▲" icon blinking. The timer can also be used as a simple count-up timer, with a "▲" icon blinking every second during the count-up process.

Important Technical Specifications:

  • Temperature Range: The LCD displays temperatures from 16°F to 482°F (-9°C to 250°C).
  • Probe Wire Temperature Limit: The probe wire should not be used above 482°F (250°C).
  • Power Source: The unit is powered by 2 AAA batteries (included).
  • Timer Minimum Setting: The minimum setting for the timer is 1 minute.
  • LCD Color Coded Screen:
    • Blue: Flashes blue when the temperature has risen 10°F from the lowest temperature.
    • Green: Flashes green when the temperature is within 15°F of the set temperature.
    • Red: Flashes red when the temperature reaches the set temperature.

Usage Features:

  • Buttons:
    • MODE: Toggles between thermometer and timer modes.
    • HR (Hour/Increase): In timer mode, sets hours (press and hold for rapid increase). In thermometer mode, increases the set temperature (press and hold for rapid increase).
    • MIN (Minute/Decrease): In timer mode, sets minutes (press and hold for rapid increase). In thermometer mode, decreases the set temperature (press and hold for rapid decrease).
    • °F/°C: In thermometer mode, switches temperature readings between Celsius and Fahrenheit.
    • MEAT: In thermometer mode, selects meat type (PROG, GBEEF, GPOUL, BEEF, VEAL, CHCKE, PORK, POULT, LAMB, FISH). In timer mode, switches between hour/minute and minute/second timer displays.
    • START/STOP: In timer mode, starts or stops the timer.
    • TASTE: In thermometer mode, selects meat doneness level (RARE, MED RARE, MEDIUM, MED WELL, WELL DONE).
  • Rapid Setting: Pressing and holding the HR or MIN buttons allows for rapid adjustment of hours, minutes, or temperature settings (10 units per second).
  • Alerts: Audible beep and red LCD backlight when target temperature is reached.
  • Error Display: "LLL" or "HHH" on the LCD indicates a probe issue (e.g., shorted internal wire due to moisture or heat damage) or that the probe needs to reach room temperature.
  • Probe Placement Guidance: Ensure the probe tip is inserted into the thickest part of the food, avoiding bone or heavy fat areas, and not poking through to the outside, to ensure accurate readings.

Maintenance Features:

  • Cleaning:
    • The metal probe tip should be washed with hot soapy water and dried thoroughly. Do not immerse the probe in water.
    • The main unit should be wiped with a damp cloth. Do not immerse the unit in water.
  • Battery Replacement: The unit uses 2 AAA batteries, located in the battery compartment.
  • Warranty: A 90-day limited warranty covers defects in parts, materials, and workmanship. Defective probes within the warranty period can be replaced free of charge by contacting Maverick Customer Service.
  • Cautions:
    • Not intended for use by persons under 12 years of age.
    • The unit is not waterproof and should not be used in the rain.
    • Avoid exposing the stainless steel probe plug or the unit's plug hole to water or any liquid to prevent bad connections and faulty readings.
    • Do not expose the unit to direct heat or surface heat.
    • Do not use the stainless steel probe in a microwave oven.
    • Do not allow the probe or probe wire to come into contact with flames.
    • When cooking with a grill cover closed, use only medium or low heat.

Maverick ET-8 Specifications

General IconGeneral
BrandMaverick
ModelET-8
CategoryThermometer
LanguageEnglish

Related product manuals