16
INSTALLATIONSSCHRITTE
1. Machen Sie im Hühnerstall eine Öffnung, die an die Hühnerluke angepasst ist.
2. Befestigen Sie die beiden Seitenträger der Schiene mit einem L-förmigen horizontalen
Träger an der Unterseite.
3. Platzieren Sie das Türregal in der Schiene und befestigen Sie die rechteckige horizontale
Stange oben an der Seitenschiene.
4. Installieren Sie die Basis des Steuerkastens mit 4 selbstschneidenden Schrauben, um ihn
zu befestigen, decken Sie den Steuerkasten mit dem Deckel ab und verriegeln Sie ihn
mit 4 Kunststoffschrauben, dann binden Sie die Türplatte mit dem Seil fest.
5. Befestigen Sie den Verlauf des Seils mit 4 Rädern. Achten Sie darauf, dass das Seil nicht
hängen bleibt, damit sich die Tür reibungslos bewegt.
EINSTELLUNGEN VOR DER INBETRIEBNAHME
A. Passen Sie die Türhöhe an
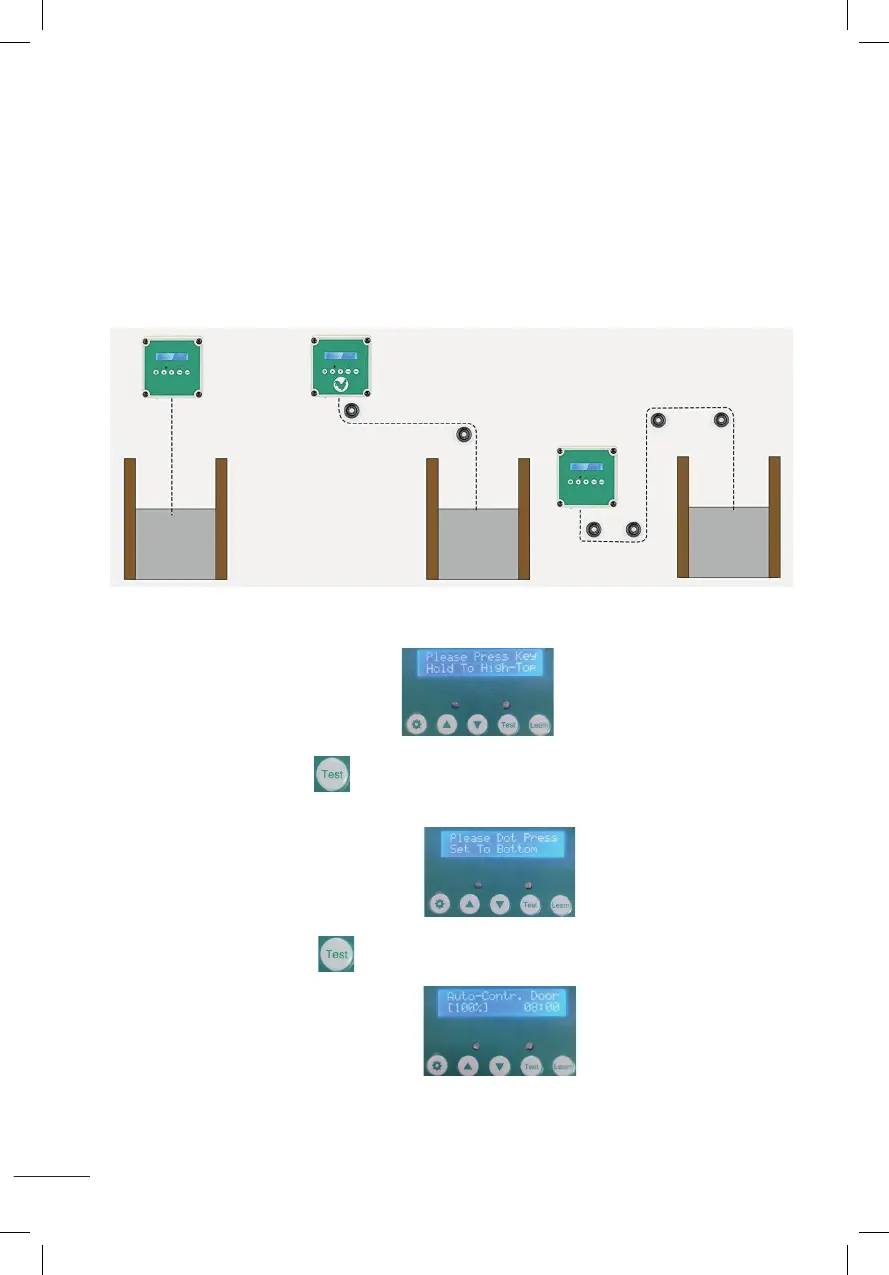
1. Nach dem Einschalten des Displays
Halten Sie die Testtaste gedrückt und lassen Sie sie nicht los. Warten Sie, bis die Tür
die gewünschte Höhe erreicht hat, und lassen Sie sie dann los.
2. Nach der Anzeige wie im Bild gezeigt
Halten Sie die Testtaste 1 Sekunde lang gedrückt und lassen Sie sie dann los.
Die Tür fällt nach unten.
3. Nach der Anzeige wie im Bild gezeigt
Dies bedeutet, dass die Türhöhenverstellung abgeschlossen ist.
Installation steps:
1. Adjust and fix the size of the chicken cage;
2. Fixed at the bottom of the two side bars of the track with L-shaped horizontal bar ;
3. Put the door plank into the track, and fix the rectangular horizontal bar at the top of the track side bar;
4. Install the control box base with 4 self-tapping screws to fix, cover the control box wtih the cover and
lock with 4 plastic screws, then tied up the door plank with the rope.
5. Use 4 wheels to fix the route of the rope, the rope can not be stuck so that the door activities smoothly.
Please take a few minutes to read and follow these steps to set up before using.
A
::Set the height of the door::
1.After power-on display (Please Press Key Hold To High-To p),
hold down the test button and do not release,wait until the door rises to the height you need and
then release it.
2.After displaying as shown (Please Dot Press Set To Bottom) ,
press and hold the test button for 1 second and then release, the door will drop to the bottom.
3.When the LCD screen is displayed as shown (Auto-Contr.Door(100%)), it means
the door height setting is completed.
 Loading...