Do you have a question about the Mayones Cali and is the answer not in the manual?
Warning about hearing damage from loud volumes and recommendation to use the lowest usable level.
Recommendations for maximum exposure time at specific sound levels to prevent hearing damage.
Caution regarding high volume use of earphones/headphones to prevent permanent hearing damage.
Overview of the internal headphone amp for practice and its power source.
Explains how the mini-switch and volume knob control active/passive modes and outputs.
Explains the function of the four LEDs indicating battery charge and amp status.
Details how to charge the internal battery using the provided charger and micro USB port.
Warning about using only the specified battery type to avoid damage or injury.
Crucial safety precautions for handling Li-Poly batteries, including risks of explosion and toxic release.
Guidelines for safe installation, storage, and disposal of batteries to prevent short-circuits.
Procedures to follow in case of electrolyte leakage, including eye and skin contact advice.
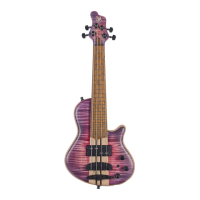
The Mayones Cali Bass is a highly functional and professional instrument designed for both typical bass amplification and practice situations, thanks to its internal headphone amplifier. It's a short-scale bass that can hold its own against regular basses and even shine during solos or in arrangements specifically written for its scale.
The Cali bass features an embedded active three-band-EQ preamp, offering extensive tone adjustments across bass, mids, and treble frequencies. A push-pull volume knob allows the user to completely bypass the preamp, making the instrument entirely passive. For those seeking more sophistication, the Cali VFret model offers a varied scale for each string (17.1" - 18.3" multiscale) with fanned frets, a tilted pickup, and a bridge composed of individual modules for each string.
The instrument incorporates a high-quality, dual-channel headphone amplifier, enabling unrestricted practice with a full, accurate tone without disturbing others. This is powered by a highly efficient lithium-polymer battery and a user-friendly charging system, extending its usability across various scenarios.
Listening to sounds at loud volumes can lead to permanent hearing damage. The volume should always be set to the lowest usable level. Prolonged exposure to loud sounds can cause permanent hearing impairment. Recommended maximum exposure times to specific sound levels are:
Most setup procedures for the Cali bass are similar to conventional bass guitars, utilizing full-size components identical to those in other Mayones basses. This ensures the signature Mayones sound, top quality, perfect playability, broad setup adjustments, reliability, and longevity.
The Cali 4 is tuned one octave higher than a typical 4-string bass (G high, D, A, E low). Default string gauges are 0.30-0.44-0.63-0.84 inch, cut to a length corresponding to the 17.1" (436 mm) scale. String length from tuner pegs to tailpiece should not exceed 10 centimeters. Users can experiment with different string gauges (±0.03" compared to stock strings) and tunings. Thicker strings may necessitate setup adjustments or luthier customization, such as adjusting neck nut slot width.
A truss rod is used to set the neck relief, ensuring optimal playability and stability. The adjustment nut is located beyond the neck nut, protected by a decorative cover. The adjustment process is identical to a typical bass guitar. Recommended neck relief, measured above the 8th fret (with the string fretted at the first and last fret), should be 0.3 mm for each string.
Once neck relief is set, the recommended distance between strings and the top of the 12th fret is approximately 1.3 mm for the G string and 1.5 mm for the E string. A detailed description of all setup and usage procedures can be found in the Mayones instruction manual for bass guitars, available on their website.
The headphone amp is switched on via a two-way toggle mini-switch on the front of the instrument. Its active status is indicated by the first blue LED on the left, labeled "PREAMP ON."
The Cali bass has four potentiometer knobs:
The headphone amp works only with stereo headphones fitted with a 1/8" (3.5 mm) TRS jack plug. Headphones with impedance from 16 to 64 Ohms are acceptable (16 Ohms is an allowed option). If using stereo headphones with a different plug, a proper adapter must be used. Mono (TS jack) headphones or headphones with an embedded microphone (OMTP, CTIA, or similar TRRS jack plugs) are not compatible. The Cali mini bass is not stereophonic; both headphone channels (left and right) transmit the same monophonic pickup signal, split between the two channels of the headphone amp. For safety and comfort, headphones should be plugged in only after the headphone amp is switched on, with the volume knob set to minimum (extreme left).
The headphone amp is powered by a high-efficiency, high-capacity Li-Polymer battery. Four LEDs on the electronics cover indicate battery charge levels and headphone amp status:
To charge the internal battery, use the supplied charger with optimized charging parameters. The micro-USB charging port (24) is located next to the LED controls on the electronics cover. Exercise caution when plugging/unplugging the charger due to the delicate nature of the port and plug. Avoid excessive force. Inspect the plug and input for any objects or dirt. Do not use a damaged charger or force the cable. Do not remove the plug at an angle.
Charging begins when the charger is plugged into the micro-USB port and a mains socket, indicated by a continuous yellow "CHARGING" LED. A full charge from a completely depleted battery takes approximately 3 hours. When fully charged, the yellow "CHARGING" LED turns off, and the green "FULLY CHARGED" LED lights up. While the charging module has overcharging protection, it's recommended to unplug the charger once the battery is full for safety. Leaving it plugged in continuously risks damaging the charger socket and plug.
If the yellow "CHARGING" LED or green "FULLY CHARGED" LED does not light up after plugging in the charger, it may indicate a damaged charger, cable, charging port, or an unplugged battery. In a worst-case scenario, the headphone amp itself might be damaged. Try unplugging and replugging the charging cable or using another compatible charger.
Note: It is not recommended to plug the Cali into a PC USB port, as most do not provide proper charging parameters for the battery. Tip: The internal battery can also be charged using an external power bank providing 5V/1A. A minimum 2500 mAh power bank is required for a full charge. This offers an alternative charging unit where mains access is unavailable. Other 5V, 1A chargers with a micro-USB plug can also be used. Important: The micro-USB port is solely for charging the battery and is not used as an audio output.
With a fully charged battery and 32 Ohm stereo headphones, the headphone amp can be used for approximately 26 hours at a comfortable playing volume. Note: Do not leave the mini-switch in the top position when not in use, as power is supplied to the headphone amp, leading to rapid battery discharge.
The Cali bass uses a 3.7V Li-Po (Lithium-Polymer) battery with a capacity of 1,400 mAh. It features PCM safeguards against excessive depletion and overcharging, ensuring optimal battery lifetime. The battery retains baseline performance for approximately 500 charge-discharge cycles. If a noticeable performance or capacity drop occurs, the battery should be replaced. The battery is located on the inner side of the electronics cover. To replace it, unscrew the cover, disconnect the preamp PCB connector, disconnect the battery, and carefully remove it, gently separating the adhesive. New batteries come with mounting tape for easy and rigid installation. Reconnection should be done in reverse order.
Note: The headphone amp must only be powered by a 3.7V battery identical to the original. Using any other cell may damage the headphone amp or lead to an explosion, potentially causing fire and/or injury.
The instrument's battery is recyclable and must be disposed of separately from household waste. Treat it as hazardous waste and return it to the seller or a battery recycling point. Dispose of only discharged and completely depleted batteries to conserve resources and protect human health and the environment.
The product uses a lithium polymer cell, which is safer than Li-Ion counterparts due to the elimination of electrolyte spilling risk.
Mayones Guitars and Basses continuously strive for quality, releasing newer and upgraded versions, and seeking the best building materials. The company reserves the right to make changes without prior notice. All parts are RoHS compliant. All content, including specifications, data, and illustrations, is subject to change without prior notice. No part of this document may be reproduced or transmitted without prior written permission from the publisher. Mayones and the Mayones logo are registered trademarks of Gitary Mayones s.c.
| Brand | Mayones |
|---|---|
| Model | Cali |
| Category | Musical Instrument |
| Language | English |