EasyManua.ls Logo

MayPole Erde MP6812 - User Manual

MayPole Erde MP6812
6 pages
Print Icon
To Next Page IconTo Next Page
Loading...
NOTE: TIGHTEN FIXINGS TO TORQUES
PRESCRIBED IN THE LIST OF TOOLS
90° BRACKET
TOOLS REQUIRED FOR ASSEMBLY. NOT PROVIDED
(M6)
(M8)
(M10)
WEAR GLOVES
DURING ASSEMBLY
LIMITED
Manufactured on behalf of
Maypole Ltd, Birmingham UK
www.maypole.ltd.uk
sales@maypoleltd.co.uk
NUTS AND BOLTS CONTENT IN BOX B
MP6812
Question and Answer IconNeed help?

Do you have a question about the MayPole Erde MP6812 and is the answer not in the manual?

Summary

Trailer Parts and Tools Overview

Nuts and Bolts Content

Lists the specific nuts and bolts included in Box B for trailer assembly.

Required Tools

Details the tools necessary for assembly that are not provided with the kit.

Assembly Safety Warning

Advises users to wear gloves during the assembly process for safety.

Trailer Assembly Step A: Base Frame

Initial Fastening Instruction

Instruction to not fully tighten fixings at this stage of the assembly.

Trailer Assembly Step B: Draw Bar

Draw Bar Bolt Removal

Instruction to remove the pre-fitted bolt from the draw bar.

Trailer Assembly Step C: Cable and Draw Bar

Cable Attachment

Instruction to clip cables to the trailer beam.

Final Tightening for Sections A-C

Instruction to fully tighten all fixings in sections A, B, and C.

Draw Bar Bolt Insertion

Instruction to insert the bolt into the draw bar.

Trailer Assembly Step D & E: Wheel Fitting

Wheel Fitting Orientation

Specifies domed head against the wheel rim for wheel nut fitting.

Base Panel Securing

Check the base panel is securely clamped down onto the draw bar.

Wheel Nut Tightening

Instruction to fully tighten the wheel nuts to the specified torque.

Trailer Assembly Step F: Additional Fittings

Trailer Assembly Step G: Side Panel Attachment

Intermediate Tightening Caution

Do not fully tighten fixings in sections G-J until instructed.

Trailer Assembly Step H: Rear Panel Attachment

Trailer Assembly Step I: Front Panel Attachment

Trailer Assembly Step J: Mudguard and Brackets

Mudguard Bracket Fitting

Instruction to fit 90° brackets inside the mudguard.

Trailer Assembly Step K: Pin Insertion

Pin Check

Illustration showing the pin for securing components.

Trailer Assembly Step L: Final Tightening and Checks

Tailgate Securing

Instruction to close and secure the tailgate.

Final Fastening Instruction

Instruction to fully tighten all fixings in sections G-J.

Post-Assembly Checks

List of components to check after assembly and first 60 miles.

Roadworthiness and Maintenance

Legal requirements for trailer inspection, maintenance, and bearing checks.

Overview

This document provides assembly and usage instructions for the ERDÉ 122.2 and DAXARA 127.2 trailers, identified by part number N°58420025/A. The manual details the step-by-step assembly process, including the components, tools required, and specific tightening torques for various fixings.

Function Description

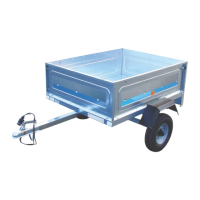
The ERDÉ 122.2 and DAXARA 127.2 are utility trailers designed for general-purpose hauling. They feature a robust chassis with a drawbar, an axle with wheels, and a cargo bed with side panels and a tailgate. The trailers are intended to be towed by a vehicle, providing additional cargo capacity. The assembly process involves attaching the drawbar, axle, wheels, and cargo bed components, including the side panels and tailgate. Electrical connections for lighting are also integrated into the design, ensuring road legality.

Important Technical Specifications

The manual specifies various nuts and bolts used in the assembly, indicating their dimensions and quantities. Key fixings include:

  • M 10x25 bolts: 4 pieces
  • M 8x25 bolts: 4 pieces
  • M 8x20 bolts: 12 pieces (for general assembly), 2 pieces (for sections G-J), 2 pieces (for section H), 4 pieces (for section I)
  • 90° BRACKETS: 4 pieces
  • M 6x12 bolts: 2 pieces (for general assembly), 2 pieces (for sections G-J)
  • Ø10 washers: 4 pieces (for general assembly), 8 pieces (for section A)
  • Ø10 bolts: 8 pieces
  • 8x16 bolts: 1 piece
  • M 12x70 bolt: 1 piece (for drawbar)
  • Ø12 washer: 1 piece (for drawbar)
  • M12 nut: 1 piece (for drawbar)
  • M 10 bolt: 1 piece (for drawbar)
  • Ø10 washer: 1 piece (for drawbar)
  • M 10x70 bolt: 1 piece (for drawbar)
  • Wheel nuts: 8 pieces

Torque Specifications:

  • M6 fixings: 0.8 daN.m (or 0.8 Kg.m)
  • M8 fixings: 1.8 daN.m (or 1.8 Kg.m)
  • M10 fixings: 3.6 daN.m (or 3.6 Kg.m)
  • Wheel nuts: 6 daN.m (or 6 Kg.m)

The trailers are designed for 480x8 wheels, as indicated by the assembly instructions for the mudguards. The electrical system includes yellow and green cables, likely for indicator and brake lights, which need to be clipped to the beam.

Usage Features

The assembly instructions highlight several usage-related features:

  • Modular Design: The trailer components are supplied in packs (Pack A and Pack B), suggesting a modular design for easier shipping and assembly.
  • Drawbar Assembly: The drawbar is a critical component, and its assembly involves removing a pre-fitted bolt, inserting a new bolt, and securing it with specific nuts and washers. This ensures a secure connection to the towing vehicle.
  • Wheel Installation: The wheels are secured with eight wheel nuts, and it's emphasized that the domed head of the nut should be against the wheel rim.
  • Base Panel Clamping: The base panel must be securely clamped down to the drawbar, indicating its importance for structural integrity and load distribution.
  • Tailgate: The trailer features a tailgate that can be closed and secured, allowing for easy loading and unloading of cargo while ensuring its retention during transit.
  • Mudguards: The mudguards are installed using 90° brackets, which fit inside the mudguard, providing protection from road debris.
  • Lighting: The presence of electrical cables (yellow and green) and the requirement to clip them to the beam indicate that the trailer is equipped with lighting, essential for road safety and compliance.

Maintenance Features

The manual provides crucial maintenance guidelines to ensure the trailer's longevity and roadworthiness:

  • Progressive Tightening: The instructions repeatedly emphasize "DO NOT FULLY TIGHTEN FIXINGS AT THIS STAGE" during initial assembly steps (sections A and G-J), followed by "FULLY TIGHTEN ALL FIXINGS IN SECTIONS A-C" and "FULLY TIGHTEN FIXINGS IMMEDIATELY" for the base panel. This phased tightening approach is a key maintenance practice, ensuring components settle correctly before final torque application.
  • Post-Assembly Check: A critical maintenance step is to "check the tightness of all fixings on the opposite listed components" after assembly and again after the first 60 miles. This addresses potential loosening due to initial use and vibrations. The components to check include:
    • Wheels
    • Axle
    • Drawbar
    • Coupling head
    • Mudguards
    • Lighting
  • Regular Inspections: The manual states that "Road trailers must be inspected prior to use to ensure they are of a road worthy condition; it is a legal requirement that all trailers are maintained and comply with all relevant regulations." It further advises that "the unit should be checked at least annually by a competent person." This highlights the importance of routine professional inspections.
  • Bearing Maintenance: While "Sealed bearings do not require lubrication," they "require frequent inspection for wear and should be replaced if worn or noisy." This specific instruction for bearings is vital for wheel integrity and safe operation.
  • General Wear and Tear: The overall emphasis on checking fixings and components for wear and noise indicates a proactive approach to maintenance, preventing failures and ensuring safety.
  • Safety Precaution: The "WEAR GLOVES DURING ASSEMBLY" warning is a general safety feature, protecting the user from cuts and abrasions during the assembly process.

The manual, produced by Maypole Ltd on behalf of ERDÉ, provides comprehensive guidance for both assembly and ongoing maintenance, ensuring the safe and effective use of the ERDÉ 122.2 and DAXARA 127.2 trailers.

MayPole Erde MP6812 Specifications

General IconGeneral
BrandMayPole
ModelErde MP6812
CategoryAutomobile Accessories
LanguageEnglish