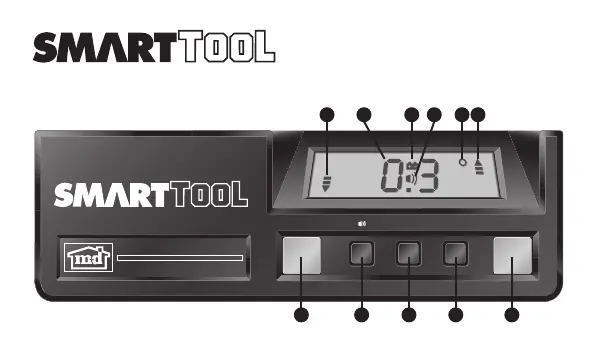
CONTROLS
(see fig. 1)
ON/OFF -
If left idle for 6 minutes,
SMARTTOOL™
will
automatically shut off.
HOLD
- Push to “freeze” and “unfreeze” display readings.
LISTEN & LEVEL AUDIO
- Push to activate and
de-activate the beeper. Beeper will sound at level and
plumb.
CALIBRATE
(see Calibration Procedures)
° % IN/FT
- Push to change the display units: Degrees
(°), Slope (%), Pitch (in/ft).
Pitch readings are in 1/8 in/ft increments. Plus and minus
signs indicate when the pitch is slightly more (+) or
slightly less (-) than the pitch shown on the display.
Note: The ° % IN/FT button can be used even when the
display is in HOLD. This feature is a convenient way to
convert angles from one unit to another. For example a 5
in/ft roof pitch measurement can be converted to 22.6° for
setting up cuts on a chop saw.
LCD DISPLAY
Display reads right side up when
SMARTTOOL™
is upside
down!
UP/DOWN ARROWS
- Left and right indicators point
toward level or plumb (whichever is closer). Indicators get
shorter as
SMARTTOOL™
gets closer to level (0˚) or plumb
(90˚).
LOW BATTERY
- Low 9V battery indicator.
Replace battery within 24 hours.
DIGITAL DISPLAY
Display readout of current
measurement.
Builder's Angle Finder
CALIBRATION PROCEDURES
PROCEDURE FOR LEVEL:
Step 1: Place
SMARTTOOL™
on a flat surface with the
display facing you. Turn it on and wait 10 seconds. Push
and hold the CALIBRATE button for 2 seconds until CAL1
appears on the display.
Step 2: Rotate
SMARTTOOL™
end-for-end on the flat
surface with the display now facing away from you. Wait
10 seconds. (see fig. 3)
Push and hold the CALIBRATE button for 2 seconds until
CAL2 appears on the display.
Step 3: Place
SMARTTOOL™
upside down facing you.
Wait 10 seconds. Push and hold the CALIBRATE button
for 2 seconds until CAL1 appears on the display.
Step 4: Rotate
SMARTTOOL™
, still upside down, end-
for-end on the flat surface with the display now facing
away from you. Wait 10 seconds. Push and hold the
CALIBRATE button for 2 seconds until CAL2 appears on
the display. (see fig. 4)
SMARTTOOL™
has now been calibrated for level.
PROCEDURE FOR PLUMB:
Step 5: Place
SMARTTOOL™
against a flat vertical
surface with the display facing you, the plumb vial at the
bottom, and the level vial away from the surface. Wait
10 seconds. Push the CALIBRATE button for 2 seconds
until CAL1 appears on the display.
BATTERY INSTALLATION
The battery is inside the endcap opposite the plumb vial.
To install the battery, remove the endcap using a coin or
blade in the slot provided. Be careful not to pull on the
battery wires.
Note:
SMARTTOOL™
includes a 9-volt battery, however, it
is not connected. Before checking your
SMARTTOOL™
,
connect the battery. Use only 9-volt alkaline batteries.
Step 6: Turn
SMARTTOOL™
M
with the display facing away
from you, along its long axis (the plumb vial is still at the
bottom, but the level vial is now against the flat vertical
surface.) Wait 10 seconds. Push the CALIBRATE button for
2 seconds until CAL2 appears on the display. (see fig. 5)
Step 7: Place
SMARTTOOL™
against the flat vertical
surface with the plumb vial at the top and the display
facing you. Wait 10 seconds. Push the CALIBRATE button
for 2 seconds until CAL1 appears on the display.
Step 8: Turn
SSMARTTOOL™
along its long axis, with the
plumb vial still at the top but the display now facing away
from you. Wait 10 seconds. Push the CALIBRATE button
for 2 seconds until CAL2 appears on the display.
SMARTTOOL™
has now been calibrated for plumb.
Note: To read accurately away from level and plumb,
SMARTTOOL™
must be calibrated through all eight
calibration steps. If the CALIBRATE button is pushed when
SMARTTOOL™
is not near level or plumb, the display will
show --- and
SMARTTOOL™
will ignore the calibration
attempt. If CAL ALL appears on the display,
SMARTTOOL™
needs to be calibrated through all eight calibration steps.
Note: We recommend checking calibration daily, after a
rough fall, or if the temperature has changed by more than
20 F since the previous calibration. To check calibration,
follow the above procedures without depressing the
CALIBRATE button. If the readings vary by more than 0.1
deg. then
SMARTTOOL™
should be recalibrated.
MAINTENANCE
The following tips will ensure that your
SMARTTOOL™
is
kept in top condition.
•The
SMARTTOOL™
is weather and water resistant.
Should
SMARTTOOL™
be splashed with mortar or other
construction site residue, simply wipe clean with a damp
cloth. Do not immerse the
SMARTTOOL™
in water.
•Aluminumsurfacescanbecleanedwithanon-abrasive
cleansing powder.
•ABSpolymersurfacesshouldbecleanedwithamild
liquid soap and water.
•Weadviseyoutostore
SMARTTOOL™
away from extreme
temperatures below 20°F (-4°C) or higher than 140°F
(60°C).
ONE YEAR LIMITED WARRANTY
If within one year from the date of original purchase, the
SMARTTOOL™
fails to function because of defects in
materials or workmanship, Macklanburg-Duncan will, at its
option, either repair or replace such components provided
the original purchaser:
1. Call 1-800-SMART LEVEL (762-7853) for a Return
Authorization Number.
2. Returns the
SMARTTOOL™
postage paid and insured to
M-D at the address set forth below. M-D is not
responsible for any damage incurred to the components
while in transit to M-D;
3. Includes a brief explanation describing why the
SMARTTOOL™
is inoperable, or how the component was
damaged;
4. Sends the materials to:
M-D Building Products
Service Center Authorization
4411 N. Santa Fe
Oklahoma City, OK 73118
This warranty does not cover damage resulting from accident,
misuse or abuse, water, tampering, servicing performed or
attempted by unauthorized agencies, or units that have been
modified in any fashion. If the components do not perform as
warranted herein, the original purchaser's sole remedy will be
the repair or replacement of the components as provided
above. In no event will M-D be liable for damages, lost
revenue, lost wages, lost savings or any other incidental or
consequential damages, domestic or international, rising from
the purchase and use or inability to use the components, even
if M-D has been advised of the possibility of such damages.
Except as provided herein, M-D makes no warranties, express
or implied, including without limitation, the implied
warranties of merchantability and fitness for a particular
purpose, with respect to the components. All warranties for the
components, express or implied, are limited to the warranty
period set forth above. Some states do not allow limitations on
how long an implied warranty lasts or the exclusion or
limitation of incidental or consequential damages, so the
above limitations or exclusions may not apply to you. This
warranty gives you specific legal rights. You may also have
other rights, as indicated above, which vary from state to state.
LISTEN & LEVEL AUDIO
° % IN/FT MODES
- Indicates measurement "mode":
Degrees (˚), Slope (%), Pitch (in/ft).
ANGLE COPY
To copy angles, place unit on angle to be copied. Press
the Hold/Copy button. Push the Listen and Level
Audio button. Laser Level will begin beeping. The "copy"
angle will remain frozen on the display. A beep will sound
when the unit is returned to this exact angle.
To remove the unit from the angle copy mode, push the
Hold/Copy button or the Listen and Level Audio
button. This operation will return the unit to the
regular mode.
Pour enlever l'unité du mode Impression d'angle, poussez
le bouton de Prise/Copie ou le bouton Audible,
Escuche y Nivele. Cette opération renverra l'unité au
mode régulier.
INSTALACIÓN DE LA BATERÍA
(fig. 2)
La batería se encuentra bajo la tapa en el extremo
opuesto a la ampolleta de plomada. Para instalar la
batería, quitar la tapa usando una moneda o cuchilla en
la ranura de la tapa. Sacar la batería gastada y poner una
nueva. Tener cuidado de no tirar de los cables de la
batería.
Nota:
SMARTTOOL™
incluye una batería de 9 voltios; sin
embargo no está conectada. Conectar la batería antes de
inspeccionar
SMARTTOOL™
. Usar únicamente baterías alcal-
inas de 9 voltios.
PROCEDIMIENTOS PARA CALIBRAR
PROCEDIMIENTOS PARA CALIBRAR EL NIVEL:
Paso 1: coloque el nivel sobre una superficie horizontal
plana y con el visualizador digital hacia usted, y
enciéndalo. Espere 10 segundos. Presione el botón
CALIBRADOR por 2 segundos hasta que en el visualizador
digital aparezca CAL 1.
Paso 2: rote el nivel sobre la superficie horizontal. El
visualizador digital debe quedar alejado de usted. Espere
10 segundos. (vea la Fig. 3) Presione el botón CALIBRADOR
por 2 segundos hasta que en el visualizador digital
aparezca CAL 2.
Paso 3: invierta el nivel poniendo la base hacia arriba y
con el visualizador digital hacia usted. Espere 10
segundos. Presione el botón CALIBRADOR por 2 segundos
hasta que en el visualizador digital aparezca CAL 1.
Paso 4: con el nivel aún invertido, rótelo sobre la
superficie plana. El visualizador digital debe quedar
alejado de usted. Espere 10 segundos. Presione el botón
CALIBRADOR por 2 segundos hasta que en el visualizador
digital aparezca CAL 2. (vea la Fig. 4)
Ahora el nivel
SMARTTOOL™
está calibrado para el plano
horizontal.
PROCEDIMIENTO PARA CALIBRAR LA
PLOMADA:
Paso 5: coloque el medidor de nivel contra una superficie
vertical plana, con el visualizador digital hacia usted, la
ampolla de plomada hacia abajo y la ampolla de nivel
CONTROLES DE SMARTTOOL
(fig. 1)
PRENDIDO/APAGADO
SMARTTOOL™
se apagará
automáticamente si se deja prendida por 6 minutos.
RETENCIÓN
Presionar para “detener” y “liberar” las
lecturas del indicador.
INDICADOR SONORO DE NIVEL
Presionar
para activar y desactivar la alarma sonora. La alarma
sonará al encontrar el nivel horizontal y vertical.
CALIBRAR
(Ver los procedimientos para Calibrar)
% PULG./PIE
Presionar para cambiar las unidades
en el indicador. Grados (˚) Pendiente (%) Inclinación
(Pulgadas/pie). Las lecturas de inclinación se dan en
incrementos de 1/8 Pulg./pie. Los signos más/menos
indican si la inclinación es lige-ramente mayor (+) o
menor (-) a lo que muestra el indicador.
NOTA: E l b o t ó n (˚ % IN/FT ) puede usarse aún cuando
el indicador esté en “HOLD”. Esta característica es una forma
conveniente de convertir ángulos de una unidad a otra. Por
ejemplo, una medida de inclinación del techo de 5
pulgadas/pie puede convertirse a 22.6 para fijar el ángulo
de los cortes.
INDICADOR DE CUARZO LÍQUIDO
El indicador presenta las mediciones al derecho cuando
SMARTTOOL™
está invertido.
FLECHAS ARRIBA/ABAJO
Los indicadores derecho
e izquierdo apuntan hacia nivel o plomada (el que esté
más cerca). Los indicadores se achican conforme
SMARTTOOL™
se acerca al nivel (0˚) o la plomada (90º).
BATERÍA BAJA
Indica que la batería de 9V está
baja. Remplazar dentro de las siguientes 24 horas.
INDICADOR DIGITAL
Indica las mediciones de
corriente.
INDICADOR SONORO DE NIVEL
MODALIDAD DE , %, PULG./PIE
Indica “
modalidad” de medición. Grados (˚), Pendiente (%) e
Inclinación (pulgadas/pie).
COPIE D'ANGLE
Pour copier des angles, placez l'unité sur l'angle à copier.
Appuyez sur le bouton de Prise/Copie. Poussez le bouton
Audible, Escuche y Nivele. Le niveau de laser
commencera à faire bip-bip. Le " ; copy" ; l'angle
demeurera congelé sur l'affichage. Un signal sonore
semblera quand l'unité est retournée à cet angle exact.
FIG. 1
alejada de la superficie. Espere 10 segundos. Presione el
botón CALIBRADOR por 2 segundos hasta que en el
visualizador digital aparezca CAL 1.
Paso 6: voltee el medidor de nivel sobre su eje vertical
para que el visualizador digital quede alejado de usted,
(con la ampolla de plomada aún hacia abajo, pero con la
ampolla de nivel contra la superficie vertical plana).
Espere 10 segundos. Presione el botón CALIBRADOR por 2
segundos hasta que en el visualizador digital aparezca
CAL 2 (vea la Fig. 5)
Paso 7: coloque el medidor de nivel contra la superficie
vertical plana, con la ampolla de plomada arriba y el
visualizador digital hacia usted. Espere 10 segundos.
Presione el botón CALIBRADOR por 2 segundos hasta que
en el visualizador digital aparezca CAL 1.
Paso 8: voltee el medidor de nivel sobre su eje largo, con
la ampolla de plomada aún hacia arriba, pero con el
visualizador digital alejado de usted. Espere 10
segundos. Presione el botón CALIBRADOR por 2 segundos
hasta que en el visualizador digital aparezca CAL 2.
Ahora el medidor de nivel
SMARTTOOL™
está calibrado a
plomo.
Nota: Para medir la desviación precisa del nivel
(horizontal) y de plomada (vertical), el nivel
SMARTTOOL™
debe estar calibrado siguiendo todos los ocho pasos. Si se
presiona el botón CALIBRADOR cuando el nivel no está
cerca del nivel horizontal o de plomada (vertical), el
visualizador digital indicará - - - y el nivel ignorará el
intento de calibración. Si en el visualizador digital aparece
CAL ALL (calibrar todo), el nivel debe calibrarse siguiendo
los ocho pasos.
Nota: Recomendamos verificar la calibración diariamente,
después de una caída fuerte o si la temperatura ha variado
más de 11°C (20°F) desde la calibración anterior. Para
verificar la calibración, siga los pasos precedentes sin
presionar el botón CALIBRADOR.
MANTENIMIENTO
Las siguientes recomendaciones asegurarán que
SMARTTOOL™
se mantenga en condiciones óptimas.
•
SMARTTOOL™
es a prueba de clima y resistente al agua.
En caso de caerle cemento o algún otro residuo a
SMARTTOOL™
, simplemente limpielo con un trapo
húmedo. No Sumergir
SMARTTOOL™
en agua.
•Lassuperficiesdealuminiosepuedenlimpiarconun
polvo limpiador no abrasivo.
•LassuperficiesdepolímeroABSdebenlimpiarsecon
una solución de agua lige-ramente jabonosa.
•Sugerimosalmacenar
SMARTTOOL™
en algún lugar no
expuesto a tempera-turas extremas, por debajo de
20 F (-4˚C) o por encima de 140˚F (60˚C).
FIG. 2
FIG. 4
FIG. 5
FIG. 3
Instrucciones
1
2
3
4
5
6
5
7
8
9
10
1
2
3
4
5
6
7
8
5
9
10
ON/OFF HOLD
Calibrate
% IN /FT
˚
TM
 Loading...