EasyManua.ls Logo

MDB 4791 User Manual

Default Icon
12 pages
To Next Page IconTo Next Page
Page #1 background imageLoading...
Page #1 background image
page 1
revised 26MAY2011
Congratulations on purchasing a MDB Family product. This crib will provide many years of service if you adhere
to the following guidelines for assembly, maintenance, and operation. This crib is for residential use only.
Any institutional use is strictly prohibited.
Please be sure to follow the instructions for proper assembly. Use a Phillips head screwdriver for assembling
the crib in addition to the Allen wrench included in the hardware box. Do not use power screwdrivers. All of our
cribs are made from natural woods. Please understand that natural woods have color variations which are the
result of nature and not defects in workmanship.
DO NOT SUBSTITUTE PARTS. ALL MODELS HAVE THE SAME QUANTITY OF PARTS AND HARDWARE.
YOUR MODEL MAY LOOK DIFFERENT FROM THE ONE ILLUSTRATED DUE TO STYLISTIC VARIATIONS.
Félicitations pour l’achat du produit MDB Family. Celui-ci va vous fournir un service à long terme si vous
respectez les consignes d’assemblage et d’entretien qui vous sont fournies. Ce produit est destiné à un usage
domestique uniquement. Tout usage public ou commercial est strictement interdit.
Prière de s’assurer de respecter les instructions ci-après pour réaliser un assemblage parfait. Pour des fins
d’assemblage, utiliser un tournevis cruciforme Philips et la clé Allen inclus dans la boite d’emballage. Ne pas
utiliser un tournevis électrique. Tous nos produits sont fait de bois naturel. Prière de noter que le bois naturel
présente des variations dans sa couleur propre. Celles-ci résultent de la nature même du bois et ne constitue
en aucun un défaut de fabrication.
NE PAS REMPLACER LES PIECES D’ASSEMBLAGE. TOUS LES MODELS VENDUS DISPOSENT DE LA
MÊME QUANTITÉ DE PIÈCES À MONTER ET DE QUINQUAILLERIE FOURNIS. VOTRE MODEL PEUT
PARAÎTRE DIFFÉRENT PAR RAPPORT A CELUI ILLUSTRÉ, ET CE EN RAISON DE LA VARIATION
STYLISTIQUE.
Crib (4791) - Assembly and Operation Manual
Le Lit d’Enfant (4791) – Le Manuel de l’assemblée et l’Opération
* The crib can later be
converted into a toddler bed
or a full-size bed. To convert
to a toddler bed, turn to page 10.
To convert to a full-size bed,
turn to page 11.
* Le Lit d’Enfant peut être
converti en lit de bébé ou
en grand lit. Pour la conversion
en lit de bébé, allez à la page 10.
Pour la conversion en grand lit,
allez à la page 11.
Question and Answer IconNeed help?

Do you have a question about the MDB 4791 and is the answer not in the manual?

MDB 4791 Specifications

General IconGeneral
BrandMDB
Model4791
CategoryBaby & Toddler Furniture
LanguageEnglish

Summary

Crib Parts Identification

Headboard Side

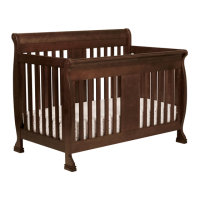
Identifies the headboard side panel.

Stationary Side

Identifies the stationary side panel.

Left Side Panel

Identifies the left side panel of the crib.

Right Side Panel

Identifies the right side panel of the crib.

Spring Frame

Identifies the mattress support frame.

Front Left Leg

Identifies the front left leg assembly.

Front Right Leg

Identifies the front right leg assembly.

Rear Left Leg

Identifies the rear left leg assembly.

Rear Right Leg

Identifies the rear right leg assembly.

Guard Rail

Identifies the guard rail component.

Cross Bar

Identifies the cross bar component.

Hardware Identification

3/4" Allen Head Bolt

Identifies the 3/4 inch Allen head bolt.

3" Machine Bolt

Identifies the 3 inch machine bolt.

Barrel Nut

Identifies the barrel nut hardware.

Washer

Identifies the washer hardware.

Allen Wrench

Identifies the included Allen wrench.

Lock Washer

Identifies the lock washer hardware.

1 3/4" Allen Head Bolt

Identifies the 1 3/4 inch Allen head bolt.

Crib Assembly Steps

Step 1: Headboard Assembly

Instructions for assembling the headboard.

Step 2: Attach Legs to Sides

Instructions for attaching crib legs to side panels.

Step 3: Attach Sides to Headboard

Instructions for attaching crib sides to the headboard.

Step 4: Attach Spring Frame

Instructions for attaching the mattress spring frame.

Step 5: Attach Cross Bar

Instructions for attaching the cross bar.

Step 6: Attach Stationary Side

Instructions for attaching the stationary side panel.

Safety and Warnings

Mattress Size Requirements

Specifies the required dimensions for the crib mattress.

General Safety Warnings

Provides essential safety guidelines for crib use and assembly.

Disassembly Warning

Caution against removing wood screws during normal disassembly.

Warranty Information

One Year Limited Warranty

Details the terms and coverage of the one-year limited warranty.

Product Care and Registration

Storage Guidelines

Provides recommendations for storing the furniture.

Care and Cleaning Instructions

Instructions for cleaning and maintaining the crib's finish.

Product Registration and Parts

Information on registering the product and ordering replacement parts.

Daybed Conversion Assembly

Step 1: Remove Stationary Side

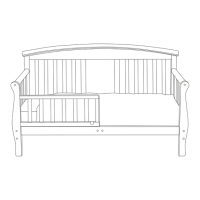
Instructions to remove the stationary side panel for conversion.

Step 2: Adjust Spring Frame

Instructions to move the mattress spring frame to the lowest level.

Step 3: Attach Guard Rail

Instructions for attaching the guard rail.

Conversion Rails Assembly

User Age and Weight Limits

Specifies the minimum age and maximum weight for the user.

Conversion Rails Assembly Instructions

General instructions for assembling conversion rails.

Step 1: Order Rails

Guidance on ordering adult wooden bed rails for conversion.

Full Size Conversion Steps

Step 2: Assemble Footboard

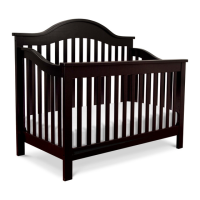
Instructions for assembling the footboard for full size conversion.

Step 3: Attach Headboard and Footboard

Instructions for attaching headboard and footboard assemblies.

Related product manuals