EasyManua.ls Logo

Mebus 51500 - User Manual

Mebus 51500
72 pages
Go to English
Print Icon
To Next Page IconTo Next Page
Loading...
1
{
FUNKWECKER ART.-NR. 51500/51501 MEBUS
Wir danken Ihnen für den Kauf dieses Funkweckers. Dieses Gerät
ist mit einer Funkuhr und einem Kalender, einer Weckfunktion sowie
einem Thermometer zur Messung der Raumtemperatur ausgestattet.
Lesen Sie bitte die Bedienungsanleitung sorgfältig durch, bevor Sie
das Gerät benutzen, um die Eigenschaften und Funktionsweisen
ausführlich kennenzulernen und bewahren Sie diese an einem
sicheren Ort auf.
Zur Inbetriebnahme dieses Gerätes benötigen Sie 2 x 1,5 V, “AAA“
LR03 Batterien (NICHT enthalten)
INHALTSVERZEICHNIS
SICHERHEITSHINWEISE 2
BATTERIE-WARNHINWEISE 3
ENTSORGUNGSHINWEISE 5
GERÄTEÜBERSICHT 6
INBETRIEBNAHME 8
MANUELLE ZEITEINSTELLUNG 10
WECKEREINSTELLUNG 12
WEITERE FUNKTIONEN 15
BATTERIEN ERSETZEN 15
FEHLERBEHEBUNG UND PFLEGEHINWEISE 16
TECHNISCHE DATEN 17
EU-KONFORMITÄTSERKLÄRUNG 18
51500_51501-MEBUS-IM-V03-INT.indd 1 12/23/16 10:54 AM
Question and Answer IconNeed help?

Do you have a question about the Mebus 51500 and is the answer not in the manual?

Overview

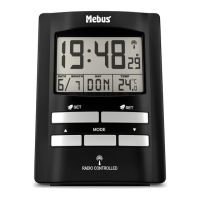
The MEBUS 51500/51501 is a radio-controlled alarm clock with an integrated calendar and a thermometer for measuring room temperature. It is designed for indoor use.

Function Description

This device serves as a radio-controlled alarm clock, automatically setting the time and date based on a radio signal. It also features a thermometer to display the current room temperature and a calendar function. The alarm clock has two independent alarm times that can be set. It also includes a snooze function and a backlight for easy viewing in low light conditions.

Important Technical Specifications

  • Batteries: The device operates on 2 x 1.5 V AAA LR03 alkaline batteries.
  • Radio Signal: The clock synchronizes with the DCF77 radio signal from Frankfurt, Germany. This signal transmits time information at a frequency of 77.5 kHz. The transmission power is approximately 50 kW, with a coverage range of about 1500 km around Frankfurt/Main.
  • Temperature Display: The thermometer can display temperature in either Celsius (°C) or Fahrenheit (°F).
  • Time Display: The time can be displayed in either 12-hour or 24-hour format.
  • Display: The device features an LCD display that shows the time, date, day of the week, room temperature, battery status, and alarm icons.

Usage Features

Initial Setup:

  1. Battery Insertion: Open the battery compartment on the back of the device. Insert 2 x 1.5 V AAA LR03 batteries, ensuring correct polarity (+ and -). Close the battery compartment cover.
  2. Radio Clock Signal Reception: After inserting the batteries, the display will light up, and an acoustic signal will sound. The device will automatically search for the radio clock signal. The radio clock reception icon (A3) will flash in the display during this process. Once the signal is received, the clock will automatically set the correct time and date. The radio clock reception icon (A3) will light up steadily. This process typically takes 3-5 minutes.
  3. Manual Search: If the radio clock signal is not received automatically, press and hold the ▼ button (B3) for approximately 2 seconds to manually search for the radio clock signal. The radio clock reception icon (A3) will flash during this process.
  4. Snooze/Light Function: Press the SNOOZE/LIGHT button (B1) to activate the backlight for approximately 4 seconds.

Manual Time Setting: This is useful if the device is out of range of the radio transmitter or if reception is not possible.

  1. Enter Manual Setting Mode: Press and hold the MODE button (B4) for several seconds until "00" starts flashing in the display.
  2. Adjust Time Zone: Use the ▲ (B5) or ▼ (B3) buttons to set the time zone. For use in Germany, leave the setting at "00".
  3. Confirm and Move On: Press the MODE button (B4) again to confirm the setting and move to the next value (hours, minutes, year, month, day, language).
  4. Set Values: Use the ▲ (B5) or ▼ (B3) buttons to adjust the hours, minutes, year, month, day, and language.
  5. Language Selection: The display language for the weekday can be set to German (GER), English (ENG), Danish (DAN), Spanish (ESP), Dutch (NET), Italian (ITA), or French (FRA).
  6. Quick Adjustment: For faster adjustment, press and hold the ▲ (B5) or ▼ (B3) buttons for approximately 2 seconds to adjust the values quickly.
  7. Completion: The manual time setting is complete once all values are set.

Alarm Settings: The device allows setting two independent alarm times, "Alarm 1" and "Alarm 2".

  1. Set Alarm 1:
    • Press and hold the SET button (B6) until the hour digits of alarm time 1 (A1) start flashing.
    • Use the ▲ (B5) or ▼ (B3) buttons to adjust the hours.
    • Press the MODE button (B4) to confirm the hours and move to minutes.
    • Use the ▲ (B5) or ▼ (B3) buttons to adjust the minutes.
    • Press the MODE button (B4) to confirm the minutes and move to weekday settings.
    • Use the ▲ (B5) or ▼ (B3) buttons to select the desired weekdays for the alarm: "M-F" (Mondays through Fridays), "S-S" (Saturdays and Sundays), or "M-S" (Mondays through Sundays).
    • Press the MODE button (B4) to confirm. Alarm time 1 (A1) will be saved but not activated.
  2. Set Alarm 2:
    • In order to set alarm time 2, press and hold the SET button (B2) until the hour digits of alarm time 2 (A2) start flashing.
    • Repeat the steps for setting alarm time 1.
  3. Activate/Deactivate Alarm:
    • To activate alarm time 1, press the SET button (B6). The symbol for alarm time 1 (A2) appears on the display.
    • To deactivate alarm time 1, press the SET button (B6) again. The symbol for alarm time 1 (A2) disappears.
    • Repeat for alarm time 2 using the SET button (B2). The symbol for alarm time 2 (A11) appears/disappears.
  4. Displaying Set Alarm Time:
    • To view the stored alarm times, press the MODE button (B4) in normal time display mode. The display will show alarm time 1.
    • Press the MODE button (B4) again to view alarm time 2.
    • Press the MODE button (B4) again to return to normal time display mode.
  5. Snooze Function: When an alarm sounds, press the SNOOZE/LIGHT button (B1) to interrupt the alarm. The "zz" indicator (A12) and the alarm time symbol (A2)/(A11) will flash on the display. The alarm will sound again after 5 minutes. To turn off the alarm for the current day, press any other button. The alarm will sound at the set time on the next programmed day. The alarm time symbol (A2)/(A11) lights up steadily on the display.

Other Functions:

  • Temperature Unit: To switch between Celsius (°C) and Fahrenheit (°F), press the ▼ button (B3) when in normal time display mode.
  • Time Display Format: To switch between 12-hour and 24-hour time display format, press the ▲ button (B5) when in normal time display mode.
  • Backlight: Press the SNOOZE/LIGHT button (B1) to activate the display backlight for approximately 4 seconds.

Maintenance Features

Cleaning:

  • Clean the device with a slightly damp, lint-free cloth.
  • Dry with a dry cloth.
  • Never immerse the device in water or other liquids.
  • Do not use abrasive cleaners, wire brushes, scrubbing sponges, or metallic/sharp objects for cleaning.

Display:

  • If the display weakens, it may indicate that the batteries need to be replaced.
  • The display is only clearly visible from a certain angle. Many devices with LCD displays cannot be viewed equally well from every angle.

Radio Signal:

  • The clock does not set automatically: Check whether the inserted batteries match the requirements above. Ensure batteries are of good quality. Change the location of the device.

Location:

  • Do not install the device near interfering sources such as TVs, computers, etc.
  • Avoid placing the device next to or on metal surfaces.
  • Do not place the device in locations such as airports, basements, high-rise buildings, or factories.
  • Do not start radio reception while in a moving vehicle such as a car or train.

Battery Replacement:

  • When the battery charge is too low, the battery symbol (A4) will appear on the display.
  • Open the battery compartment on the back of the radio clock.
  • Always use new alkaline batteries and do not mix old and new batteries.
  • Always insert batteries observing correct polarity (+ and -) as indicated in the battery compartment and on the batteries.
  • Close the battery compartment with the cover clicking into place.

Troubleshooting:

  • If the display is weak, check the batteries.
  • If the radio signal is not received, check the battery quality and try changing the device's location.
  • For further questions or issues, contact customer service.

Disposal Instructions:

  • The end user is legally obliged to return old batteries.
  • Disposing of old batteries through unsorted municipal waste is prohibited.
  • The crossed-out wheeled bin symbol on the battery indicates that batteries contain substances harmful to the environment and human health (Cadmium (Cd), Mercury (Hg), and Lead (Pb)).
  • You can return old batteries free of charge to shops or public collection facilities.
  • Electronic devices must not be disposed of through normal household waste. Dispose of them at collection facilities or local disposal centers, or return them to the manufacturer/retailer.
  • By contributing to the proper disposal of this product, you help protect the environment and health.

Mebus 51500 Specifications

General IconGeneral
BrandMebus
Model51500
CategoryClock Radio
LanguageEnglish