Do you have a question about the Medirol VIVERA Monoblock M301 and is the answer not in the manual?
Details about the company MEDIROL s.r.o., its address, and website.
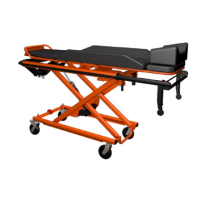
Specifies the product as VIVERA Monoblock M301 and its use as a patient transport device.
Explains the meaning of WARNING and NOTE symbols used throughout the manual for user safety and information.
Outlines what the two-year warranty covers and what it excludes, such as wear and tear or improper maintenance.
Critical safety warnings regarding tilting, switch usage, patient securing, obstacle handling, and temperature exposure.
Warns about side rail positions, wheel locking, handle retraction, battery charging, and voltage limits.
Covers training, lubrication, disinfectant use, storage, transport, and electromagnetic interference precautions.
Advises on using specified accessories and maintaining distance from RF communication devices to prevent malfunctions.
Details stretcher dimensions (length, width, height), load capacity, and minimum number of operators required.
Lists battery capacity, voltage, degree of protection, operating cycle, run/rest times, and operating temperature range.
Illustrates stretcher dimensions and notes on modifications M01-M08 affecting specific parts like footrest and side rails.
Shows specific adjustment angles for Head Section and Leg Section for Modifications M01 and M04.
Shows specific adjustment angles for Head Section and Leg Section for Modifications M05 and M08.
Details symbols on the product nameplate, including safety warnings, technical specifications, and homologation.
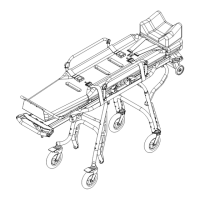
Labels and identifies major components of the VIVERA Monoblock stretcher, including the headrest, leg section, and wheels.
Details the indicator panel, button panel, emergency positioning lever, and ambulance exit release lever.
Explains how to activate the system using the main switch, including removing the protective cover and initial charging.
Warns against using the main switch while the monoblock is running and advises on proper battery charging.
Guides on placing and securing the patient on the stretcher using all available straps for safety.
Provides instructions for safely moving the monoblock, including securing it and handling low obstacles.
Specifies the use of the VIVERA FASTENER loading system for safe and secure ambulance loading.
Details the recommended operating temperature range and precautions for using the stretcher in extreme temperatures.
Explains how to activate the system using buttons and notes the automatic shut-off after 15 minutes of inactivity.
Describes the first step of exiting the ambulance: releasing the fixing lever and moving the monoblock to the end position.
Details pressing the '+' button for downward movement and using the exit lever to move the monoblock out.
Instructs on setting the monoblock height slightly above the slider before attempting ambulance entry.
Guides on moving the monoblock onto the slider and ensuring automatic locking against backward movement.
Explains lifting the undercarriage and pushing the monoblock to securely lock it into the ambulance.
Details how to use the '+' and '-' buttons for height adjustment, including safe handling and loading heights.
Warns against activating height positioning at angles over 30° and reminds about duty cycle to prevent overheating.
Explains how to raise and lower the head section using its position release lever.
Describes headrest adjustment for specific models using its release lever.
Illustrates headrest adjustment mechanisms for different model modifications.
Explains how to raise and lower the leg section using its position release lever.
Describes calf section adjustment for specific models using its release lever.
Illustrates calf section adjustment mechanisms for different model modifications.
Details how to lift and lower side boards using the release lever, and their fine positioning range.
Explains how to lower and raise side rails using the release button, and their upright/lowered positions.
Describes how to lock and unlock the front swivel wheels using a pedal for improved maneuverability.
Explains how to engage and disengage the rear wheel brake by pressing the brake pedal.
Details how to retract the telescopic handle by turning release levers and ensuring it is secured.
Explains connectors for charging from ambulance/adapter and the charging status indication on the panel.
Describes battery balancing, recommended charging temperature, and capacity indications.
Details the automatic connection and charging process when the trolley is loaded in the ambulance.
Explains connecting the charging adapter to a mains supply and the approximate charging time.
Explains the indicator scheme for battery capacity, showing GREEN for sufficient charge and RED for low charge.
Describes blue flashing for low temperature and red flashing for high temperature of electronic components.
Details light indicators for unsafe conditions like orange flashing for overload or fault, with solutions.
Provides a table linking specific indicator lights to their causes and recommended solutions.
Explains how to use the emergency lever on the underside of the rear panel for manual positioning.
Illustrates correct operator positions for height positioning and for entering/exiting the ambulance.
Details the procedure for lifting and lowering the stretcher using the emergency lever, including safety notes.
Instructs on raising the stretcher to the optimal height relative to the slider for emergency entry.
Explains moving the monoblock onto the slider and ensuring automatic locking on the loading system arm.
Details lifting the undercarriage and pushing the monoblock to securely lock it into the ambulance.
Describes releasing the fixing lever and moving the monoblock out of the ambulance to its limit position.
Explains pulling and holding the emergency lever to lower the undercarriage to the ground.
Details pressing the ambulance exit locking lever and sliding the monoblock out of the loading system.
Explains how to fasten straps securely across the chest and legs, wrap them, and tighten them appropriately.
Provides technical specifications for the charging adapter, including voltage, current, power, and operating conditions.
Describes how to adjust the headrest extension for specific modifications using a locking lever.
Outlines required maintenance activities like cleaning and their minimum frequencies.
Details procedures for lubricating mechanisms and disinfecting the stretcher using approved methods.
Provides guidance on storing the stretcher and precautions for safe transportation, including battery charging.
Instructs to contact the manufacturer or service centre for appropriate product disposal at end of life.
Checks for mechanical parts, welds, components, adjustable sections, side rails, straps, and wheels.
Advises on using the monoblock near high-frequency devices or in areas with EM interference.
Details compliance with standards for high-frequency emission, harmonic radiation, and voltage fluctuations.
Lists compliance with standards for ESD, radiated fields, fast transients, shock pulse, and mains supply variations.
Presents a table detailing resistance levels to various RF wireless communication devices.
A structured template to record date, description of maintenance, and performer.
| Category | Medical Equipment |
|---|---|
| Type | Hemodialysis Machine |
| Model | M301 |
| Brand | Medirol |
| Blood Flow Rate Range | 50-500 mL/min |
| Dialysate Flow Rate Range | 300-800 mL/min |
| Ultrafiltration Control | Volumetric |
| Ultrafiltration Accuracy | ± 1% or ± 10 mL/h, whichever is greater |
| Application | Hemodialysis |
| Power Supply | AC 220V, 50/60Hz |
| Weight | 85 kg |
| Display | LCD Touchscreen |
| Safety Features | Blood leak detection, Air bubble detection, Pressure monitoring |