EasyManua.ls Logo

MedPro DEFENSE COMFORT PLUS User Manual

MedPro DEFENSE COMFORT PLUS
4 pages
To Next Page IconTo Next Page
Page #1 background imageLoading...
Page #1 background image
COMFORT PLUS
Commode
Chaise d’aisance
CONFORT PLUS
MC
www.medprodefense.com
Generated by : Jean-François Perron
Flat Size :
Assembled Size :
Projet :
Item No. :
Part No. :
Colours :
B/W CMYK Spots:
770-317 Instructions_rev1 0618
Unfolded 17 x 11 inch
Folded 8.5 x 11 inch
(4 pages)
770-317
X
861-770317
ASSEMBLY INSTRUCTIONS
IMPORTANT: Read the information and
precautions on the back of this document
before assembling / using this commode.
INSTRUCTIONS D’ASSEMBLAGE
IMPORTANT : Bien lire les informations
et consignes de sécurité à l’arrière de ce
document avant d’assembler et /ou
d’utiliser cette chaise d’aisance.
Hardware located in pail /
Vous trouverez la quincaillerie dans le seau
LIFETIME LIMITED WARRANTY
Your MedPro Defense® Comfort plus™ Commode
is warranted to be free from defects in material and
workmanship under normal use. The warranty does
not extend to non-durable components which are
subject to normal wear and replacement.
GARANTIE LIMITÉE À VIE
Votre chaise d’aisance Confort plus
MC
de MedPro
Defense® est garantie contre tout défaut de matériel
ou de fabrication sous une utilisation normale. Cette
garantie ninclut pas les pièces non durables, qui
sont sujettes à l’usure normale et au remplacement.
REV1 0618 P/N 861-770317
Question and Answer IconNeed help?

Do you have a question about the MedPro DEFENSE COMFORT PLUS and is the answer not in the manual?

MedPro DEFENSE COMFORT PLUS Specifications

General IconGeneral
BrandMedPro
ModelDEFENSE COMFORT PLUS
CategoryMedical Equipment
LanguageEnglish

Summary

Assembly Instructions

Important Information and Precautions

Read the information and precautions on the back of this document before assembling or using the commode.

Hardware Location

Hardware for assembly is located in the pail.

Lifetime Limited Warranty

Commode Assembly Steps

Step 1: Attach Side Frames to Legs

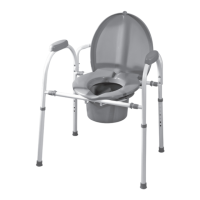
Push side frames into extension legs until pop-pins snap into place. Ensure all legs are adjusted to the same height.

Step 2: Connect Crossbars

Align and insert side frame tubing into the crossbar frame, securing with e-clips. Ensure pail support bars are under transversal bars.

Step 3: Attach Backrest

Align backrest holes with side frame holes, insert bolts, washers, and wing nuts, then tighten.

Final Assembly and Adjustments

Install Toilet Seat and Cover

Align toilet seat clamps on back crossbar rails and push down until they snap into place. Repeat for the cover.

Adjust Commode Height

Turn commode upside down, press pop-pins, slide legs to desired height, and ensure pop-pins snap into place.

Install Commode Pail

Place the commode pail over the pail support bars, sliding from back to front with the seat and lid down.

Additional Installation and Safety

Install Zorbi™ Bedpan

Place the Zorbi™ bedpan over the support bars, sliding from back to front with seat and lid in downward position.

Safety Precautions

Read instructions, check for damage, ensure seat is at room temperature, and provide supervision for users with limited capability.

Maintenance and Weight Capacity

Regularly verify hardware is tight. Clean with mild liquid cleaners. Maximum weight capacity is 350 lb.