EasyManua.ls Logo

MEI CONLUX MCM5 - User Manual

MEI CONLUX MCM5
4 pages
Print Icon
To Next Page IconTo Next Page
Loading...
DIS LED
C/C LED
DIAGNOSTIC LED’s
Error status will be reported to the main controller, and
LEDs will flash as below:
“DIS”: Error of discriminator (Upper part of body)
“C/C”: Error of coin changer (Lower part of body)
User
Interface
Buttons
TOKEN TEACH
The Conlux MCM5 will accept tokens when the Token
DIP Switch is placed in the ON position. The Token teach
mode is entered by pressing the Mode and B button
simultaneously for longer than 2 seconds. When this mode
is entered, the C/C LED will flash rapidly. The user should
then drop 10 tokens with at least 1 second intervals
between tokens.
The mode will automatically end after the 10
th
token
is dropped. If successful, the C/C LED will illuminate
continuously.
To obtain tokens contact Vendnet at 800-833-4411.
www.vendnet.com
Check Light LED
Discriminator
MCM5
Installation Guide
Coin Dispenser
Coin Cassette
ELECTRONICS &
REFRIGERATION
Distributed By :
Area Wide Inc.
4753 E. Lower Springboro Rd.
Waynesville, OH 45068
Phone: 1-800-233-5413
Fax : 1-513-897-7696
e-mail: vending@earthlink.net
www.vendohio.com
Question and Answer IconNeed help?

Do you have a question about the MEI CONLUX MCM5 and is the answer not in the manual?

Summary

Diagnostic LEDs

LED Indicators and Status

Explains DIS/C/C LEDs and their status for error reporting.

Token Teach Mode

Token Teach Configuration

Details the process of setting up the machine to accept tokens.

General Information

Installation Instructions

Preparation and Tools

Lists required tools and initial setup steps before mounting.

Mounting and Securing

Details the physical mounting process using mounting studs/screws.

DIP Switch Configuration

Guides on checking and setting the DIP switches for machine operation.

Currency Switch

Currency Switch Settings

Defines the function of switches for USA, Canada, and Token acceptance.

Coin Cassette

Loading the Coin Cassette

Provides two methods for loading coins into the cassette.

Factory FLOAT;PAR Settings

Manual Float;Par Programming

Explains how to manually set user float/par levels via buttons and DIP switches.

Overview

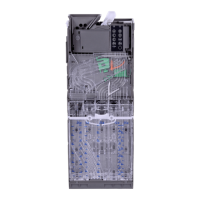
The Conlux MCM5 is a coin mechanism designed for vending machines, handling coin acceptance, validation, and dispensing. It operates within the standard coin changer channel provided by vending machine manufacturers and mounts on existing three mounting studs/screws.

Function Description:

The MCM5's primary function is to manage coin transactions in vending machines. It accepts and validates coins, stores them in a cassette, and dispenses change as needed. The device interfaces with the vending machine's main controller via the MDB (Multi Drop Bus) protocol. It features a discriminator unit that identifies and validates coins, and a coin changer that manages the coin tubes within the cassette. The system can be configured to accept United States coins, Canadian coins, or tokens, depending on the DIP switch settings. It also supports "Auto Storing" for certain cassette configurations, where coins are automatically routed to tubes.

Important Technical Specifications:

  • Weight: 3.5 lbs.
  • Rated Operating Voltage: 34V d.c. 12W
  • Peak Current: 0.92A at DC34V peak
  • Compliance: UL standard, FCC standard
  • Interface: MDB (Multi Drop Bus)
  • Cassette Configurations: Available for both USA and Canada, with specific tube denominations (e.g., US-1: 25¢, 5¢, 25¢, 10¢, 25¢; US-4: $1, 5¢, 25¢, 10¢, 25¢).
  • Float Settings: Two factory float/PAR settings are available:
    • Float 1 ($34) - Switch Position Low (OFF)
    • Float 2 ($52) - Switch Position High (ON) These settings define the "Empty Quantity" (minimum coins for a tube to be considered not empty) and "Full Quantity" (maximum coins a tube can hold). For example, with Float 1 and Cassette US-1, a 25¢ tube has an empty quantity of 6 coins ($1.50) and a full quantity of 71 coins ($17.75).

Usage Features:

  • Installation: The unit is installed by lifting a white lever, tilting the discriminator assembly forward, and hanging the mechanism on three mounting studs/screws. It's crucial to ensure the mechanism is mounted vertically without tilt.
  • DIP Switches: Four DIP switches are located on the back of the Discriminator Unit to configure the device:
    • #1 USA On/Off: Accepts United States coins.
    • #2 Canada On/Off: Accepts Canadian coins.
    • #3 Token On/Off: Accepts tokens.
    • #4 Float High/Low: Sets the float level to either High ($52.00) or Low ($34.00).
  • Coin Cassette Loading: Cassettes can be loaded in two ways:
    1. By Removing Cassette: The cassette is removed, placed front down, and opened by pinching two tabs. Coins are then inserted into each tube. It's recommended to fill each tube with at least 15 coins, up to the MAX FILL line.
    2. From the Front: The cassette latch is pressed, the top of the cassette tilted out, and coins are manually loaded into tubes A, B, C, D, and E from the front.
  • Token Teach Mode: To enable token acceptance, the Token DIP Switch must be ON. The teach mode is entered by simultaneously pressing the Mode and B buttons for over 2 seconds. The C/C LED will flash rapidly. The user then drops 10 tokens with at least 1-second intervals. The mode automatically ends after the 10th token, and if successful, the C/C LED illuminates continuously.
  • Manual User Float/PAR Programming: This feature allows users to set custom float levels. The current cassette must be empty. The DIP switch should be set to the desired Float High (ON) or Float Low (OFF) position. Pressing the Mode and C buttons simultaneously initiates the programming mode (C/C LED blinks rapidly if all low-level sensors are uncovered). Users then insert coins through the funnel until the desired float level is reached. Unrecognized coins are rejected. If tubes have equal value, coins are alternately routed. The mode exits automatically if no coins are dropped for 2 minutes or if the Mode button is pressed for 2 seconds or longer. To save the new levels, press Mode and C buttons simultaneously. To revert to factory default, enter programming mode and press the F↓ and F↑ buttons simultaneously.
  • Diagnostic LEDs: The device includes diagnostic LEDs to indicate error status:
    • DIS LED (Upper part of body): Indicates an error with the discriminator.
    • C/C LED (Lower part of body): Indicates an error with the coin changer.
    • Check Light LED: Provides status information (Ready, Check Discriminator for ERROR, Check Coin Changer for ERROR, Clean Discriminator). Pressing the unmarked button clears the Check Light.

Maintenance Features:

  • Alignment Check: After installation, it's important to check for a small gap (2 mm) between the return lever on the vending machine and the Acceptor Gate lever on the coin mechanism. Ensure the coin return lever fully depresses the acceptor gate lever and returns smoothly. Also, verify the alignment of the coin input chute and cashbox chute by inserting coins to confirm proper entry and exit.
  • Cleaning: The diagnostic LEDs can indicate when the discriminator needs cleaning ("Check and CLEAN the Discriminator").
  • Harnessing Management: Any excess length of the MDB harness should be tucked inside the machine to prevent pinching or trapping when the coin return lever is pressed or the vending machine door is closed.
  • Troubleshooting: Error status is reported via the diagnostic LEDs. For example, a flashing DIS LED indicates a discriminator error, while a flashing C/C LED indicates a coin changer error. A continuously lit Check Light LED suggests the discriminator needs cleaning.

MEI CONLUX MCM5 Specifications

General IconGeneral
BrandMEI
ModelCONLUX MCM5
CategoryTouch terminals
LanguageEnglish