Do you have a question about the MERCKU M6 and is the answer not in the manual?
Instructions for connecting the device to power and WAN cables, including indicator light status.
Guidance on connecting to the MERCKU-XXXX Wi-Fi network without requiring a password.
Steps to finalize the setup process using a web browser or by downloading the Mercku mobile application.
Advice on adding M6 routers (nodes) for mesh connection to expand wireless network coverage.
Instructions for powering on an M6 node and pressing the 'Connect' button on both master and slave nodes.
This document outlines the Quickstart Guide for the M6 device, a wireless router designed to provide and expand Wi-Fi coverage. The M6 system is built to offer a robust and easily manageable home network, with features that simplify setup and ongoing use.
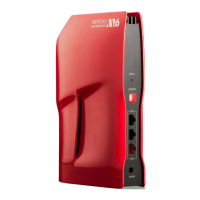
The M6 device primarily functions as a Wi-Fi router, providing internet connectivity to your devices. It is designed to be a central hub for your home network, allowing multiple devices to connect wirelessly. A key feature of the M6 system is its ability to create a mesh network. This means that in addition to a main M6 router, you can add other M6 devices, referred to as "nodes," to expand your wireless network coverage throughout your home. This mesh capability ensures a seamless and extended Wi-Fi signal, eliminating dead zones and providing consistent connectivity across a larger area. The device supports both power and WAN cable connections, indicating its role in receiving an internet signal and distributing it. It also features LAN ports for wired connections, offering flexibility for devices that require a stable physical link. The M6 is designed for indoor use, specifically optimized to reduce potential harmful interference to co-channel mobile satellite systems.
The M6 Quickstart Guide emphasizes a straightforward, three-step setup process, making it user-friendly even for those with limited technical expertise.
Connecting to Power and WAN Cables: The initial step involves physically connecting the M6 device. A red light indicator signifies that the device is powered on. Once an internet connection is established, this light will turn white, providing a clear visual cue of the device's operational status. This simple color-coded feedback helps users quickly ascertain if the basic connections are correctly made.
Connecting to Wi-Fi: After powering on, users can connect their mobile devices or computers to the M6's Wi-Fi network. The guide specifies searching for a network named "MERCKU-XXXX" (where XXXX is a unique identifier found on the device's bottom label). Importantly, this initial connection does not require a password, simplifying the first-time access. This open access facilitates the subsequent configuration steps without the immediate hurdle of password entry.
Opening Browser or App for Setup: To complete the setup and manage the network, users have two options:
mywifi.mercku.tech through a web browser allows for a guided setup process. This web-based interface provides a comprehensive way to configure network settings, set passwords, and customize other parameters.A significant usage feature of the M6 system is its ability to expand Wi-Fi coverage through mesh networking. This process is also designed to be simple:
Powering on the M6 Node: To add an M6 node to an existing M6 router, the node should be powered on and allowed to initialize for about a minute. Similar to the main router, a red light indicates power, and then the node indicator light will turn solid orange, signaling it's ready for connection.
Pressing the "Connect" Button on the Main Router: This action initiates the pairing process from the main router's side.
Pressing the "Connect" Button on the Node: Within 30 seconds of pressing the main router's connect button, the user must press the "Connect" button on the slave node. During this period, the slave node's indicator light will flash blue, indicating it is broadcasting its signal for connection. A successful operation is confirmed when both the master (main router) and slave node's indicator lights flash white.
While the guide doesn't explicitly detail ongoing maintenance, the availability of a dedicated mobile app and a web-based management interface (mywifi.mercku.tech) suggests robust management capabilities. These platforms would typically allow users to:
www.mercku.com/help for further assistance with setup and node addition problems, indicating a support system for maintenance and troubleshooting.The device also includes a "RESET" button, which is a standard maintenance feature allowing users to revert the device to its factory default settings if needed, for example, during troubleshooting or re-configuration.
The manual includes important regulatory information, specifically FCC ID: 2APR4-M2, detailing compliance with FCC rules and Industry Canada's licence-exempt RSSs. This section provides guidelines on interference, operation conditions, and user responsibilities regarding changes or modifications to the equipment. It also offers measures to correct interference, such as reorienting antennas or increasing separation from other equipment.
For user support, the guide provides contact information:
www.mercku.comsupport@mercku.comwww.mercku.com/helpThis comprehensive support structure ensures that users can access assistance for any issues related to setup, usage, or maintenance of their M6 device. The emphasis on easy setup, expandable coverage, and accessible support makes the M6 a user-friendly solution for modern home networking needs.
| Frequency Bands | 2.4 GHz, 5 GHz |
|---|---|
| RAM | 512 MB |
| MU-MIMO | Yes |
| OFDMA | Yes |
| Mesh Networking | Yes |
| Wireless Standard | IEEE 802.11ac |
| Ports | 1 x WAN, 3 x LAN |
| Antenna | 4 x External Antennas |
| Coverage Area | Up to 3, 000 sq ft per unit |
| Processor | Quad-core |
| Security | WPA3 |