15
90-10104R40
GB
of
OPERATION
one3
OPERATING IN SALT WATER OR POLLUTED WATER
We recommend that you flush the internal water passages of your outboard with
fresh water after each use in salt or polluted water. This will prevent a buildup of
deposits from clogging the water passages. Refer to “Flushing The Cooling
System” procedure in the Maintenance Section.
If you keep your boat moored in the water, always tilt the outboard so the gear case
is completely out of water (except in freezing temperature) when not in use.
Wash down the outboard exterior and flush out the exhaust outlet of the propeller
and gear case with fresh water after each use. Each month, spray Mercury
Precision or Quicksilver Corrosion Guard on external metal surfaces (do not spray
on corrosion control anodes as this will reduce the effectiveness of the anodes).
onb2
OPERATING AT HIGH ELEVATIONS
Operating your outboard at an elevation higher than 2500 ft. (750 m) above sea
level may require a carburetor jet change and/or different pitch propeller. Consult
your dealer. This will reduce the normal performance loss experienced as a result
of reduced oxygen in the air causing an overly rich fuel mixture.
IMPORTANT: To prevent serious damage to the engine caused by a lean fuel
mixture, DO NOT operate your outboard (if the jets were changed for high
elevation) at a lower elevation unless the jets are changed again to
correspond to the new elevation.
ono2
OPERATING OUTBOARD AS AN AUXILIARY ENGINE
1
If the outboard is used as an auxiliary engine, stop the engine and tilt the
outboard out of the water when you plan on using the main power source.
IMPORTANT: The outboard has to be restrained from bouncing while
operating the boat using the main power source. Accessory tilt lock kit
(830578A1) is designed to help support the tilted outboard. BOUNCING
CAN DAMAGE THE OUTBOARD AND THE BOAT’S TRANSOM.
gof12
2
1
a
ofc1
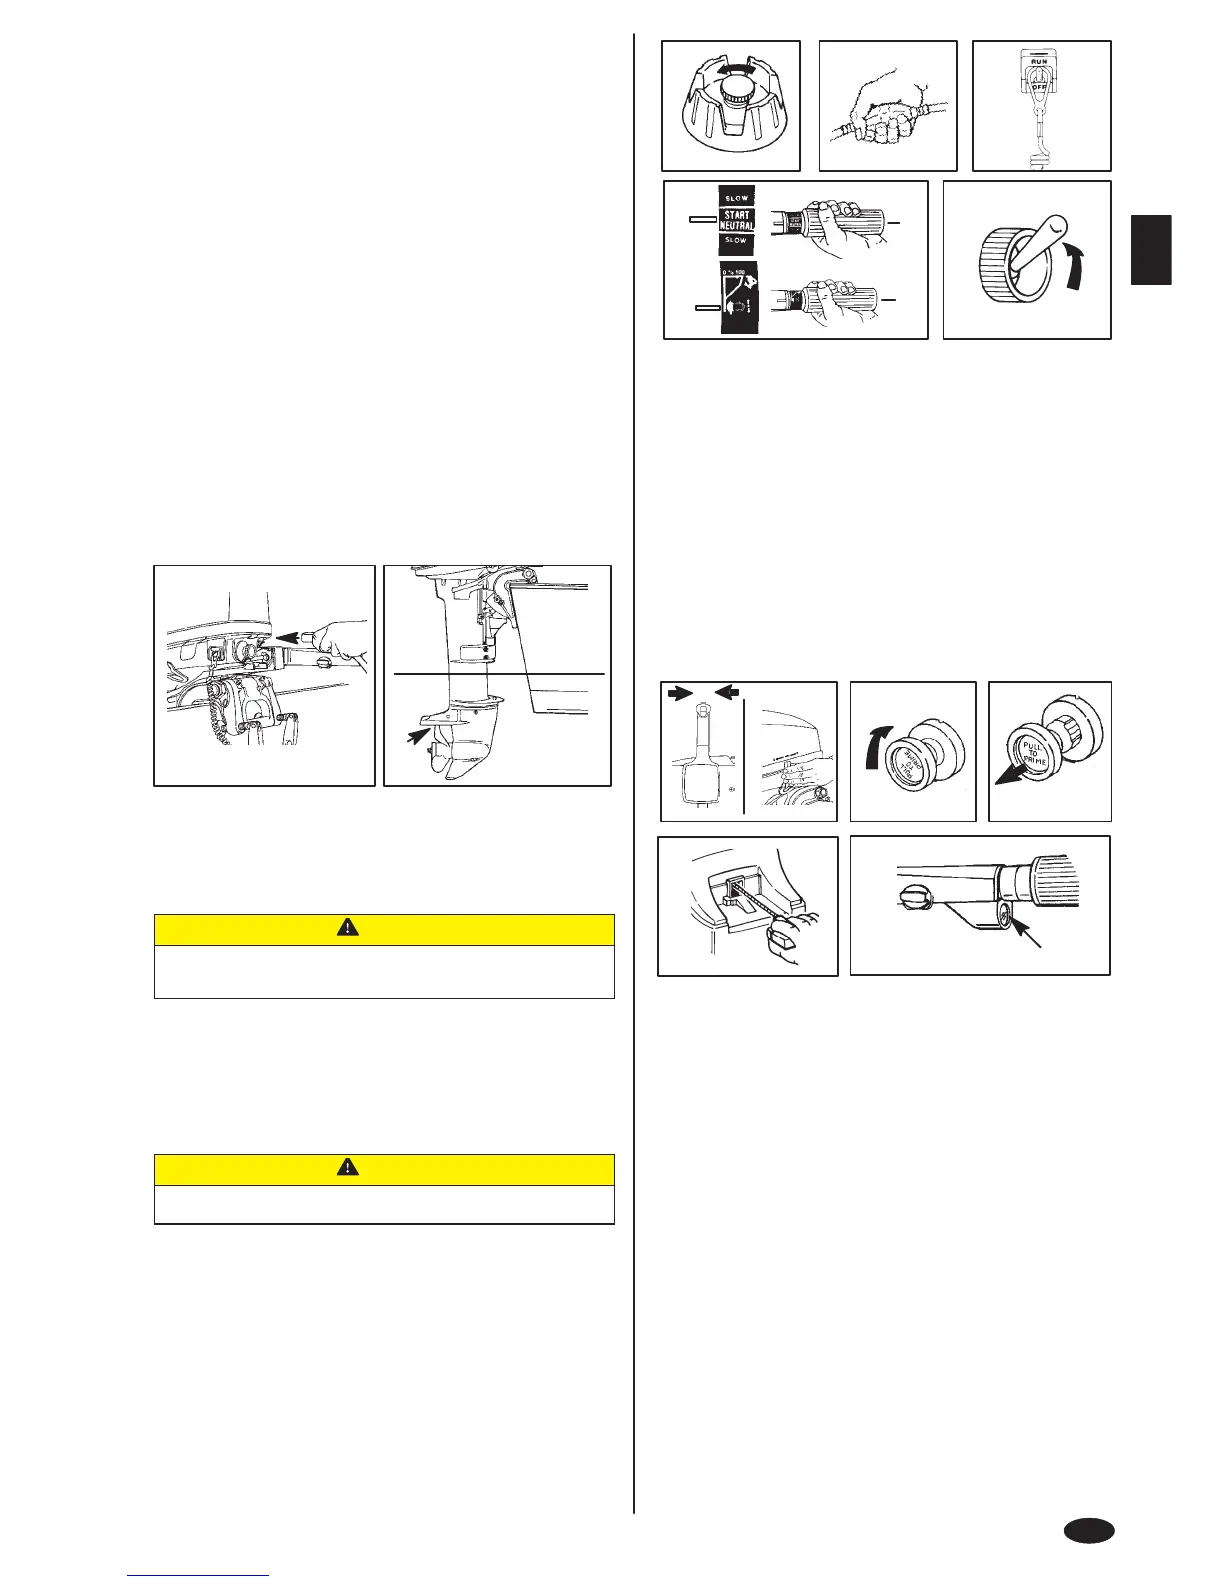
PRE-STARTING INSTRUCTIONS
1 Connect the remote fuel line to the outboard. Make sure connector is snapped
into place.
2 Lower the outboard to the run position. Make sure the cooling water intake (a)
is submerged.
CAUTION
Never start or run your outboard (even momentarily) without water circu-
lating through the cooling water intake in the gear case to prevent dam-
age to the water pump (running dry) or overheating of the engine.
ofd1
ENGINE BREAK-IN PROCEDURE
Engine Break-in Fuel Mixture
Use a 25:1 (4%) gasoline/oil mixture in the first tank of fuel.
Engine Break-in Procedure
Vary the throttle setting during the first hour of operation. During the first hour of
operation, avoid remaining at a constant speed for more than two minutes and
avoid sustained wide open throttle.
CAUTION
Severe damage to the engine can result by not complying with the Engine
Break-in Procedure.
gof13
123
4
a
b
5
ofr5
STARTING THE ENGINE - TILLER HANDLE MODELS AND
MANUAL START REMOTE CONTROL MODELS
Before starting, read the Pre-Starting Check List, Special Operating Instructions,
Pre-Starting Instructions, and Engine Break-in Procedure on the first three pages
in the Operation Section.
1 Open fuel tank vent on manual venting type tanks.
2 Squeeze the fuel line primer bulb several times until it feels firm.
3 Set the lanyard stop switch to RUN position.
4 Set the throttle grip to start position.
a. Throttle Grip Gear Shift Models
b. Side Handle Gear Shift Models
5 Remote Control Models - Move ON-OFF switch to the ON position.
IMPORTANT: Electric starting outboards must not be run or started (either
manually or electrically), without having the outboard battery cables
connected to a battery, as damage to the charging system could result.
gof14
10
9
7
8
6
N
6 Side Handle Gear Shift and Remote Control Models - Set the gear shift to
NEUTRAL position.
7 Turn Primer/idle speed knob full clockwise (direction of arrow) to increase
engine idle speed for starting.
8 When engine is cold, pull out and push in the primer/idle speed knob one to
three times to prime the engine. Leave the knob in the pulled-out position when
starting.
9 Manual Starting Models - Pull the starter rope slowly until you feel the starter
engage, then pull rapidly to crank the engine. Allow rope to return slowly.
Repeat until engine starts.
10Electric Starting Models - Push starter button and crank the engine. Release
button when engine starts. Do not operate starter motor continuously for longer
than ten seconds at a time. If engine fails to start, wait 30 seconds and try again.
 Loading...