ENGLISH en
11
7.6 Sanding belt replacement
Pull the mains plug out of the socket.
Swivel out lever (13) as far as it will go. This relieves
sanding belt tension and it can now be removed
from the rollers.
For sanding belts, see Accessories chapter 10..
Place the new sanding belt on the rollers such that
its direction of circulation (arrows on the inside of
the sanding belt) matches the arrow (12) on the
machine housing.
To tension the sanding belt, press the lever (13)
back into its initial position.
7.7 Stationary use of machine
Fitting stand
(equipment-dependent)
Secure the machine safely on the stand
(14) before using it. Slipping of the machine
on the stand can result in loss of control.
Place the stand (14) on a firm, flat,
horizontal surface. Safe, steady work cannot
be guaranteed if the stand slides or wobbles.
- Fit the additional handle (10) in the bottom
position.
- Hook in the stand (14) as shown in the illustration.
- Then screw the wing screw (15) of the stand into
the machine housing and tighten.
- Place the machine on the stand (the sanding belt
faces upwards).
- The stand can be secured to the workbench with
two collets 6.27107 (see Accessories chapter
10.).
Fitting parallel guide (equipment-dependent)
Once the machine has been set up in this manner,
the parallel guide (18) can be fitted.
Secure the parallel guide with the wing screw (20) to
the machine housing.
After releasing the wing screw (16), the plate (17) of
the parallel guide can be shifted.
For sanding inclined surfaces, the plate (17) of the
parallel guide can be inclined by up to 45° after the
wing nut (19) is released.
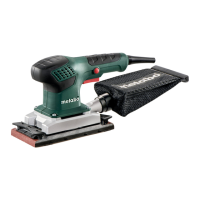
To optimise the extraction performance, empty the
dust bag in good time. The dust bag should not be
filled with sanding dust beyond 1/3 of its capacity.
When emptying the dust bag, ensure that
sanding dust cannot penetrate your body or
harm other persons.
Clean the machine regularly. This includes vacuum
cleaning the ventilation louvres on the motor.
Do not press the device too firmly against the
surface being sanded. This does not improve, but
rather impairs, the sanding performance.
Use a suitable sanding disc to achieve the best
possible work results:
- Removal of old paint layers, coarse sanding work
on wood: .............................................. P 40
- Finishing of wood,
sanding steel: .............................. P 60, P 80
- Sanding of veneered surfaces: P 100 - P 180
- Very fine sanding of wood and
plastics (finishing).
Pre-sanding for subsequent
burnishing work (metal)............P 240, P 320
Use only genuine Metabo accessories.
If you need any accessories, check with your
dealer.
For dealers to select the correct accessory, they
need to know the exact model designation of your
power tool.
See page 4.
A Sanding belts, 3 pieces, resin-bonded, for
wood and metal.
For application examples, see Chapter 9..
B Collets for securing on workbench for stationary
application (see Chapter 7.7)
For a complete range of accessories, see
www.metabo.com or the main catalogue.
Repairs to electrical tools must be carried out
by qualified electricians ONLY!
A defective mains cable must only be replaced with
a special, original mains cable from metabo, which
is available only from the Metabo service.
A defective mains cable must only be replaced with
a special, original mains cable from metabo, which
is available only from the Metabo service.
If you have Metabo electrical tools that require
repairs, please contact your Metabo service centre.
For addresses see www.metabo.com.
You can download spare parts lists from
www.metabo.com.
Metabo's packaging can be 100% recycled.
Scrap power tools and accessories contain large
amounts of valuable resources and plastics that can
be recycled.
These instructions are printed on chlorine-free
bleached paper.
Only for EU countries: Never dispose of
power tools in your household waste! In
accordance with European Guideline 2012/
19/EU on used electronic and electric equipment
and its implementation in national legal systems,
used power tools must be collected separately and
handed in for environmentally compatible recycling.
8. Cleaning, Maintenance
9. Tips and Tricks
10. Accessories
11. Repairs
12. Environmental Protection

 Loading...