Do you have a question about the METHVEN MINIMALIST and is the answer not in the manual?
Specifies the minimum and maximum operating pressure limits for the bath filler.
Details the maximum hot and minimum cold water temperatures for operation.
States the standard type of inlet connections used for the bath filler.
Provides guidance on how to clean the product safely and effectively.
Attaching the mounting plate to the pillar tube and sliding the base trim cover.
Locating the intended mounting position and marking fixing holes.
Drilling pilot holes and cutting the water supply hole for pipework.
Connecting flexible hoses and securing the bath filler to the floor.
Sealing the base trim cover and assembling the spout and shower hose.
This document provides comprehensive instructions for the installation, use, and maintenance of the Minimalist Bath Filler. It is designed to ensure proper setup and long-term functionality of the product.
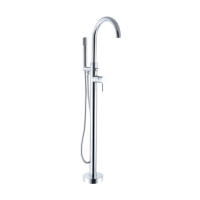
The Minimalist Bath Filler is a floor-mounted fixture designed to deliver water to a bathtub, featuring both a main spout and a handheld shower. Its primary function is to provide a convenient and stylish water delivery solution for bathing, offering flexibility with its dual output options. The main spout is ideal for quickly filling the bath, while the handheld shower offers versatility for rinsing, cleaning, or focused washing.
The installation process for the Minimalist Bath Filler is detailed, emphasizing the need for a sturdy floor surface of at least 50mm thickness to ensure stability. The first step involves preparing the pillar tube by sliding the base trim cover over it and screwing the mounting plate into its bottom. This forms the foundational structure that will be secured to the floor.
Next, the bath filler needs to be positioned correctly according to the provided dimensions, ensuring that the mixer handle operation is not obstructed by the bath or any adjacent walls. This step is crucial for both aesthetic placement and practical usability. Once the ideal position is determined, the locations for the three mounting holes are marked through the mounting plate. The bath filler is then temporarily set aside to allow for the preparation of the floor.
A template, located on the back page of the manual, is used to align with the marked mounting holes and to pinpoint the center of the water supply hole. This ensures precise drilling for both the fixings and the water connections. Pilot holes are then drilled for the floor fixings, with different sizes recommended for wood (ø3mm) and concrete (ø10mm) floors.
The central water supply hole is cut next, with specific diameters for wooden (ø45mm) and concrete (ø55 x 50mm) floors, to accommodate the hose fittings. It is important that the under-floor supply pipework has 1/2" BSP male connections positioned within 135 ± 25mm of the mounting plate base, ensuring compatibility and ease of connection.
Before permanently mounting the bath filler, the flexible hoses are carefully laid on the floor and inserted through the water supply hole. These hoses are then connected to the hot and cold supplies. A critical step at this point is to leak test the connections. This pre-mounting leak test helps identify and resolve any issues before the fixture is fully secured, preventing potential water damage and rework.
Once the connections are verified to be leak-free, the bath filler is raised and aligned with the fixing holes. It is then attached to the floor using the appropriate floor fixings, ensuring a secure and stable installation. After securing the fixture, the base trim cover is slid down to the floor, and silicone is applied to create a waterproof seal between the cover and the floor surface. This seal is essential for preventing water ingress and protecting the floor structure.
The final steps involve assembling the spout and shower components. The spout is inserted into the mixer body and firmly tightened with a grub screw at the back. The shower hose is then connected to the mixer body at one end and to the handset at the other. The manual also includes important warnings regarding hose handling, advising against stretching or twisting the hose and cautioning against crushing or swaging the ends, as these actions can damage the hose and impair its function.
The general instructions emphasize the importance of professional installation. Methven recommends that a licensed plumber install this product in compliance with all relevant regional regulations. This ensures that the installation meets safety standards and local codes, and helps preserve the product's warranty.
A crucial warning is provided against hydrostatic testing the installation with the mixer installed, as this can damage the ceramic cartridge. This highlights the delicate nature of the internal components and the need for careful handling during installation and testing.
Prior to mixer installation, all pipework must be thoroughly flushed. This step is vital to remove any debris or foreign particles that could otherwise damage the ceramic cartridge or clog the system. In-line filters are also required on both hot and cold supplies to prevent foreign particles from reaching and damaging the ceramic cartridge, further protecting the internal mechanisms of the mixer. The ceramic cartridge itself should not be removed from the mixer during installation.
After the entire installation is complete, all connections must be checked for leaks again to ensure a watertight system. For outlets used for personal hygiene, the manual specifies that water must be delivered at a safe temperature, adhering to regional regulations. This is a key safety feature, particularly for bath fillers where users will be in direct contact with the water.
The mixer is not recommended for use with uncontrolled heating systems such as wet-backs or solar heating units unless a suitable tempering valve is fitted. This indicates that the product is designed for systems with regulated temperature control to prevent scalding or discomfort. If users experience limited water flow, they are advised to locate the aerator and filter washers and clean away any foreign material that may have accumulated. This is a common maintenance task that helps restore optimal water flow.
The installer bears the responsibility of ensuring a waterproof seal between the product and the mounting surface. If there is any doubt about the quality of the seal, the product should be removed and reinstalled using silicone to ensure a robust seal. This reinforces the importance of preventing water damage and maintaining the integrity of the installation.
For ongoing maintenance, the manual provides clear instructions on how to care for and clean the Minimalist Bath Filler. Users are explicitly warned against using abrasives or abrasive cleaning agents, as these can damage the product's finish. Instead, regular cleaning with contamination-free warm soapy water and a damp soft cloth is recommended. This gentle cleaning method helps preserve the aesthetic appearance and longevity of the fixture without causing damage.
Finally, a safety warning advises users not to use the bath filler as a support to enter or exit the bath. The bath filler is not designed to support weight, and attempting to do so could result in injury or damage to the fixture. This highlights the product's intended use as a water delivery device rather than a structural support.
In summary, the Minimalist Bath Filler is a sophisticated and stylish bath fixture designed for floor mounting. Its installation requires careful attention to detail, including precise measurements, proper pipework preparation, and thorough leak testing. Usage features include dual water delivery options (spout and handheld shower) and a focus on safe water temperatures. Maintenance is straightforward, emphasizing gentle cleaning and periodic checks for flow issues, all aimed at ensuring the product's durability and user satisfaction. The comprehensive instructions and warnings provided in the manual are crucial for a successful and safe experience with the product.
| Style | Minimalist |
|---|---|
| Material | Brass |
| Finish | Chrome |
| Warranty | 10 years |
| Water Pressure | 0.5 - 5 bar |