The World’s best kits.
®
MetraOnline.com © COPYRIGHT 2018 METRA ELECTRONICS CORPORATION REV. 7/18/18 INSTHD-ASWC-1
The World’s best kits.
®
MetraOnline.com © COPYRIGHT 2018 METRA ELECTRONICS CORPORATION REV. 7/18/18 INSTHD-ASWC-1
INSTALLATION INSTRUCTIONS
INSTALLATION INSTRUCTIONS
HD- ASWC-1
HD- ASWC-1
WIRING INSTRUCTIONS (CONT)
WIRING INSTRUCTIONS (CONT)
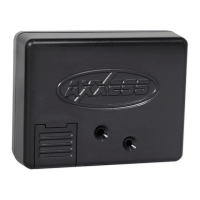
• Program the ASWC-1:
a. Turn the ignition on, the LED will start flashing rapidly, which means the ASWC-1
is looking for the vehicle and the radio.
Note:
If the LED did not start flashing rapidly, press the reset button for 3 seconds
.
b. After a few seconds the LED should stop flashing rapidly, and then go out for
approximately 2 seconds.
c. After approximately 2 seconds there will be a series of 7 Green flashes, some
short, and some long. The long flashes represent the wires that are connected to
the ASWC-1.
Tip:
Knowing this will help to troubleshoot, if need be.
d. The LED will pause for another 2 seconds, and then flash Red up to 18 times
depending on which radio is connected to the ASWC-1. Refer to the L.E.D.
feedback section for information.
e. This is the end of the auto detection stage. If the ASWC-1 detected the vehicle
and the radio successfully, the L.E.D. will light up solid.
f. Test the handlebar controls for proper operation. Refer to the “Programming
Information” document online at axxessinterfaces.com for customizing the
buttons, if so desired.
L.E.D. Feedback
The (18) Red L.E.D. flashes represent which brand radio the ASWC-1 is connected to. Each flash
represents a different radio manufacturer. For example, if you are installing a JVC radio, the
ASWC-1 will flash Red (5) times, and then stop. Following is a legend that dictates which radio
manufacturer corresponds to which flash.
L.E.D. Feedback Legend
* Note:
If the ASWC-1 flashes Red (7) times, and you do not have an Alpine radio connected to it, that
means the ASWC-1 does not detect a radio connected it. Verify that the 3.5mm jack is connected to the
correct steering wheel jack/wire in the radio.
** Note:
The AX-SWC-PARROT is required (sold separately). Also, the Parrot radio must be updated to
rev. 2.1.4 or higher through www.parrot.com.
† Note:
If you have a Clarion radio and the handlebar controls do not work, change the radio type to the
other Clarion radio type; same for Eclipse. Refer to the “Programming Information” document online
.
‡ Note:
If you have a Kenwood radio and the L.E.D. feedback comes back as showing as a JVC radio,
change the radio type to a Kenwood. Refer to the “Programming Information” document online.
1 flash - Eclipse (Type 1) †
2 flashes - Kenwood ‡
3 flashes - Clarion (Type 1) †
4 flashes - Sony / Dual
5 flashes - JVC
6
flashes -
Pioneer / Jensen
7 flashes - Alpine *
8 flashes - Visteon
9 flashes - Valor
10 flashes - Clarion (Type 2) †
11 flashes - Metra OE
12 flashes - Eclipse (Type 2) †
13 flashes - LG
14 flashes - Parrot **
15 flashes - XITE
16 flashes - Philips
17 flashes - TBD
18 flashes - JBL
 Loading...