EasyManua.ls Logo

Metra Electronics 99-9600 User Manual

Metra Electronics 99-9600
7 pages
To Next Page IconTo Next Page
Page #1 background imageLoading...
Page #1 background image
APPLICA
TIONS
C
AUTION: Metra recommends disconnecting the
negative battery terminal before beginning any
installation. All accessories, switches, and especially
air bag indicator lights must be plugged in before
reconnecting the battery or cycling the ignition.
NOTE: Refer to the instructions included with the
aftermarket radio.
INSTALLATION INSTRUCTIONS FOR PART 99-9600
ISODINradioprovision
Pre-wired
ASWC-1harnessinc
luded
(Axxess ASWC-1
is sold seperately
, for retention of handlebar controls)
•A)Radiohousing•B)Rubbergasket•C)(4)1/2”longbutton-headcapscrews
•D)Harness(notsho
wn)
KIT FEATURES
KIT COMPONENTS
WIRING &
ANTENNA CONNECTIONS
(soldsepara
tely)
WiringHarness:•Inc
luded
AntennaAdapter:•Notrequired
P
anel
removaltool•Phillipsscrewdriver
Socketwrench(T
-25,
T-27,6mmor3/16hex)
TOOLS REQUIRED
Har
ley-Davidson 1998-2013
(FL models with fairings)
99-9600
A B C
Question and Answer IconNeed help?

Do you have a question about the Metra Electronics 99-9600 and is the answer not in the manual?

Metra Electronics 99-9600 Specifications

General IconGeneral
Product TypeRadio Installation Kit
MaterialPlastic
ColorBlack
FunctionAllows aftermarket radio to be installed in the factory location
Installationno special tools required

Summary

Product Overview and Kit Details

Kit Features

Highlights the product's capabilities and functionalities for motorcycle audio integration.

Kit Components

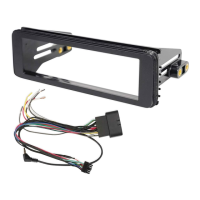
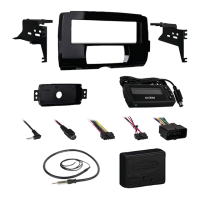
Lists the physical parts included in the installation kit for easy identification.

Installation Preparation and Requirements

Tools Required

Specifies the necessary tools for safely and effectively installing the radio kit.

Wiring and Antenna Connections

Details the wiring harness and antenna adapter requirements for the installation.

Critical Safety and Installation Notes

Cautionary Advice

Provides essential safety warnings, like disconnecting the battery, before starting installation.

Installation Guidance

Offers important notes and references for a successful and correct radio installation.

Fairing Disassembly

FLH/Batwing Models Disassembly

Instructions for dismantling the fairing on FLH/Batwing Harley-Davidson models.

Roadglide/Sharknose Models Disassembly

Instructions for dismantling the fairing on Roadglide/Sharknose Harley-Davidson models.

Kit Assembly and Radio Provision

ISO DIN Radio Provision

Guides the process of fitting the ISO DIN radio into the housing and fairing.

Wiring Connections

Connections to Aftermarket Radio

Details how to connect the 23-pin harness wires to the aftermarket radio for audio output.

Connections to Vehicle

Explains connecting the harness to the vehicle, including handlebar control retention.

Related product manuals