EasyManua.ls Logo

MFJ MFJ-461 - User Manual

MFJ MFJ-461
2 pages
Print Icon
To Next Page IconTo Next Page
Loading...
MFJ-461 Pocket CW Reader, Version 0B Copyright 2001 MFJ Enterprises, Inc.
Introduction to the MFJ Pocket CW Reader
Thank you for purchasing the MFJ-461 Pocket CW
Reader. The CW Reader is a pocket size Morse code
decoder that features:
Two-line 32-character LCD (liquid crystal display)
Auto track CW up to 99 WPM (words per minute)
140 characters volatile repeat buffer memory
Four scrolling display modes
Please read the following instructions before using the
CW Reader. If you still have questions after reading all
the instructions, please refer to the “Technical
Assistance” section.
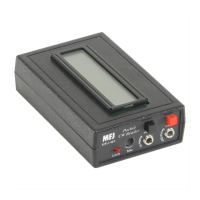
List of Components
9. PLL Frequency10. Battery Cover
8. Input Level
7. LCD Screen
S
e
r
i
a
l
O
u
t
A
u
d
i
o
I
n
REPEAT
MicLock
POWER
Pocket
CW Reader
MFJ-461
3. Serial Out
4. Audio In
6. Lock LED
5. Microphone
2. Repeat
1. Power
1.
Power Button
– Push button in to turn power ON.
Always turn power OFF when changing the battery.
2.
Repeat Button
– Push button momentarily to
display the last 140 characters enclosed within “[“
and “]”; push button again to exit repeat mode. Push
and hold the button for two seconds to rotate
through the four different display modes.
Mode 1
Text will display from left to right along
the bottom line. When filled, that entire line will
display on the top line until the bottom line refilled
with the speed displayed on the right side (power-
on initial mode).
Mode 2
Text will display from left to right along
the bottom line. When filled, that entire line
displays on the top line until the bottom line refills.
Mode 3
Text will scroll from right to left along the
top line with the speed displayed on bottom line.
Mode 4
Text will scroll from right to left along the
bottom line, then up and across the top line.
3.
Serial Out Jack
– A 3.5 mm jack for connecting the
Reader to the computer’s serial port to display CW
text on a monitor using a terminal software. Use an
MFJ-5161 serial cable. Set the terminal software to
19200 baud, 8 data bits, no parity, 1 stop bit, and no
flow control.
4.
Audio In Jack
– A 3.5 mm jack for inputting any
audio source. A plug in this jack disconnects the
built-in microphone.
5.
Microphone (Mic)
– Picks up audio signal from your
receiver. This microphone is disabled when a plug
is inserted into the Audio In jack.
6.
Lock Indicator LED
– Indicates signal lock when it
blinks in sync with the Morse code.
7.
LCD Screen
– Displays the CW text on the two-line
32-character LCD screen.
8.
Input Level Control
– Adjusts the audio input level.
Rotate right to increase input level.
9.
PLL Frequency Control
– Adjusts the PLL (phase
locked loop) frequency from about 500 to 1000 Hz.
Rotate right to decrease frequency. Factory set to
approximately 700 Hz.
10.
Battery Cover
– Remove cover to add or replace
the 9-volt battery (not included).
Installing Battery
Remove the battery cover on the back of the CW Reader
and insert a 9-volt battery. Use
only
fresh, high quality
batteries. Alkaline batteries are recommended.
Caution: Always make sure the power is off before
replacing the battery.
Battery life will vary depending on usage, so always
keep a spare on hand. When the LCD begins to fade,
the battery life is almost gone and you should replace
the battery as soon as possible.
Operation
Power on your receiver and tune it to find a clear, well-
sent Morse code signal. When you have found one,
power on the Reader and place its microphone near
your receiver’s speaker. If necessary, adjust the Input
Level control so that the Lock LED is blinking. Now tune
in the signal again to adjust its frequency (to match the
PLL frequency) until you get the maximum response
from the LED. Next, turn the Input Level control until the
LED is blinking in sync with the Morse code. Wait for the
LCD screen to start displaying something that makes
sense. Once it has tracked the signal, read the
messages as they scroll across the LCD screen. Repeat
these steps a few times to get the best response.
The Reader automatically locks on and tracks low and
high speed Morse code, decoding it up to 99 WPM. Its
initial power-on tracking speed is 20 WPM. It will take
some time to track an incoming signal or to re-track an
extremely slow signal after copying a fast one and vice
versa. If there is a lot of static, it will take time to track
slow signals. This is because the static appears to the
Reader as high speed Morse code.
There is a lot of sloppy code on the air and most
computers cannot read them. Do not expect this Reader
to do the incredible when it comes to copying Morse
code. Nothing can clean up and copy a sloppy fist,
especially with a weak signal and lots of QRM/QRN
(interferences). However, you will be quite pleased
when copying strong well-sent code, especially those
sent with electronic keyers. Farnsworth code* and
extremely negative weighted code will display with
spaces between each character. Finally, invalid
characters are displayed as block characters on the LCD
screen and as spaces on the computer monitor.
Prosigns (procedural signs) are enclosed within “<” and
“>” such as <AR> and <SN>.
When it is too noisy for microphone pickup or when you
do not want to hear CW, you can connect the Reader to
your receiver using the Audio In jack.
*
Farnsworth code is where the dits and dahs are sent at a fast
rate and the character and word spaces are much longer.
Accessories
The following accessories are sold separately:
MFJ-26B: Soft leather protective pouch with clear
plastic overlay for LCD display, equipped with push
buttons and jacks openings, and pocket/belt clip.
MFJ-5161: A 3.5 mm to DB-9 RS-232 serial cable.
MFJ-5162: Receiver cable that connects the Reader
to your radio’s external speaker 3.5 mm jack.
Copyright Message and Firmware Number
Press and hold the Repeat button while turning the
power on. A copyright message and the firmware
version number will display across the LCD screen. The
Reader then returns to normal operation.
Question and Answer IconNeed help?

Do you have a question about the MFJ MFJ-461 and is the answer not in the manual?

Summary

Component Descriptions

Installing Battery

Operation

Initial Setup and Tuning

Guides on powering on, placing the mic, adjusting input level, and tuning frequency for signal lock.

Tracking and Decoding

Explains automatic tracking of Morse code up to 99 WPM and factors affecting tracking.

Troubleshooting

Problem: Screen stays blank

Solution for the screen remaining blank when the power is ON.

Problem: Screen appears faint

Solution for the LCD screen appearing faint or dim.

Problem: The LED does not light

Solution for the Lock Indicator LED not lighting up.

Problem: The screen displays unreadable code

Solution for unreadable characters or spaces displayed on the screen.

Technical Assistance

Overview

The MFJ-461 Pocket CW Reader is a portable Morse code decoder designed to convert audio Morse code signals into readable text displayed on an LCD screen or outputted to a computer.

Function Description

The primary function of the MFJ-461 is to decode Morse code signals from a receiver. It features a two-line, 32-character liquid crystal display (LCD) for showing the decoded text. The device automatically tracks CW speeds up to 99 words per minute (WPM). It includes a 140-character volatile repeat buffer memory, allowing users to review previously decoded messages. The unit offers four different scrolling display modes to suit various preferences for text presentation.

Technical Specifications

  • Display: Two-line, 32-character LCD.
  • CW Speed Range: Auto tracks up to 99 WPM. Initial power-on tracking speed is 20 WPM.
  • Memory: 140-character volatile repeat buffer memory.
  • Audio Input: 3.5 mm jack for external audio sources, and a built-in microphone.
  • Serial Output: 3.5 mm jack for connecting to a computer's serial port (requires MFJ-5161 serial cable). Serial settings: 19200 baud, 8 data bits, no parity, 1 stop bit, no flow control.
  • PLL Frequency Control: Adjustable from approximately 500 to 1000 Hz (factory set to approximately 700 Hz).
  • Power Source: 9-volt battery (not included).
  • Dimensions: Pocket-sized.

Usage Features

Controls and Indicators:

  • Power Button: Push to turn ON. Always turn OFF when changing the battery.
  • Repeat Button:
    • Momentary push: Displays the last 140 characters in the buffer, enclosed within [ and ]. Push again to exit repeat mode.
    • Push and hold for two seconds: Rotates through the four display modes.
  • Input Level Control: Adjusts the audio input level. Rotate right to increase.
  • PLL Frequency Control: Adjusts the PLL frequency. Rotate right to decrease frequency. Factory set to approximately 700 Hz.
  • Lock Indicator LED: Blinks in sync with the Morse code when a signal is locked.
  • LCD Screen: Displays the CW text.
  • Microphone (Mic): Built-in microphone for picking up audio signals from a receiver. Disabled when an external plug is inserted into the Audio In jack.
  • Audio In Jack: 3.5 mm jack for external audio input. Disconnects the built-in microphone when a plug is inserted.
  • Serial Out Jack: 3.5 mm jack for connecting to a computer for displaying CW text on a monitor using terminal software.

Display Modes (accessed by holding Repeat button for 2 seconds):

  • Mode 1 (Power-on initial mode): Text displays from left to right along the bottom line. When filled, the entire line moves to the top line until the bottom line is refilled, with speed displayed on the right side.
  • Mode 2: Text displays from left to right along the bottom line. When filled, the entire line moves to the top line until the bottom line refills.
  • Mode 3: Text scrolls from right to left along the top line, with speed displayed on the bottom line.
  • Mode 4: Text scrolls from right to left along the bottom line, then up and across the top line.

Operation Procedure:

  1. Power on your receiver and tune to a clear, well-sent Morse code signal.
  2. Power on the Reader and place its microphone near the receiver's speaker.
  3. Adjust the Input Level control until the Lock LED blinks.
  4. Tune the signal again to adjust its frequency (using the PLL Frequency control) to match the PLL frequency until the maximum response from the LED is achieved.
  5. Adjust the Input Level control until the LED blinks in sync with the Morse code.
  6. Wait for the LCD screen to display sensible text.
  7. Read messages as they scroll across the LCD screen.
  8. Repeat these steps for optimal response.

Decoding Performance:

The Reader automatically locks on and tracks low and high-speed Morse code up to 99 WPM. It may take time to track incoming signals, especially very slow signals after a fast one, or when there is significant static (which appears as high-speed Morse code). The device is designed for well-sent code, particularly from electronic keyers. Sloppy code, weak signals, or significant QRM/QRN (interference) may reduce decoding accuracy. Farnsworth code (dits and dahs sent fast, with longer character and word spaces) and extremely negative weighted code will display with spaces between characters. Invalid characters are shown as block characters on the LCD and spaces on a computer monitor. Prosigns (procedural signs) are enclosed within < and > (e.g., <AR>, <SN>).

Connecting to a Computer:

Use an MFJ-5161 serial cable to connect the Serial Out jack to a computer. Set terminal software to 19200 baud, 8 data bits, no parity, 1 stop bit, and no flow control.

Connecting to a Receiver:

If microphone pickup is too noisy or if you prefer not to hear CW, connect the Reader to your receiver's external speaker using the Audio In jack (requires MFJ-5162 receiver cable, sold separately).

Firmware Information:

To display the copyright message and firmware version number, press and hold the Repeat button while turning the power on. The information will display across the LCD screen before returning to normal operation.

Maintenance Features

Battery Installation and Replacement:

  1. Remove the battery cover on the back of the CW Reader.
  2. Insert a 9-volt battery. Use only fresh, high-quality alkaline batteries.
  3. Caution: Always ensure the power is OFF before replacing the battery.
  4. Battery life varies with usage. Keep a spare battery on hand.
  5. Replace the battery when the LCD begins to fade, indicating low battery life.

Troubleshooting Guide:

  • Problem: Screen stays blank even though power is ON.
    • Solution: Turn the power OFF. Wait a few moments, and then turn the power ON. Replace the battery.
  • Problem: Screen appears faint.
    • Solution: Replace the battery.
  • Problem: The LED stays on.
    • Solution: Decrease the input level.
  • Problem: The LED does not light at all.
    • Solution: Increase the input level. Place the mic closer to your audio source.
  • Problem: The screen displays unreadable code.
    • Solution: Adjust the PLL Frequency control. Make sure nothing is plugged into the Audio In jack. Place the unit closer to your audio source.
  • Problem: The microphone is not picking up the audio.
    • Solution: Make sure nothing is plugged into the Audio In jack.
  • Problem: The terminal displays unreadable code or nothing at all.
    • Solution: Make sure the serial cable is securely connected. Set the terminal software to 19200 baud, 8 data bits, no parity, 1 stop bit, and no flow control.

Accessories (Sold Separately):

  • MFJ-26B: Soft leather protective pouch with clear plastic overlay for LCD display, push button and jack openings, and pocket/belt clip.
  • MFJ-5161: 3.5mm to DB-9 RS-232 serial cable.
  • MFJ-5162: Receiver cable that connects the Reader to your radio's external speaker 3.5 mm jack.

MFJ MFJ-461 Specifications

General IconGeneral
BrandMFJ
ModelMFJ-461
CategoryCard Reader
LanguageEnglish