CLEANING
Interior
Clean the carpets with a semi-stiff brush or a vacuum cleaner preferably before
washing the outside of the car. The most satisfactory way to give carpets a
thorough cleaning is with UNIPART Upholstery Cleaner, diluted one
part
with
eight parts warm water. Apply vigorously with a semi-stiff brush, and remove
the surplus with a damp cloth or sponge. Carpets should
not
be cleaned by the
'dry-clean' process. The upholstery and
roof
lining may be treated with undiluted
UNIPART
Upholstery Cleaner spread thinly over the surface to be cleaned with
a brush or cloth. Leave for five minutes, then wipe off with a moist sponge or
cloth.
UNIPART Upholstery Cleaner can be used for cleaning and renovating all the
usual upholstery materials, and rubber, but it should
not
be used on painted
surfaces.
Body
Regular care of the body finish is necessary if the new appearance of the car
exterior is to be maintained against the effects of air pollution, rain, and mud.
. .
Wash the bodywork frequently, using a soft sponge and plenty of water con-
taining UNIPART Car Shampoo. Large deposits of mud must be softened with
water before using the sponge. Smears should be removed by a second wash in
clean water, and with the sponge if necessary. When dry, clean the surface of the
car with a damp chamois-leather. In addition to the regular maintenance, special
attention is required if the car is driven in extreme conditions such as sea spray
or on salted roads. In these conditions and with other forms of severe contamina-
tion an additional washing operation is necessary which should include under-
body hosing. Any damaged areas should be immediately covered with paint and
a complete repair effected as soon as possible. Before touching-in light scratches
and abrasions with paint, thoroughly clean the surface. Use petrol/white spirit
(gasoline/hydrocarbon solvent) to remove spots of grease or
tar.
The application of UNIPART Car Polish is all
that
is required to remove traffic
film and to ensure the retention of the new appearance.
Bright
trim
Never use an abrasive on stainless, chromium, aluminium, or plastic bright parts
and on no account clean them with metal polish. Remove spots of grease or
tar
with petrol/white spirit (gasoline/hydrocarbon solvent) and wash frequently
with water containing UNIPART Car Shampoo. When the dirt has been removed
polish with a clean dry cloth or chamois-leather until bright. Any slight tarnish
found on stainless or plated components which have not received regular attention
may be removed with UNIPART Chrome Cleaner. An occasional application of
light mineral oil or grease will help to preserve the finish, particularly during
winter, when salt may be used on the roads, but these protectives must not be
applied to plastic finishes.
~
Windscreen
If
windscreen smearing has occurred it can be removed with UNIPART Screen
Cleaner.
Hood
To clean the hood it is only necessary to use soap and water, with a soft brush
t7r~~FRR'.l
"tJpiRllsrJlY'LWft~IJirsp'l~'U
m11'il)i
'15'v'e\.i
thle'\miIRfi! wtol
crua"iieurMh~
a brush or cloth. Leave for five minutes, then wipe off with a moist sponge or
cloth.
UNIPART Upholstery Cleaner can be used for cleaning and renovating all the
usual upholstery materials, and rubber, but it should
not
be used on painted
surfaces.
Body
Regular care of the body finish is necessary if the new appearance of the car
exterior is to be maintained against the effects of air pollution, rain, and mud.
. .
Wash the bodywork frequently, using a soft sponge and plenty of water con-
taining UNIPART Car Shampoo. Large deposits of mud must be softened with
... .,,..4-,..._
l....""",+"
__
"",
'1,
...
:_
....
4-1-.."", t"O
.....
__
no.o.
C..-on
.....'"
"'~,.,.nlr1
'h..o.
,....o.'t'V'I"'·o.o.r1
'h."I:1 f'lI C'.o.ronnrl
t'l1t:Jocoh
;n
COOLING
SYSTEM
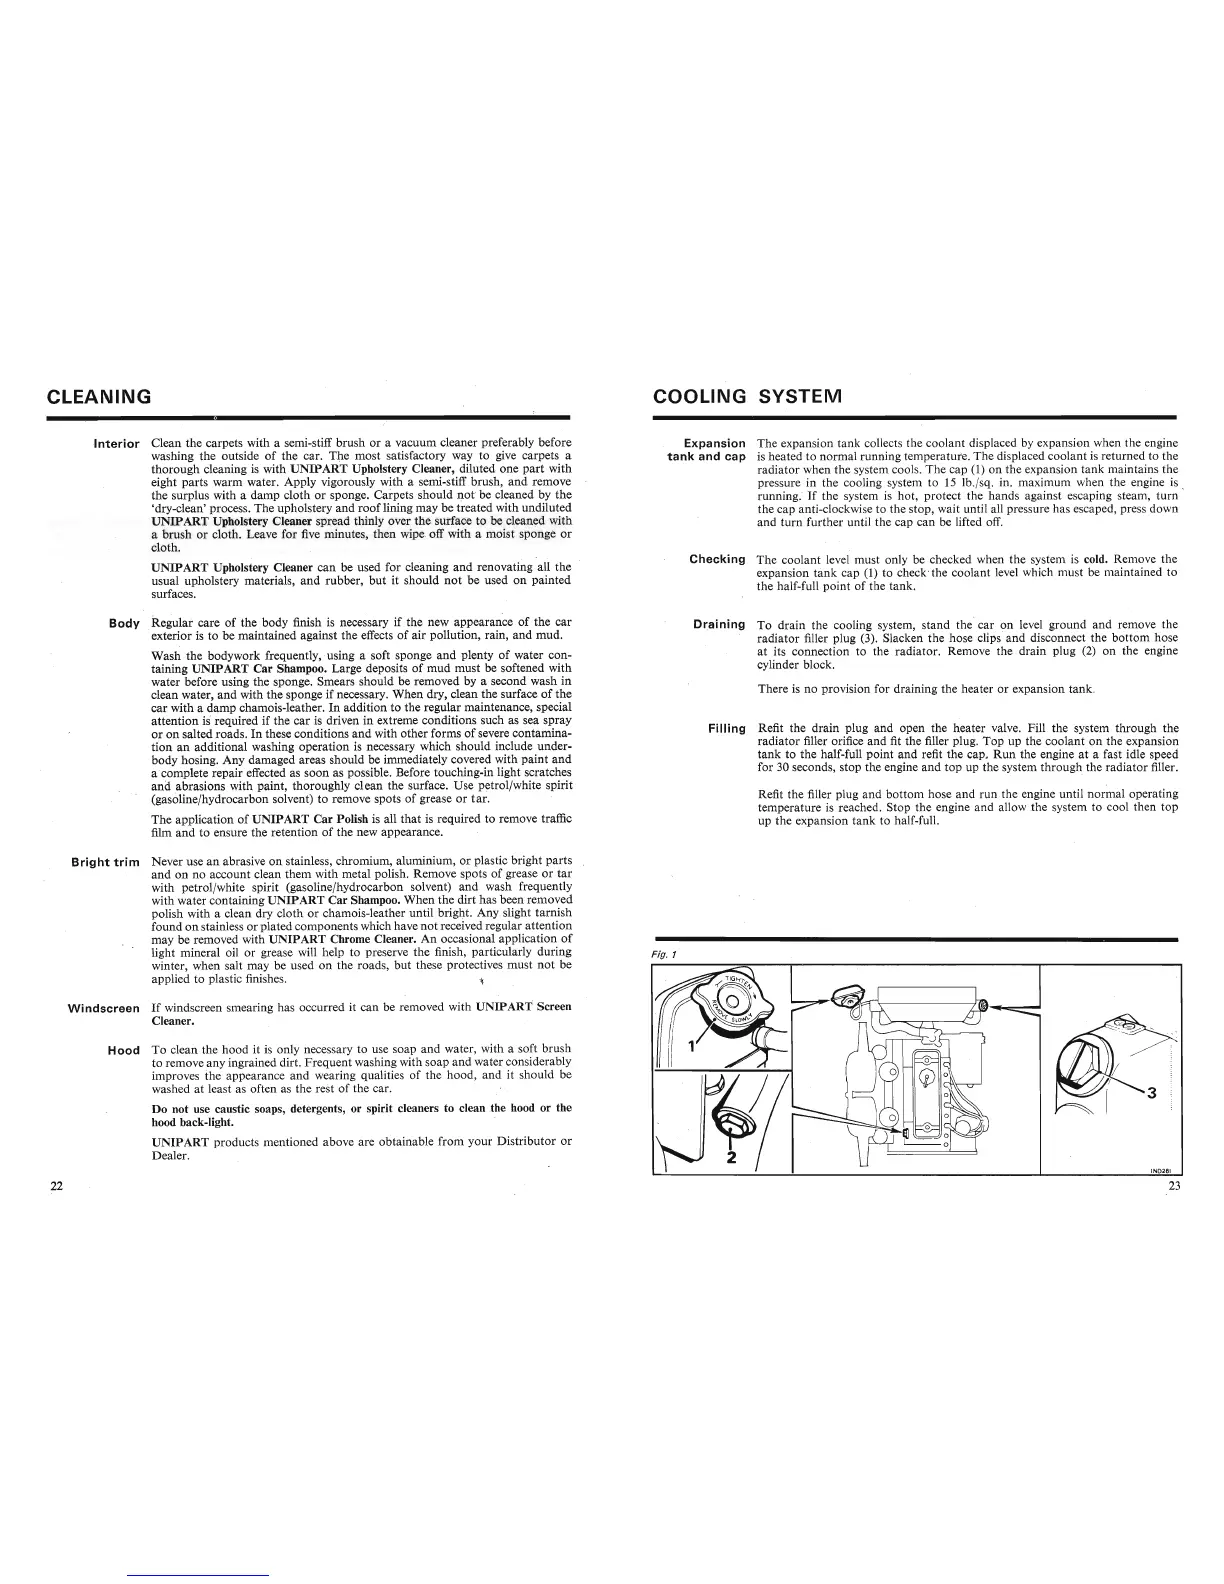
Expansion
The expansion tank collects the coolant displaced by expansion when the engine
tank
and
cap
is heated to normal running temperature. The displaced coolant is returned to the
radiator when the system cools. The cap
(1) on the expansion tank maintains the
pressure in the cooling system to 15 lb./sq. in. maximum when the engine is .
running.
If
the system is hot , protect the hands against escaping steam, turn
the cap anti-clockwise to the stop, wait until all pressure has escaped, press down
and turn further until the cap can be lifted off.
Checking
The coolant level must only be checked when the system is cold. Remove the
expansion tank cap (1) to
check
the coolant level which must be maintained to
the half-full point of the tank.
Draining
To drain the cooling system, stand the' car on level ground and remove the
radiator filler plug (3). Slacken the hose clips and disconnect the bottom hose
at its connection to the radiator. Remove the drain plug (2) on the engine
cylinder block.
There is no provision for draining the heater or expansion tank,
Filling
Refit the drain plug, and open the heater valve. Fill the system through the
radiator filler orifice and fit the filler plug. Top up the coolant on the expansion
tank to the half-full point and refit the cap. Run the engine at a fast idle speed
for 30 seconds, stop the engine and top up the system through the radiator filler.
Refit the filler plug and bottom hose and run the engine until normal operating
temperature is reached . Stop the engine and allow the system to cool then top
up the expansion tank to half-full.
Fig. 1
~
~
~
::o-::;
-
.. .
---
. , '
, '
Checking
The coolant level must only be checked when the system is cold. Remove the
expansion tank cap (1) to
check
the coolant level which must be maintained to
the half-full point of the tank.
Draining
To drain the cooling system, stand the' car on level ground and remove the
radiator filler plug (3). Slacken the hose clips and disconnect the bottom hose
at its connection to the radiator. Remove the drain plug (2) on the engine
cylinder block.
 Loading...


