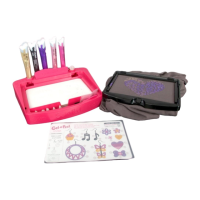
FASHION maker
1 Station
1 Removable Screen Frame
1 Top Cover Platform
1 Large Squeegee
1 Small Squeegee
10 Stencils
2 Gel Trays
5 Gel Tubes
3 Snap Sets
contents
A.
B.
C.
D.
E.
F.
G.
H.
I.
1. DESIGNING ON FABRIC:
•
Choose a thin material that you want to PERMANENTLY design (not included).
NOTE: Thick fabrics like denim may not work with the clamp.
•
Remove the screen frame and platform from the design station. Keep the frame and
platform o of the station as you design.
• Open the screen frame and place the top cover platform in between your layers of fabric. (Fig. 1A)
• Clamp down one side of the frame and stretch the material tightly. Then, clamp down the other side.
•
Lift the tab on the screen frame and slide in a stencil. Then, lay it at over the material
until you hear a snap. (Fig. 1B)
•
If the stencil has multiple designs, but you choose to only use one, place scrap paper
over the designs you do not wish to ll in.
•
Add a tip to your desired gel tube and draw thick vertical lines down the stencil.
Alternate colors for unique designs.
•
Use the large squeegee to push the gel evenly over the stencil.
•
Use the small squeegee if you are only designing over part of the stencil.
•
Fill in any gaps with extra gel and squeegee again.
•
Immediately remove the stencil by lifting the tab and sliding the stencil out.
•
Allow your design to dry overnight.
•
For layered designs, wait for the rst color to dry before adding the layered stencil
and adding more color.
2. GEL TRAYS:
• Clamp the frame over the platform. Insert the frame onto the station at an angle
and snap down to lock in place.
• Place your gel tray over the top cover platform.
• Use two or more colors to complete your design.
• Draw thick vertical lines down the tray.
• Align the large squeegee with the raised edges of the gel tray and push the gel back and forth
evenly over the tray. (Fig. 2A)
• Fill in any gaps with extra gel and squeegee again.
• Wait for the design to dry completely (usually overnight).
• Peel and fold over half of the design, but keep it in the tray.
• Add lines of gel on the inside edges of the clutch to secure it, avoiding the fold over ap. (Fig. 2B)
• Place a heavy book over the clutch while it dries.
• Once the design is dry, peel it o of the gel tray.
• Align the snaps so that they will close properly. Then, add a dollop of gel
behind each snap and secure them to the clutch. Allow the snaps to dry before using.
3. TEMPLATES & CLEAR DRAWING SHEET:
•
Secure the template and clear drawing sheet to the work surface with masking tape.
• Slowly squeeze the tube over the template and clear drawing sheet.
• Always make sure gel lines and dierent colors are touching.
•
To make your designs sturdy, overlap lines and make designs thick.
•
Reinforce thin spots by adding extra gel.
•
Rotate the template and clear drawing sheet as you design.
•
Wipe o the tip to remove excess gel before starting a new design technique or project
to keep designs neat and precise.
•
Make patches! Design directly on the clear drawing sheet, let your design dry, then peel o!
Outline the back of the design with gel and attach it to fabric or a gel clutch!
CLEANING, REPAIRING & STORING
•
If you make a mistake, wipe the gel o of the clear drawing sheet
with a paper towel before it hardens.
•
To repair a broken piece, reapply gel over the broken section
and wait for it to dry.
• To clean the tips, allow gel in the tip to harden.
Then use the cleaning tool to scoop out the hardened gel.
• After designing, store all components inside of the station,
underneath the top cover platform and screen frame.
Store gel downward in the stand.
DRYING & WEARING
•
Wait for the rst color to dry before adding additional colors
to your design.
•
Dry times may vary. For best results, allow designs to dry overnight.
•
Always remove the stencils from the screen frame
immediately after designing before your creations dry.
•
Don’t stretch your nished projects or they might break.
•
Hand wash fabrics with gel designs inside out and hang dry.
DesignING
3 Round Tips
1 Star Tip
3 Rake Tips
1 Clear Drawing Sheet
1 Template
1 Cleaning Tool
1 Pair of Earring Hooks
2 Jump Rings
J.
K.
L.
M.
N.
O.
P.
Q.
A
B
C
M
D
E
F
G
H
I
J
K
L
N
O
P
Q
2A
2B
1B1B
1A