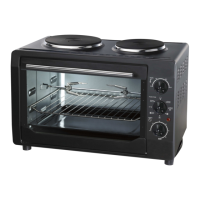
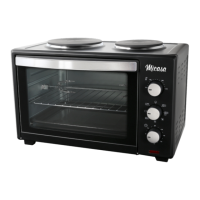
Location
Place the appliance on a secure heat resistant bench or table
top away from combustible material such as curtains and walls.
Connect to the mains supply. Do not place or store objects on
the appliance
Allow a gap around the appliance of
10cm
Oven Tray and Rack
Crumb Tray
It is advised to always use the oven with the crumb tray fitted in
the bottom. This will make for easier cleaning. Clean regularly.
Bake Tray / Wire Rack Installation Height
The oven is fitted with 3 height fitting options suitable for bake,
grill or toast cooking. Position as required
Rack Position Guide
Top – Grill Broil function
Middle – Toast Pizza Bagel function
Lower – Roast Bake and preheat
Cooking Options
Bake
1. Select the desired element heating operating configuration
Bake + Grill (rotisserie and fan options) on the selector
switch.
2. Turn the timer dial to the desired cooking time.
3. Turn the thermostat dial for the desired temperature.
4. The power on indicator will light.
5. Open door and place oven tray with food item into the oven
at the desired height. Close the oven door.
6. When finished baking, turn the temperature knob fully anti
clockwise and turn the function switch to OFF to turn the
oven off. Remove baking tray using heat proof gloves or
the bake tray handle.
Caution: If the timer has not returned to OFF allow it to
return to the OFF position by itself. The timer is a manual
timer and forcing it off may damage it over time. Allowing it
to return to zero will not affect the oven operation.
Grill
1. Select the desired element heating operating configuration
Grill (rotisserie and fan options) on the selector switch.
2. Turn the timer dial to the desired cooking time. .
3. Turn the thermostat dial for the desired temperature.
4. The power on indicator will light
5. Place the food item in the oven leaving the door half open.
6. When finished cooking, turn the temperature knob fully anti
clockwise and turn the function switch to OFF to turn the
oven off. Remove baking tray using heat proof gloves or
the bake tray handle.
Caution: If the timer has not returned to OFF allow it to
return to the OFF position by itself. The timer is a manual
timer and forcing it off may damage it over time. Allowing it
to return to zero will not affect the oven operation.
Warning! Hot surfaces
When cooking the outer surfaces reach
high temperatures. Handle with care. Use
handles and knobs and heat proof gloves.
Cooking Guide
Food Time (min) Temp Shelf Position
Bread 9-12 190°C Midd le
Cakes 25-35 190C Bottom
Pizza 12-15 200C Middle
Chicken 30-40 220-250°C Roti sserie
Fish 15 250°C Top
Helpful Information
250°C = 482°F 1lb = 453g
200°C = 392°F 3lb = 1.360kg
150°C = 302F 5lb = 2.265kg
100C = 212°F 10lb = 4.53kg
Rotisserie
Note. When selected the rotisserie motor will operate regardless
of whether you have the rotisserie accessory fitted.
The rotisserie accessory connects to the internal motor drive
socket located on the middle right of the oven wall. To fit the
rotisserie, connect one end to this drive and then fit the
supporting end to the left support of the oven wall. The rotisserie
will rotate automatically when the selection with that option is
chosen. Note. The holder only fits correctly in one position.